
Fall Gnome Pop Up Cards DIY
We had so much fun with our Fall Gnome Bookmarks from earlier in the month, that I felt the need to turn our little gnome printable into Fall Gnome Pop Up Cards for Thanksgiving! Making DIY Pop-Up Cards is fun AND easy when you know what pop up mechanism to use and makes for a great little seasonal STEAM in the classroom too! So.. if you LOVE DIY Gnome ideas.. read on!


Fall Gnome Pop Up Cards – Supplies
As with all our crafts, work with the supplies you have to hand! You don’t have to use the same colours or make a the craft in exactly the same size or way that we did!
- A4 piece of card in desired color (i.e. this is a large card!)
- Main gnome body colour – 5cm x 5cm (2 inch x 2 inch)
- Small pieces of construction paper or pretty patterned craft paper for gnome features – including beard and skin tone of choice
- Scrap card for the pop up mechanic
- Pencil and rubber for sketching shapes (if not using our templates)
- Black marker pen (for adding details to fall accessories if not using out templates)
- Scissors
- Glue stick

As with previous crafts, I do have printable versions of the template in my Teacher’s Pay Teacher’s Store – all proceeds go towards the upkeep of this website! However, you CAN make this craft on your own, as I guide you step by step through how to draw your own basic paper gnome and make your card! The worksheets, really are just an extra!

How to make Fall Gnome Pop Up Cards for the Holidays
Watch our pop up card video tutorial or follow the step by step instructions shared below.
These pop up cards really are very easy to make! They use a very simple pop up card mechanism, that I have used many times before! Using a little card, vs paper for this bit is best (see below). I guide you through how to draw your own paper gnome. Then use my templates (for speed) when decorating the final greeting card.
But as with all our cards and crafts, I encourage you to get creative and draw, colour, cut and shape your cards in your own unique way! The templates really are not necessary!
Make some Fall paper gnomes for your card
Your gnome will need the following key features:
- A square body (2 x 2 inches),
- Hat,
- Beard,
- Nose
- In addition – you can add, feet, a hand, accessories – but they aren’t strictly speaking necessary!

Begin by cutting a square for gnome’s body. I like to round the edges, but strictly speaking you don’t have to. My square was 5 x 5cm or 2 x 2 inch.
Next you will need to have a go at sketching out the gnomes hat. I placed my pretty craft paper, over the top of the square, to get a feel for size – you want the gnomes hat to be ever so slightly bigger. Alternatively, trace the shapes I have provided in the template.
Once you are happy with the hat sketch, cut it out. I created two gnome hat designs, one floppy gnome hat and one wiggly gnome hat. I love using pretty craft pattern, so your gnome has a fun hat pattern too! But you can use plain paper and decorate it if you prefer!

Now you can cut a nose – the nose is simple – just a circle – play around with the size if you wish.
Once you have your hat and nose ready. Use the hat size, to help you sketch out the gnome’s beard. Start of simple at first, with an almost triangluar beard shape, then add some little quiffs to shape it. Make sure the beard includes a little “extra” so you can stick it to the back of the hat.

Cut out the beard.

Here are the shapes for my second gnome, including a pom pom for the hat!

Check that the hat, nose and beard fit nicely on your square gnome body. If you are happy with all the sizing, glue the beard to the back of the hat. Glue the nose on top of the beard and hat. And then glue on to your gnome’s body.

Cut some oval feet and glue in place.
Create your Fall Gnome’s Seasonal Accessories

Now it is time to have fun with fall accessories! I decided to cut out some little leaves for the gnome’s hat, a bigger maple leaf for him to hold, as well as a small pumpkin!

But any accessory goes! Experiment and have fun!
Once you are happy with these, cut a circle for a gnome’s hand.
Glue the hand and the accessories in place.
Decorate the card for Fall or Thanksgiving
Your gnomes are ready and now you need your greeting card and the simple pop up mechanism. For the gnomes that I made, a large A4 sheet of paper is best!

To speed things up a little, I cut the shapes out of colourful paper, based on my accessories template. I went for a pumpkin house, some leaves and mushrooms. But really, any fall themed designs work. You can even just hand draw the background or use pretty pattern paper! Totally up to you!

Once you have your shapes glue them all in place.
How to make an Pop-Up Card – Step by Step instructions
Time for the simple pop up.

Cut a strip of card (or 2 pieces of paper stuck together) – approximately 1inch x 4 inch – though with a larger card like this, you can go bigger if you want.
Fold the strip into four equal sections by folding it in half and fold it again.
The key: The with of the pop up (in this case 1inch) + the height of your design, must be the same or smaller than the width of your card. To avoid anything “peeping out”. You can adjust either the 1inch pop up or the origami/ drawing to make sure it all fits! Or use a bigger piece of card

Refold it, so make a little “cube” like in the image.
Add glue to the two ends of the strip of paper.

Then position them into the fold of the card as shown in the photo. Make sure the paper pop up mechanism is secure and folds/ moves well as you open and shut the card.

Add a little glue to the back of your pop-up design – the image shows an origami bunny, but of course for this card, we will be using our paper gnomes!

Glue in place! And your pop up card is finished!
Use this cute little Fall Gnome Card for birthdays throughout fall – as a Thanksgiving card later in the season! SO CUTE!
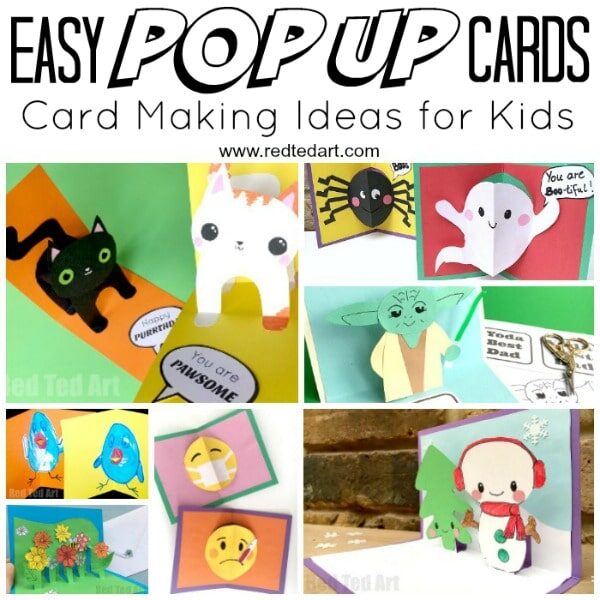
More lovely Handmade Pop Up Cards for all Occassions here:
Love gnomes? NEED more Gnome Crafts.. check these out:
