
Paper Mache Birds
Time for some Paper Mache Projects! A perfect summer craft. We have some super cute paper mache birds for you day.. adorable GARDEN BIRDS! So sweet. As you know we have a fantastic paper mache paste recipe that has been tried and tested many times! And is just perfect for gorgeous little projects like these paper mache birds!

This Papier-mâché birds guest post by the lovely Slugs Snails Puppy Dog Tails on instagram. A gorgeous instagram feed you must follow.. you simply have to see this gorgeous cardbox castle (complete with stained glass window! So cool and fun!).
Over to Slugs Snails & Puppy Dog Tails…
How to make papier mache garden birds

I try to make all my crafts with things anyone will have just hanging around. The tissue paper is not essential, but makes them look much more like birds. I don’t have any special tools, though I did find some of my husband’s pliers in the making of this and they came in very handy.
The inspiration for these came after my sons and I spotted an almost completely round robin on our birdfeeder – it looked like a tiny, imperious, fluffy ball (“me see ball bird!” bellowed the two year old). We had just finished making papier-mâché Dino Banks (a Red Ted Art original) and were in the mood to plaster more balloons with newspaper so this seemed the perfect opportunity. Add to that my discovery that the nickname of my favourite bird – the long-tailed tit – is “lollipop bird” for good reason and we had a new project…
Bear in mind that for papier-mâché to work, you need to be patient and really let it dry. All in all it took me a week from making the paste to getting the finished birds. But they are so cute and definitely worth the effort. (Don’t try and speed it along by drying the balloons with hairdryers or on radiators: I’ve found in the past this resulted in crumpled heaps of collapsed paper.)
I painted my birds as close as possible to their actual markings in real life. My boys are a little young for that (four, two and one) and so painted theirs all different colours and called them “paradise birds” (their take on “birds of paradise”). We made the paradise birds into a hanging mobile – I’ve added how to do this as a postscript.

The best birds to make are small garden birds – any kind of tit (tee hee), robins (or other chats), warblers or finches – as these are smaller and rounder so fit the balloon shape better. I also made a swallow and it didn’t work so well because their shape is slightly more elegant.
The birds I made were: long-tailed tit, blackcap warbler, blue tit, goldfinch, swallow and robin. I only took photos of the making of the goldfinch step-by-step as it had the most elaborate markings.
For your papier mache birds, you will need:
Use our super duper easy DIY Papier Mache paste recipe. Eco friendly, quick and easy to make!
- Balloons
- Old newspaper
- Scissors
- Big paintbrush (for the paste)
- String, twine or ribbon
- Pencil
- Paints and paintbrush
- Tissue paper (though if you don’t have any, kitchen paper or any tissue can do)
- Pin or small, round skewer
- PVA glue or your own inexpensive AND eco friendly flour based paper mache paste recipe (natural starch really is AMAZING!)
- Pipe cleaners or malleable wire (I used the wire that secures toys to their packaging)
- A good stick or two that the birds will be able to sit on
How to make your paper mache garden birds
Making your papier mache paste
To make at least ten small birds – use this easy paper mache recipe:
- Measure out a cup of flour and 2-3 cups of water.
- In a saucepan, mix a little of the water with the flour to make a smooth paste (you can also make this mixture in the microwave.. more info on DIY Paper Mache Paste here – just pop the mixture in a bowl and heat in the microwave).
- Add the rest of the water and ask a grown-up to heat the mixture until it boils – they must keep stirring all the time! A whisk can be really helpful! Turn the heat down and let the mixture simmer until the paste thickens.
- Leave the mixture until it is cold.
If you want to make fewer birds, you can decrease the amount of flour – just always make sure you use two-three times the amount of water to the amount of plain flour. (Alternatively, you can always use any leftover papier-mâché balloons at a later date; the shape would be perfect for Christmas baubles.)
Some people like to add one or two tablespoons of salt to help preserve the paper mache paste, but we don’t find that that is necessary!
Preparing the balloons:

- Inflate the balloons so they are small but firm and tie the end in a knot.
- Tie a string to the knot for hanging to dry.
- Cut newspaper into thin strips of varying lengths.
- Paper and paste each balloon with three or four layers of newspaper.
- Hang to dry for at least 24 hours.
The smaller the balloon, the cuter the bird but you do need it to be firm. I found the best way to get the right size balloon was to blow them up more than you would like and then little by little let the air out. Remember a little air will come out when you tie it too.
For the newspaper strips, I went for a width of about 2-3cm and lengths of about 15cm or 30cm (it does not need to be precise! I included the ruler in the photo for scale as opposed to it being used for measuring the lengths).
You can either paste the balloon, add the layers of newspaper strips and then paste the newspaper – or, if you get impatient, put a long piece of newspaper in the paste, drag it through two fingers to get rid of the excess, and then wrap it around the balloon. This is extremely messy but fun and satisfying (I found). If you prefer less mess, you can put the balloon in an egg cup to balance while you paste.
Paste right up to the knot in the balloon so that you have as small a hole as possible in the final bird. Build up one layer at a time but you don’t need to let the layers dry before adding the next one.
Painting the papier mache balloons:

- Paint the balloons in white acrylic paint and leave to dry for at least 12 hours.
- Once dry, pencil the markings of the bird onto the dry white papier-mâchéd balloon.
- The tail should be where the balloon knot is.
- Paint the sections.
- Hang to dry.
To find out the markings, I google-imaged the birds, back and front, and used this as a guide when I pencilled the markings onto the white body.
I kept the balloon in while I was painting them so I could hang them to dry again.
Adding the legs (sitting birds only)

[Warning: this stage can be pretty fiddly.]
- Cut the balloon on one side of the knot and carefully pull out.
- Hold the bird against your stick and mark where it will need to be connected.
- Make two small holes with a pin or skewer that can fit the wire or pipe cleaner through.
- Push the wire through the leg hole and out of the tail hole (you may need pliers to help with this).
- Curl the end of the wire or pipe cleaner into a knot with pliers and pull back the other end so that the knot is sitting on the inside of the bird, at the leg hole.
- Repeat with other leg so the bird has two “leg” wires sticking out.
- Wind the wires around the stick to secure the bird.
I used a pin to make the leg holes and then wriggled it to make the holes big enough to fit in the wires. I used snub-nosed pliers to catch hold of the wire – I found them in the bottom of our family toolbox – but if you can’t reach the wire you can cut the tail hole to make it a bit wider (you can paper over this hole at the end if it is too visible).
Final touches (sitting birds only)

- Add tissue paper wings and tail feathers with glue.
- Fold a tissue paper beak to make the shape of the specific bird’s beak in real life.
- Glue beak on with PVA glue.
- Add any extras as required/desired: for example, crests (see blue tit), puffed chests (long-tailed tit) and eyes (goldfinch).
- Place stick in a vase or container, if necessary.
It doesn’t matter if the paper runkles a bit as it looks like feathers.
Written out step-by-step, this looks like a very elaborate process. And I suppose it is! You do have to wait for the balloons to dry, then the primer (first coat of white paint) to dry, then the paint to dry, and even then you still have to add the legs and finishing touches… But it is really worth it: they look so lovely. The originals were meant to be sitting in our playroom but I haven’t moved them from out of my kitchen, yet, and tbh I don’t think I ever will…
Happy crafting!
Postscript: Hanging birds
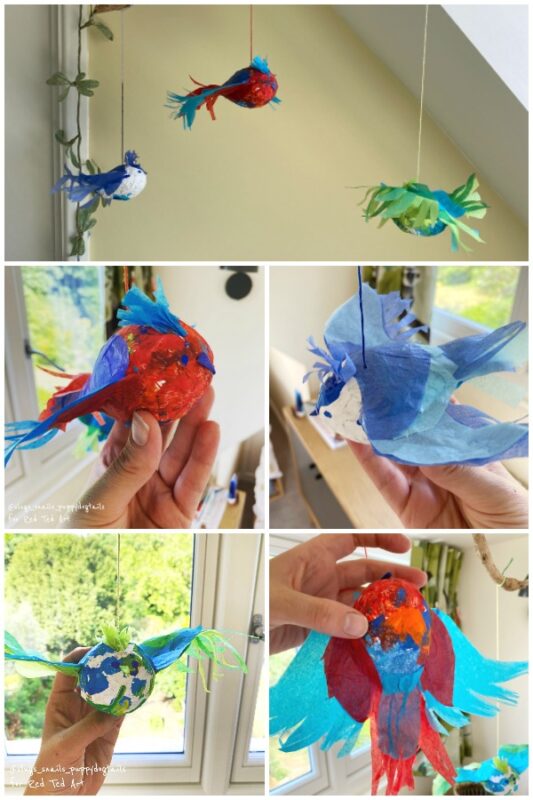
These are made exactly as per steps one-three above. However, steps four and five switch around: you put the tissue paper on before putting in the string (and no legs).
Adding the finishing touches:

- Cut out wing shapes for each layer.
- Carefully use Pritt Stick to glue the layers together until you achieve the right stiffness (so they don’t droop).
- Attach to bird with pritt stick or PVA glue.
- Paper over tail hole with tissue paper to form the bottom of the tail.
Making the wings is tricky – the combination of pritt stick and tissue paper is one likely to frustrate and infuriate. A trick to making it less likely to tear is to place one finger on the tissue paper and then draw the pritt stick directly away from the finger in one movement.
As mentioned, this paper mâché dries into a really hard material that is very durable! Making it a very great medium for all sorts of paper mâché projetcs – such as fruit bowls etc. that you can deocrate in bright colors and interesting designs.
Adding the string:
- Make a hole in the top of the bird with the pin or skewer.
- Thread a cord through with a needle and pull through the tail hole.
- Tie the cord around a bead, knot, and glue for extra security.
- Pull the cord back up through the top of the bird.
- Hang birds one by one or attach to a stick to make a mobile.
More great Paper Mache Posts here:

We also have a great paper mache clay recipe here – a fun way to make paper mash and create a simple modelling clay:
