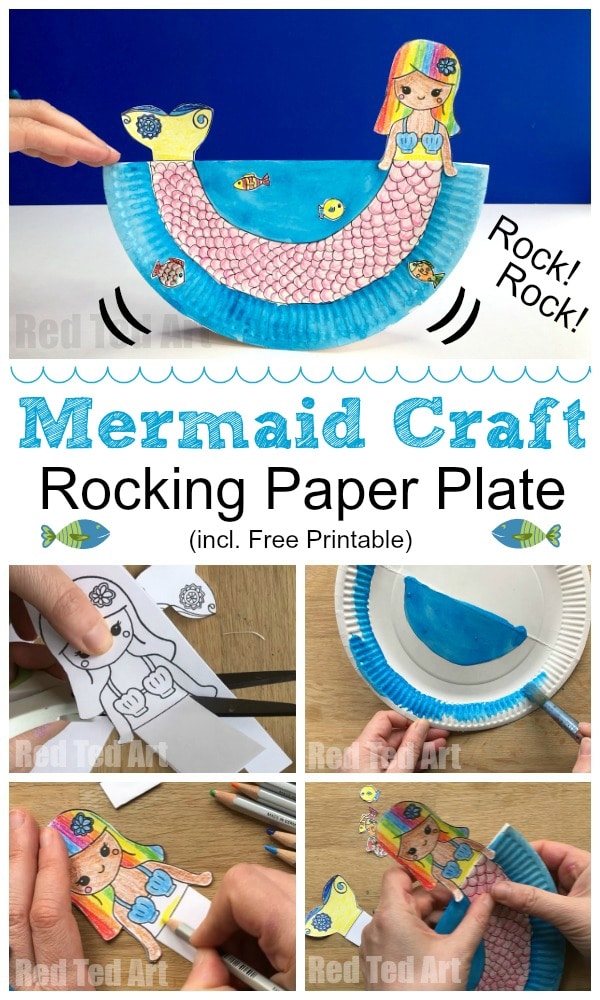
Rocking Paper Plate Mermaid
The mermaid luuuurve continues as I continue to add to our DIY Mermaid Craft Ideas collection!!! It does help to have an 8yrs old who “demands” more Mermaid Crafts from me! Today’s rocking paper plate mermaid is based on our super popular Mermaid Twirlers. I was making a Rocking Yacht.. and looking at Pip Squeak’s Mermaid Twirler… and I was like “hey”, we have the mermaid free printable already.. I bet I can turn that into another Rocking Paper Plate Craft.. and my… the result is super cute (and easy of course) and I think you will love it!!! Hooray for Summer Crafts for Preschoolers!
Rocking Paper Plate Mermaid – Materials
- your mermaid printable (see below)
- a paper plate
- choice of paint, pens, pencils
- scissors and glue stick
- sequence or glitter glue (optional)
(Enter $0 at check out for this freebie or leave a tip if you wish! Always appreciated)
How to make your paper plate mermaid rocking craft
Watch our how to video tutorial on auto play or follow the step by step instructions below!
Prepping your mermaid craft for kids
Fold your mermaid printables along the fold lines and glue in place. There are two reasons for this – it makes the paper thicker/ strong and it means IF YOU WISH you can decorate your rocking mermaid craft on both sides (we did one side only).. but it gives you more choice!
SAVE scraps of paper to draw additional fish to decorate the ocean with later (optional!).
When cutting out the mermaid head and tail – remember to leave a white space below the mermaid/ tail so that you can use this to glue the feature in place later.
Fold your paper plate in half.
Measure the position of your tail and body on the paper plate – and draw and outline for your mermaid tail.
If making these mermaids in a group or a classroom – you can prep all the paper plate “mermaid tail outlines” ahead of time!
Painting/ Coloring your paper plate mermaid
Now either paint or colour the ocean and the mermaids tale. We decided on one mermaid – to paint the ocean but use pencils for the tail. On the other mermaid we painted both the tail and the ocean. If you are painting, do take care that the paints to run inot each other.
Whilst the paint is drying colour in your mermaid’s head and tail.
You can also draw and colouring some paper fish for decorating the mermaid’s ocean with later!
Depending on how you chose to decorate your mermaid.. you can also use glitter glue to decorate or add sequence.
Assembling your rocking paper plate mermaid
You have a choice of how to assemble your mermaid – if you only decorated one side.. then either stick or tape your mermaid to the other side (with the hands peeping over the edge).
If you decorated both sides – cut two slits into the CREASE of the paper plate and slot your mermaid’s body/ tail inside the slit – you can secure it underneath with a little tape.
And THAT is your Paper Plate Rocking Mermaid Craft FINISHED!! Whoohoo.
Do check out our Mermaid Twirlers too – they make fabulous DIY Mermaid Room Decor!
And we have lots more magical mermaid DIYs here:
And lots more AMAZING Summer Arts And Crafts for Preschoolers here:


