
Star Wars Death Star Pinata
I just **know** that you have always wanted to know how to make a Death Star Pinata.. right.. admit it… you have been yearning to make a DIY Death Star Pinata since the day you first saw your own Star Wars movie. Surely every respectable resistance fighters, wants to simply SMASH the Death Star to pieces.. right? And what better way than with a fabulous Death Star Pinata! The perfect Star Wars Party activity!!! And a perfect to recycled newspapers!
The reason I ended up making this Star Wars Pinata DIY, is that one of my daughter’s friends was desperate to have a Star Wars party and her mother is a self confessed “incompetent crafter”. Now I don’t believe that ANYONE is an incompetent crafter.. but more likely inexperienced crafter!!! So I offered to make the pinata for her. It is relatively easy to make (so long as you don’t make the pinata “too wet” when painting) but it does take a little time to make. Over the course of a week, you may want to set aside 3 hours. It is not a particularly hard craft but it DOES take a little time and you do need to allow for drying periods.. so maybe make it two weeks before you need the Death Star Pinata! Though this Pinata was made for an 8yrs old girl, I think it makes a great addition to our Crafts for Boys collection.
Star Wars Death Star Pinata – Materials

The following contains Amazon affiliate links, should you choose to purchase via these links Red Ted Art will make a small comission which goes towards the upkeep of this site! Many thanks!
- Newspapers
- One large round balloon (get them from the party shop for aboiut 99p each.. they look like this US/UK but the party shop ones will be better quality!)
- DIY Papier Mache Paste (it easy to make from flour and water)
- Paints – mainly black and white – I used System 3 Acrylic paints like these White US/ UK)
- Some string & a stick for hanging
- Scissors
- Old containers for mixing the paste and resting the pinata whilst it is drying
- LOTS OF SWEETS! (Yes you need them before you can finish the death star pinata) (e.g. US/ UK)
How to make a Death Star Pinata
As per usual we have a great Death Star Pinata how to video as well as step by step written instructions below!
How to make a Star Wars Pinata – easy step by step instructions

You really will need a good quality balloon! If you get a cheap one online, it is likely to either not be fully round or pop! I bought ours at the party shop for 99p!
Prepare your Papier Mache Paste as per our Papier Mache Paste How to – it only takes a few minute and I usually store it for up to a week!
Blow it up to the size you want your Death Star to Be.
Cut or rip the Newspaper into strips – I like a variety of sizes and widths. But it doesn’t matter too much.
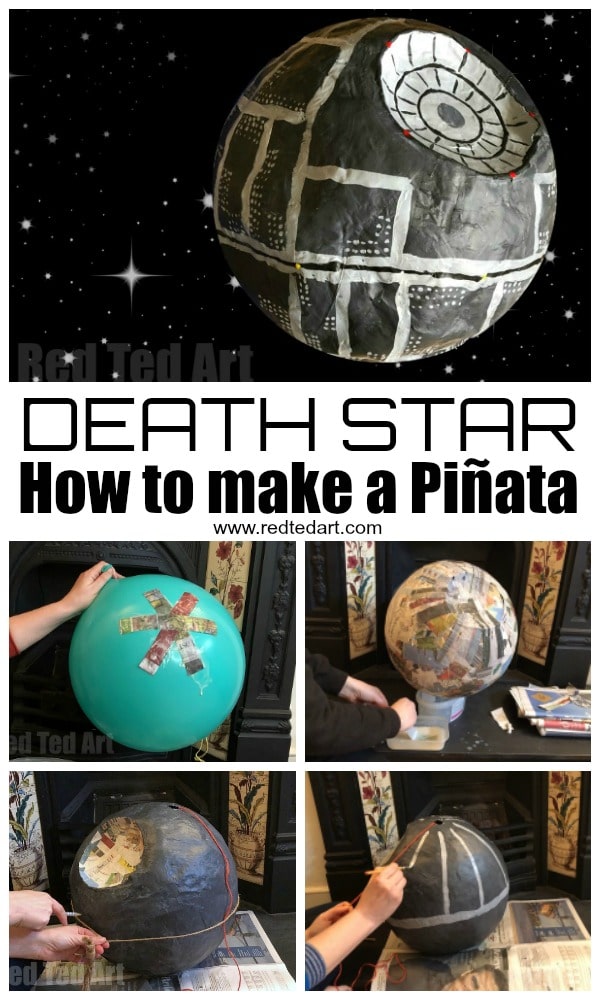
The basic papier mache death star ball
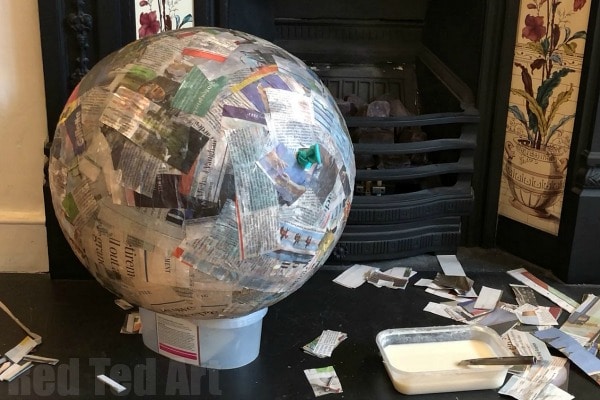
Dip the strips of newspaper into to papier mache paste and apply to the balloon. Don’t worry if it drips or is very wet.. you will be adding more and more layers and you want the newspaper to be soaked through.
Keep adding layers all over the balloon. Criss crossing the newspaper as you go – newspaper as grains that run in certain directions and some are stronger than others…..
You want to have about 4 layers of newspaper all over.
Where the rubber band of your balloon pops out will be your “top” – make sure you have 6-7 layers here, as you want this to be nice and strong for supporting the “hanging” stick later on!
Let dry fully!
Shaping the ball to have the Death Star laser

Once fully dry, get a small ball and circle just below where the balloon rubber band sticks out. This will be your death star laser area.
Cut out the balloon (poke with sharp scissors) and also cut out the circle – cut it as neatly as you can, as you will still use it.
Peel out any of the balloon from the inside of the pinata. Best to get it all out now, rather than pull at the death star whilst it is drying with the paint.
FILL THE PINATA WITH YOUR SWEETS
Take the circle and place back where it was but inside out to create the laser gun dip.
Using smaller strips of newspaper and more papier mache paste hold this circle in place – as if you are sticking it down with tape.
Let dry fully.
Painting your Death Star Pinata

I decided it was quick and easier to paint the Pinata a DARK GREY first and add lines afterwards. Many paint the Death Star Pinata Light grey first and paint the windows in afterwards. I think this takes longer and takes more precision. This is a pinata.. you will be breaking it.. it doesn’t need to be perfect.
Paint the whole papier mache ball a dark grey.
NOTE: do not make it too soggy or wet with paint (I did) – it risks crumpling up your pinata a little and it can loose it’s shape, especially when filled with heavy sweets.
Let dry fully!
Detail Painting onto your Staw Wars Pinata
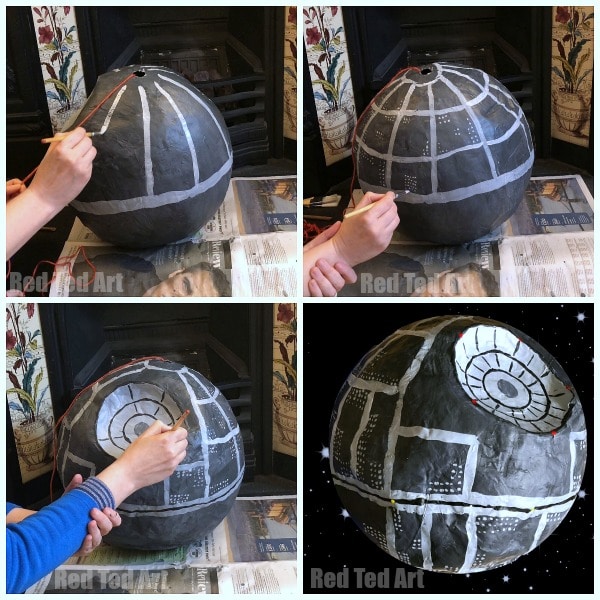
Now it is time for the details.
With some string mark the circumference of the Death Star ball and mark with a pen or brush – so you guides to follow.
Using a broad brush paint one thick strip of light grey around the circumference!
Using a smaller brush (half the size?) Paint strips from the top of your pinata down to the circumference. Paint the Death Star’s Laser area grey too!
Add more lines that run parrallel to the circumference.
Next, add little sets of dots (sets of 20-30) into the darker areas of the Death Star Pinata to resemble lights.
Finally add a black linke to the circumference and 8 yellow lights.
Add black lines to the Laser to create the laser pattern and some red lights.
LET DRY!
How to hang your DIY Death Star Pinata
Using a stick or a chopstick approximately 15cm long – tie some string to it securely.. pop it into the pinata.. and pull it back up. It should nestle securely against the hole in a T-shape.. the top of the “T” inside the pinata and the long part of the “T” being the string.
Your DIY Death Star Pinata is now complete!!!!! Let’s see how quickly the kids can break it appart!!!!!!
You may like to make a YODA Pop Up Greeting card (you can write your own Yoda Puns to go with it):

You may also like our Darth Vader Bookmarks:

More Star Wars Crafts and Party Inspiration:


More great Newspaper Crafts:
