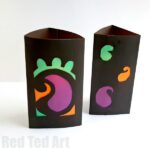
DIY Paper Lantern
And easy paper lantern for the winter months or Diwali
Equipment
- Cardstock paper – Black or any dark shades (US/ UK)
- Tissue paper – colors of your choice (US/ UK)
- Pencil
- X-acto knife
- Scissors
- Glue
- Tea lights are best (US/ UK)
Instructions
- Cut 8 inches x 12.5 inches cardstock paper.
- The base of the lantern will be made by folding the 12 inch into even thirds and keeping 0.5 inch extra for attaching the side.
- Choose a simple and easy design for the lantern. Use pencil to trace the design on the middle part of the even thirds.
- Use x-acto knife to cut out the patterns. If kids are working on this project please make sure that they are under adult supervision for this step.Cut out the patterns as neatly as possible.
- Select 3 or 4 colored craft papers and cut them according to the different parts of the cut out pattern. Cover one part of the pattern at a time. Apply glue around the sides of the selected part of the pattern and prepare a colored craft paper for it.
- Place the prepared craft paper on the glued area; to cover the open cut out areas of the pattern.Done attaching the craft papers? Now turn the cardstock paper to the other side. This is the front side of the lantern.Apply glue along the extra 0.5 inch of the cardstock.Bring the other open side of the cardstock paper and join it with the glued part. Allow the glue to dry.