Home » Felt Food, How To's

How to.. make felt donuts! More felt food!

30 July 2010 34 Comments

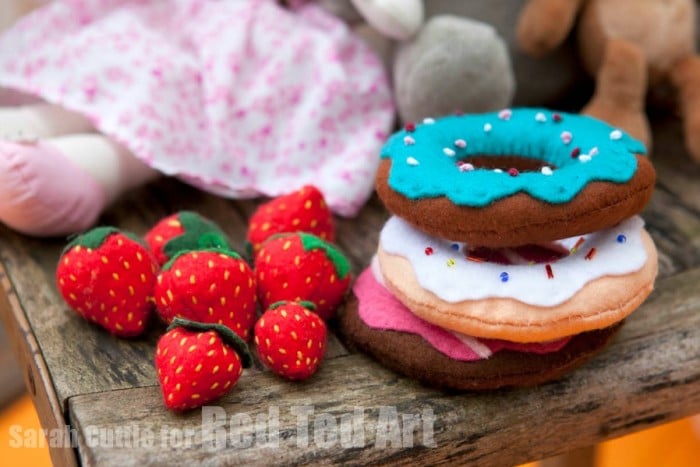
I am on a mission to make a whole grocery bag full of Felt Food for Pip Squeak’s 1st Birthday – so far I have one Gingerbread Man, 8 gorgeous Strawberries and 3 donuts (or doughnuts, depending from which side of the pond you are visiting)! I am yet to make some Cream!!! Here I will show you How To Make Felt Donuts – 2 with sprinkles and 1 with icing.

The basic donut is always the same, the only thing that differs, is the decor! I am also pretty certain you can follow my steps below and use a sewing machine, I chose to hand sew!

Here we go:

Materials: 2 circles of donut colour (cream or brown), 1 circle of icing (blue, pink, brown), thread to match circles of felt, beads or embroidery thread for sprinkles, extra thin strips of felt for icing donut, stuffing (I used plastic shopping bags), stencil of sort – cut out of card, or I used a lid slightly smaller than a CD and the thread bobbin

Step 1) Cut out three circles the same size. Cut out three holes in the centre. I used once a tupperware lid for the circle and a thread bobbin for the centre. Make sure centres are aligned. You may find it easier to make a card stencil first to make sure they all match perfectly

Step 2) Fold single colour (i.e. icing) into a quarter and cut a wiggle line. Open, trim a little if needed, but don’t cut away too much.

Step 3) For sprinkles sew on beads/ “nuts” first,then attach the icing onto one of the donut pieces (cream felt) with a running stitch. For the Choc& Nuts: Do French Knots – shown how to here. I LOVE the French Knot Donut the most as it is VERY tactile and safe for my one year old (better than the beads, which are dangerous, she will not be allowed it at first). For the swirly icing, I found it easier to sew on the pink first and then add the swhirly bit: A very thing strip of felt sew on with a running stitch. The felt may break, so be very gentle.

Step 4) Put the wrong sides together. I found it helpful to use pins to hold the central hole into place – avoiding any skewing/ misalignment. Sew all around the edge, leaving a 1-2inch gap

Step 5) Turn inside out

Step 6) Sew centre, I used a blanket stitch, but I am sure any stitch will do

Step 7) Stuff

Step 8- Sew gap shut. Again, I used a blanket stitch

Like I said, my favourite is the “Choc & Nut” Donut, as the French Knots are very tactile and safe for 1yrs olds!

Enjoy playing!

I am linking this to Visit thecsiproject.com

I was featured! Simpsonized Crafts and

Previous How Tos:

- Delicious No Sew Lavender Bags

-Make Scented Playdough

- From T to Halterneck (Guest Post)

- Easy & effective Fish Pinata

- Simple but effective paper frames (vlog)

How to make a Flower Pom Pom (guest post) – simply gorgeous – use as wedding decor!

- How to make a Paper Envelope

- How to make a No Sew Bib (out of an old shirt)

- How to make a Fabric Mâché Bowl (from old scraps of fabric!)

- How to make a Paper Flower (from newspapers) (guest post)

1 Star2 Stars3 Stars4 Stars5 Stars (No Ratings Yet)
Loading ... Loading ...

34 Comments »

  • Michelle (Utterlyscrummy) said:

    What a fabulous idea! My 3 girls (aged 3, 7, and 10) could all help make these, great school holiday craft. Thanks heaps for posting it. MWAH! :o )))

  • Red Ted Art (author) said:

    Hurray! I bet the 10yrs old in particular would like this (I remember making things at that age!). You could even do it with the sewing machine…

  • jfb57 said:

    You are such a clever lady! A whole bag of groceries?!! You could use these to hold long hair in like scrunchies!

  • Rachael (Tales from the Village) said:

    Oh these are just fab! I love them. Yum!

  • threeundertwo said:

    Oh what fun! I love felt food. Thanks so much for linking up to Finished for Friday.

  • Bethany @ The Paper Pony said:

    These are some great tips… next time I attempt these- it will go so much smoother because of this. Thank you!

  • Anne said:

    Those look great! I made some felt cupcakes this week, so I’m on a bit of a felt food kick at the moment. :)

  • Red Ted Art (author) said:

    Oooh felt cupcakes sound good! Did you post any instructions? Would love to see them!! Maggy

  • Jen @ Team Awesome said:

    Very cute!! Felt food is adorable!

  • Red Ted Art (author) said:

    Great to have “someone to make these for” :-)

  • Kaysi @ Keeping It Simple said:

    So fun!!

  • Staci Johnson said:

    Those are deliciously cute!!! Love that idea;)

  • Jill said:

    Just found you through Sew Cute Tuesday. Great felt food! and it looks like you have many other great ideas! I’m off to explore your blog some more!

  • Red Ted Art (author) said:

    Hi Jill! Thank you for your lovely comment!!! Do have a good nosey around – so much “stuff” – get lovely people to contribute amazing ideas, great if they get more visibility!!! Enjoy.

  • Scraps said:

    So cute! These would be great as favors for any sort of bruch get-together, in “flavors” to match the theme.

  • J. Hill said:

    Thanks for linking up to the Mad Skills party!

  • Clara @ amieggs said:

    those are really nice!!!! thanks =)

  • nicegirlnotes said:

    I need to make these, definitely! What else are you going to make?

    One of my girls turns two this month, so I’d love to do a kitchen/fake food set. The felt food is always so much more appealing than the plastic stuff at the stores.

    Thanks for the tutorial!

  • Red Ted Art (author) said:

    Oh yes fabulous! Do make some! Only have the Strawberries (which I LOVE!) and the Gingerbread at the moment – http://redtedart.wordpress.com/2010/07/02/how-to-make-felt-strawberries-cream-gingerbread-men/

    Haven’t quite decided yet what else to make… mmmh. Have a great cupcale tutorial this Friday, but isn’t “felt food” as such…

    Maggy

  • Audra said:

    ADORABLE!!! SOOO AWESOME!
    I’m going to be featuring this tomorrow!

  • Audra said:

    Just a reminder that I featured you today! :)
    Thanks for linking up!!

    http://simpsonizedcraftsandthensome.blogspot.com/2010/08/socialize-with-me-monday-til-sunday_09.html

  • Red Ted Art (author) said:

    Oh how fabulous! Thank you so much! Have updated post with a featured button! Thank you. Maggy

  • Red Ted Art (author) said:

    Thank you! Have updated my post!! Much appreciated!

  • amysb963 said:

    Thanks for joining us at “AP Tuesdays!” @ New Nostalgia! Hope to see you again tomorrow!

  • Rose @ Walnut Acre said:

    I love the idea of using plastic bags as stuffing!

  • Briana said:

    I have not done donuts yet, but fried eggs are super easy! good luck on your quest. :)

  • angie said:

    good enough to eat but nice that we can look at it with no calories
    come see me at http://shopannies.blogspot.com

  • karen said:

    Perfect for my sons kitchen- I hope he doesn’t eat them! Come and share this at Workshop Wednesday!

  • @mummiafelice said:

    Love love love these!!! How clever!! I’m hungry now lol!!

    Thank you for linking up!

  • Lakota [Faith Hope and Charity Shopping] said:

    Ooh another lovely idea – these are fab! Following now so I can see what else you come up with

    Lakota x

  • Julie said:

    Those make me hungry but they are super stinkin’ cute!

  • Michelle Willow said:

    Oh… I hate sewing! :( But I sooo wanna make these! :) ))

  • nicolette @ momnivores dilemma said:

    The question is…are they gluten-free donuts? lol…

    Great idea!

    Thanks for linking to Creative Juice. Hope to see you back again this week…

  • Red Ted Art (author) said:

    Hehehe most certainly gluton free ;-)

Leave your response!

Add your comment below, or trackback from your own site. You can also subscribe to these comments via RSS.

Be nice. Keep it clean. Stay on topic. No spam.

You can use these tags:
<a href="" title=""> <abbr title=""> <acronym title=""> <b> <blockquote cite=""> <cite> <code> <del datetime=""> <em> <i> <q cite=""> <strike> <strong>

This is a Gravatar-enabled weblog. To get your own globally-recognized-avatar, please register at Gravatar.