
Adorable Free Hijab Doll Crochet Pattern for Eid
Today, I have a lovely guest post from Sway Social on Reddit! They are a wonderful crocheter who makes diverse toys and dolls (love the little wheelchair doll) one of these patterns I have been given permission to reproduce here, for you, my lovely Red Ted Art readers – the fantastic Crochet Doll with a Hijab. This is actually 3 dolls in one, as you can choose from three different crochet Hijab styles. They are all super cute! They are perfect for anyone making some little Eid Crochet Gifts or for children to play with during Ramadan. Over to Sway Social!
How to crochet an Islamic Doll with a Hijab – Free Crochet Pattern

Hi everyone!
Thanks so much for the love about my doll wearing a hijab. As promised, I have worked on it the last few days and fine tuned the pattern for you. I’ve also put several notes in there for ways you can customize it and put 3 different hijabi style patterns:
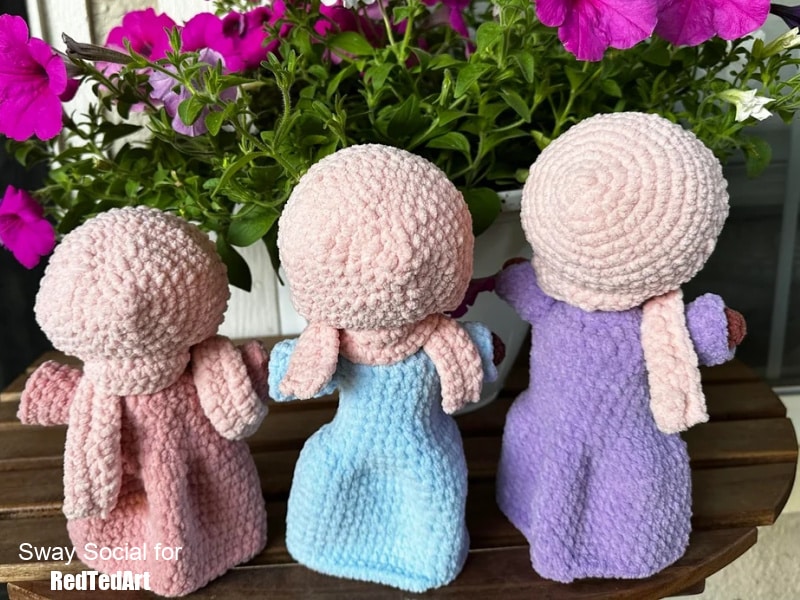
- the doll in pink has Hijab Style A,
- the doll in blue has Hijab Style B, and
- the doll in purple has Hijab Style C.
Please give me some grace as I’ve never written a pattern before. But I hope you enjoy, and if anyone makes them please send me pictures!
Supplies used for this Hijab Doll
4.0mm hook
Big Twist Post yarn (#5 weight) in shades
- Whipped Cream (white cap),
- Strawberry Shortcake (hijab),
- Croissant/Chocolate Fudge/Brown Butter (head, hands, feet), and
- Rosehip/Blueberry Smoothie/Ube Milk Tea (dress and doll body) .
Toy stuffing, scissors, safety eyes.
Crochet Abbreviations:
Pattern uses US crochet terms.
This pattern is done in mostly done in rounds so no need to slay/ch1 at the end of each row unless specified.
- Sc: single crochet
- Inc: increase
- Dec: decrease
- St/sts: stitch/stitches
- Slst: slip stitch
- BLO/FLO: back/front loop only
- FO: fasten off
How to make the crochet Doll with Hijab

Arms (make 2)
Start off with the arms, so you can attach them to the body as we go.
Skin color yarn.
R1: 6 sc in magic ring
R2-7: sc around
Do not stuff.
FO and leave a few inches to sew onto body.
Attach to body at R20
Legs (make 2)
Skin color yarn for feet
R1: 7sc in magic ring
R2-3: Sc around (7)
Change to dress colored yarn
R4-10: sc around (7) but only FO first leg
Body keep going from legs
R11: On second leg, ch 2, insert into a loop of first leg, sc around first leg, sc in the 2 chain stitches, sc around second leg (20)
R12: sc 8, dec, sc 8, dec (18)
R13-19: sc around (18) Stuff as you go (it’s easier to stuff the legs once they’re attached to the body)
R20: sc 7, ch 2 and skip 2 sts, sc into 3rd loop to make hole for arm, sc 6, ch 3 and skip 2 sts, insert into 1st st of next row to make 2nd arm hole
R21: sc around going through both chain loops on each side (18)
R22: BLO – sc around (18) NOTE: you might want to put a stitch marker in the FLO of the first stitch in this row so you can find it easily later when you start the dress
R 23: (sc, dec)* repeat around (12)
R24: sc around (12) Change to skin color yarn
Head keep going from body
R25: sc around (12)
R26: (sc, inc)* repeat around (18)
R27: (2sc, inc)* repeat around (24)
R28: (3sc, inc)* repeat around (30)
R29: (4sc, inc)* repeat around (36)
R30-33: sc around (36)
R34: (4sc, dec)* repeat around (30) Add safety eyes between rows 32 and 33. If you’re going to add eyelashes, I recommend you do that before putting in the safety eyes. For eyelashes and eyebrows, I recommend a #4 weight yarn. I used Lion Brand 100% cotton yarn.
R35: (3sc, dec)* repeat around (24) Stuff head
R36: (2sc, dec)* repeat around (18)
R37: (sc, dec)* repeat around (12) Add any additional stuffing needed
R38: dec around (6)
R39: close and FO
Crochet Doll Dress
Use dress color yarn
NOTE* make sure your work is facing the right direction so the correct side of the work is on the outside. You will need to hold the doll upside down and inset your hook from head to toes.
R1: Attach yarn in FLO of 1st st of R22 – sc around (18)
R2: sc 2, ch 6 and wrap around arms to attach on other side of arm (you will skip 2 stitches at the top of shoulder), sc 9, ch 6 and wrap around arms to attach on other side(again skipping the 2 stitches on top of shoulder), sc 7 (30)
NOTE: if you want a more snug dress, on R3 dec to 26 or 28 sts, then sc that new count for R4-8. Then increase back to 30 on R9.
R3-9: sc around (30)
NOTE: if you want a shorter waist on the dress and more skirt, only do R3-6 at 30 and then inc to 36 at R7.
R10: (7sc, inc)* repeat around (36)
R11: (sc, inc)* repeat around (54) Fasten and FO
Sleeves for the Dress
R1: ch 11, sc back to the first chain to make a circle
R2-3: 10 sc
R4: 4sc, inc, 4sc, inc (12)
R5: 5sc, inc, 5sc, inc (14) Slide the sleeves up the arms and whip stitch on.
NOTE: if you want them more bell shaped, then double the increases in R4 and R5.
Cap
Use cap color yarn
R1: 6sc in MR
R2: 6inc (12)
R3: (sc, inc)* repeat around (18)
R4: (2sc, inc)* repeat around (24)
R5: (3sc, inc)* repeat around (30)
R6: (4sc, inc)* repeat around (36)
R7-10: sc around (36) FO and leave long tail for sewing. See around edges of cap on head to keep it from sliding off.
Hijab Style A
R1: Ch 81 and turn
R2-4: 80sc, ch 1 and turn Fasten and FO
NOTE: if it starts to curl and spiral as you’re going back and forth, just gently stretch the work out to lay more flat.
R5: insert hook into 24th loop and slst to attach, 31sc, (32), ch1 and turn
R6: 32sc, ch6, attach to 1st loop (to make circle), turn and start working the other direction through the chain sts so that you’re working on the right side of the work
R7: (6sc, dec)* repeat around but you will not decrease the last time because of how you attached the chain sts. Instead finish with 1 sc (35)
R8: (3sc, dec)* repeat around (28)
R9: (2sc, dec)* repeat around (21)
R10: (1sc, dec)* repeat around (14)
R11: 9 dec (4) FO and leave tail to sew hole closed
Hijab Style B
R1: Ch 81 and turn
R2-4: 80sc, ch 1 and turn Fasten and FO NOTE: if it starts to curl and spiral as you’re going back and forth, just gently stretch the work out to lay more flat.
R5: insert hook into 22nd loop and slst to attach, 37sc, (38), ch1 and turn
R6-7: 38sc, ch 2, slst into 1st stitch to form a circle and start the back cap part of the hijab
R8: 40sc
R9: (8sc, dec)* repeat around (36)
R10: (4sc, dec)* repeat around (30)
R11: (3sc, dec)* repeat around (24)
R12: (2sc, dec)* repeat around (18)
R13: (1sc, dec)* repeat around (12)
R14: (dec)* repeat around (6) FO and leave tail to sew hole closed
Hijab Style C
Cap piece
R1-6: Repeat R1-6 of cap instructions
R7: (5 sc, inc)* repeat around (42)
R8-12: 42 sc around (42) FO but leave long tail for sewing
Scarf piece
R1: Chain 81 and turn
R2: 80 sc, ch 1 and turn
R3: 80sc, FO
To join, take the 25th loop on the scarf and sew to cap piece all the way around (one side of the scarf will be longer than the other when you’re finished). You can slst or sc the two pieces together but I wanted a flatter appearance so I sewed them. FO and weave ends
Hijab neck cover for Hijab A and B style
Attach yarn to side strands at the base of the circular cap to make the neck cover
R1: sc across and connect into other side strand, sc up on next loop of side strand, turn
R2-5: repeat R1 FO
Your Doll with Hijab is finished! A huge thank you to Sway Social for allowing me to share this amazing pattern with you!
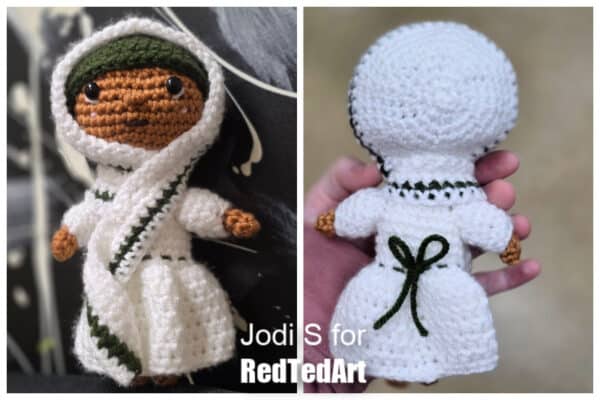
I love it when readers allow me to share their versions of the pattern! Here is Jodi’s little cute Hijab wearing doll (Front, and back). Love the white outfit and that cute little nose. Adorable. Thank you Jodi for letting me share!
If you would like some more islamic crochet patterns, suitable for Ramadan, Eid or Hajj, please do take a look at these, or take a peak at the our new, super cute and easy Crochet Book:

