
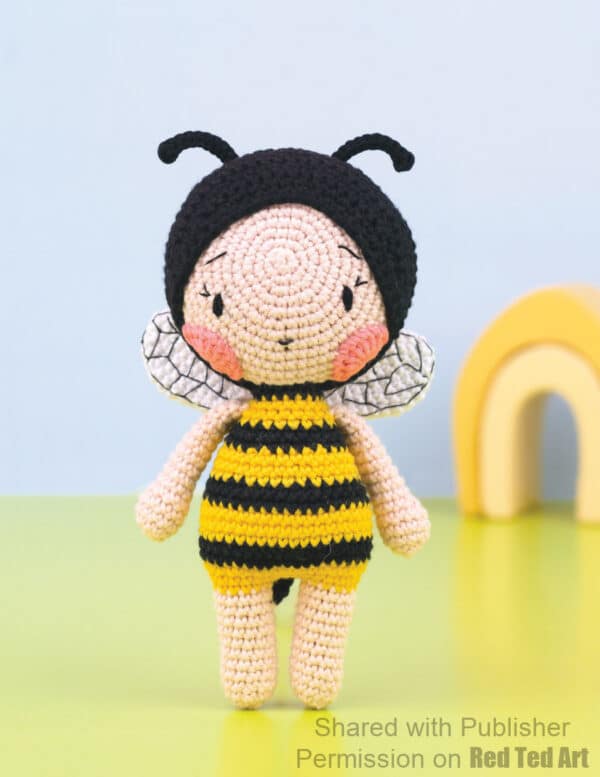
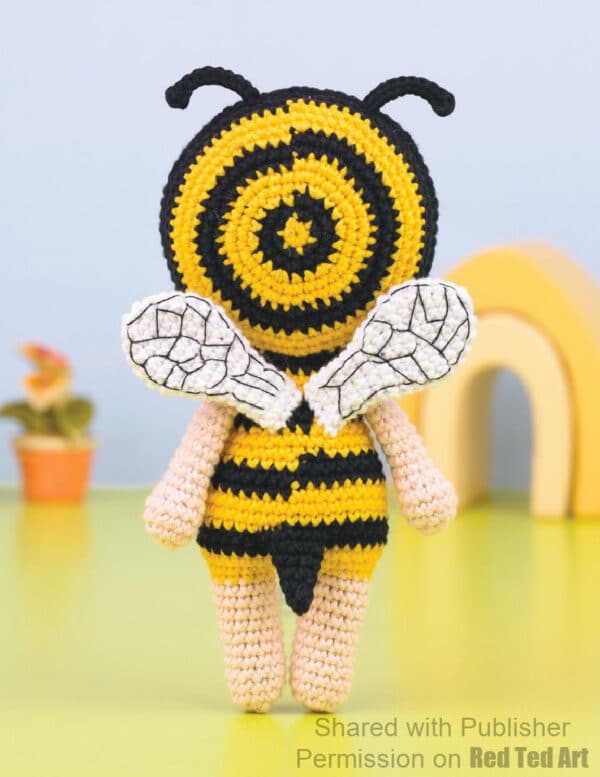
Free Bee Doll Crochet Pattern from Amigurumi Adventures
Oh how we love a super duper cute Amigurumi Bee Crochet Pattern.. but wait.. bees are cute… but Bee Crochet Dolls, are even cuter! Combining two of our favourite themes doll making and cute critters, we have this adorable sample project from the gorgeous Amigurumi Adventures by Clare Cooper to share with you today. Hone your amigurumi skills with this lovely project.
Please note: this project has been reproduced with permission from the publisher and is not allowed to be republished in any way, without their consent. It is for personal use only.
Also note: affiliate links have been added to this post – should you choose to purchase via these, I will earn a small commission that goes towards the upkeep of this site!
Amigurmi Book

Credit: Amigurumi Adventures by Clare Cooper, Tuva Publishing, RRP £15.99, available online and from all good bookshops.
Amigurumi Adventures… oh where do I begin? It is packed with such cuteness. And quite frankly, I wish I had had a copy of this book when my kids where little.. it is simply delightful. And I know my kids would have loved these little dolls to bits when they were younger – I say younger, as my daughter is now old enough to make them all herself. But that isn’t the same, right?
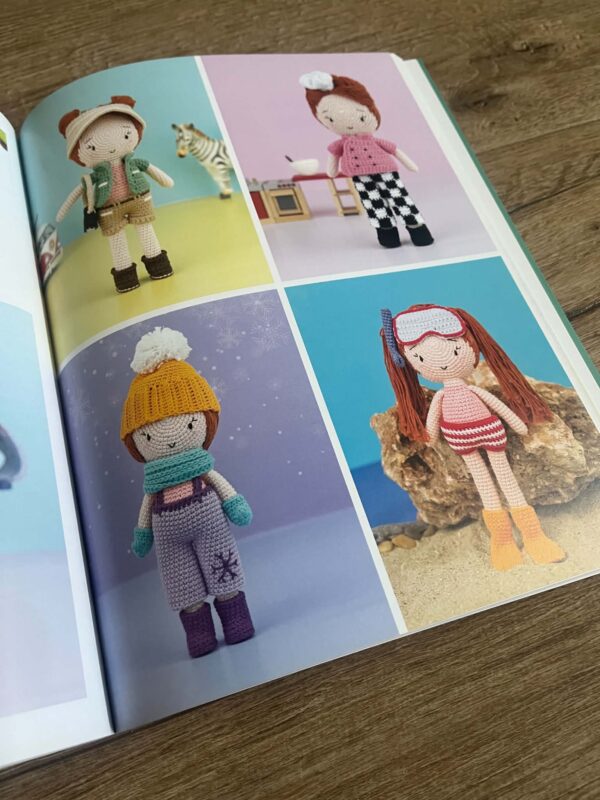
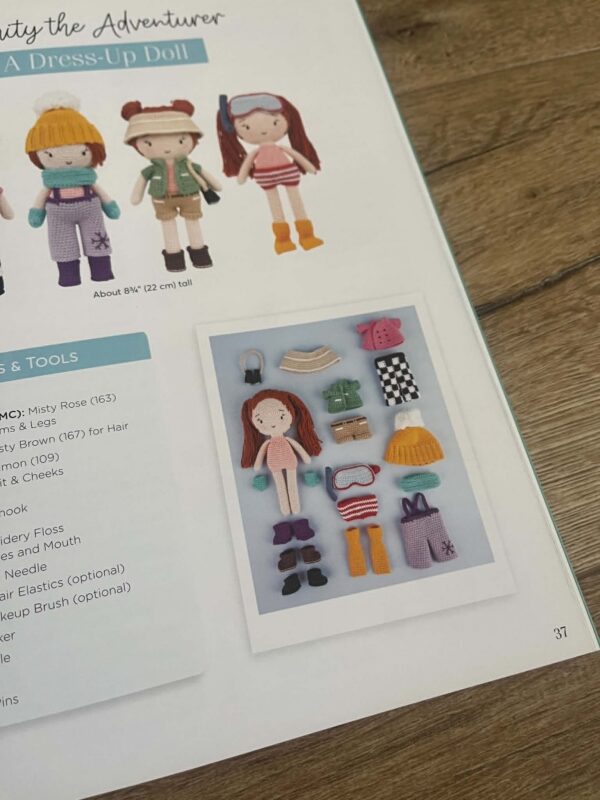
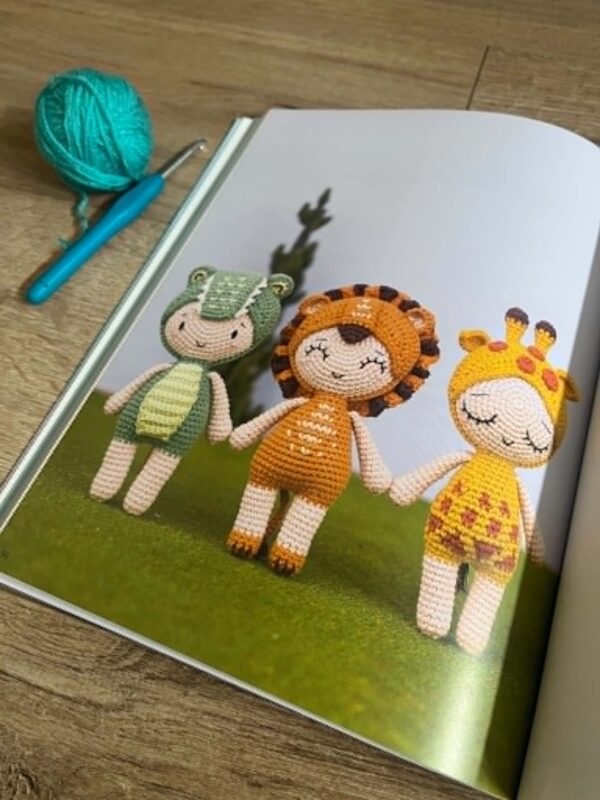
The book has 21 doll designs, which roughly fall into three sections. The dress up doll – which very much has that “rag doll” feel to it – a doll to take with you everwhere and love! And the cutest bit? You can make so many accessories for all year round. So you simply keep adding to the crochet doll’s outfits. The, what I would call, “critter dolls” – so themed dolls, like the adorable Crochet Bee Doll here today.. and then some lovely cultural dolls in different national outfits.
And of course, the book comes with a big section of detailed stitch guides to make your crochet projects a success. Such a fantastic resource!
Do grab yourself a copy today! Especially, whilst this very special reader off lasts (great as a lovely Christmas gift to your favourite crocheting friend!):
You can buy Amigurumi Adventures from Gifts to Me for only £12 (+P&P)! Usual RRP £15.99
Visit giftstome.co.uk and use the offer code R6128
Offer ends 12th December 2026
Alternatively get yourself a copy on Amazon
Supplies used to make your Amigurumi Bee Doll
YARN: HELLO Cotton
- Main color (MC): Misty Rose (163) – for Face, Arms & Legs
- Color A: Yellow (123) – for Bodysuit
- Color B: Black (160) – for Bodysuit, Hood, Antenna & Stinger
- Color C: White (154) – for Wings
- Color D: Dark Salmon (112) – for Cheeks
HOOK SIZE: 2.5 mm hook
- OTHER: DMC Embroidery Floss – Black for Eyes and Mouth
- Embroidery Needle
- Stitch Marker
- Yarn Needle
- Stuffing
- Straight Pins
Size
About 6¾” (17 cm) tall
SPECIAL STITCHES & TECHNIQUES
Single Crochet Spike Stitch (sc-sp): Insert hook in specified stitch one round below current
round, pull up loop to height of stitches in current round, yarn over and draw through both loops on hook. (single crochet spike stitch made)
MYRTLE The Bee Crochet Doll
by Clare Cooper
HEAD
Front (Face)
Round 1: With MC, make a magic ring, 6 sc in ring. (6 sc)
Round 2: Inc in each st around. (12 sc)
Round 3: [Sc in next st, inc in next st] 6 times. (18 sc)
Round 4: [Sc in next st, inc in next st, sc in next st] 6 times. (24 sc)
Round 5: [Sc in each of next 3 sts, inc in next st] 6 times. (30 sc)
Round 6: [Sc in each of next 2 sts, inc in next st, sc in each of next 2 sts] 6 times. (36 sc)
Round 7: [Sc in each of next 5 sts, inc in next st] 6 times. (42 sc)
Round 8: [Sc in each of next 3 sts, inc in next st, sc in each of next 3 sts] 6 times. (48 sc)
Round 9: [Sc in each of next 7 sts, inc in next st] 6 times. (54 sc)
Round 10: [Sc in each of next 4 sts, inc in next st, sc in each of next 4 sts] 6 times. (60 sc)
Round 11: [Sc in each of next 9 sts, inc in next st] 6 times. (66 sc)
Rounds 12-13: Sc in each st around. (66 sc)
Fasten off.
Back (Hood)
Round 1: With Color A, make a magic ring, 6 sc in ring. (6 sc)
Change to Color B
Round 2: Inc in each st around. (12 sc)
Round 3: [Sc in next st, inc in next st] 6 times. (18 sc)
Change to Color A
Round 4: [Sc in next st, inc in next st, sc in next st] 6 times. (24 sc)
Round 5: [Sc in each of next 3 sts, inc in next st] 6 times. (30 sc)
Round 6: [Sc in each of next 2 sts, inc in next st, sc in each of next 2 sts] 6 times. (36 sc)
Change to Color B
Round 7: [Sc in each of next 5 sts, inc in next st] 6 times. (42 sc)
Round 8: [Sc in each of next 3 sts, inc in next st, sc in each of next 3 sts] 6 times. (48 sc)
Change to Color A
Round 9: [Sc in each of next 7 sts, inc in next st] 6 times. (54 sc)
Round 10: [Sc in each of next 4 sts, inc in next st, sc in each of next 4 sts] 6 times. (60 sc)
Round 11: [Sc in each of next 9 sts, inc in next st] 6 times. (66 sc)
Change to Color B
Rounds 12-13: (2 Rounds) Sc in each st around. (66 sc) Do not fasten off. Continue with Head Assembly.
Head Assembly
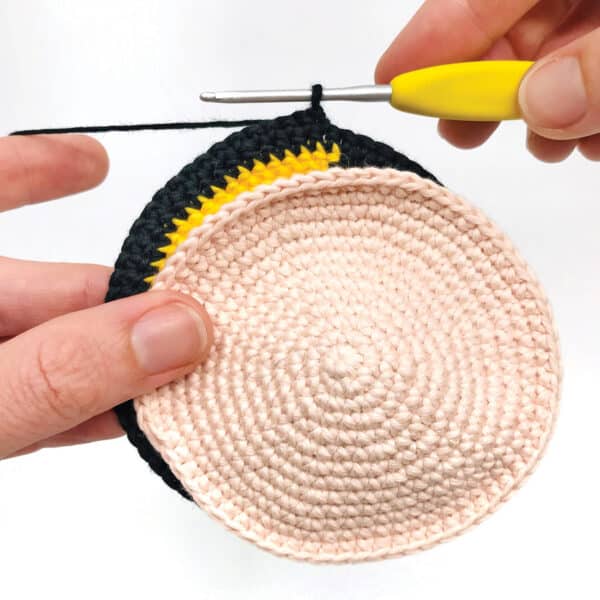
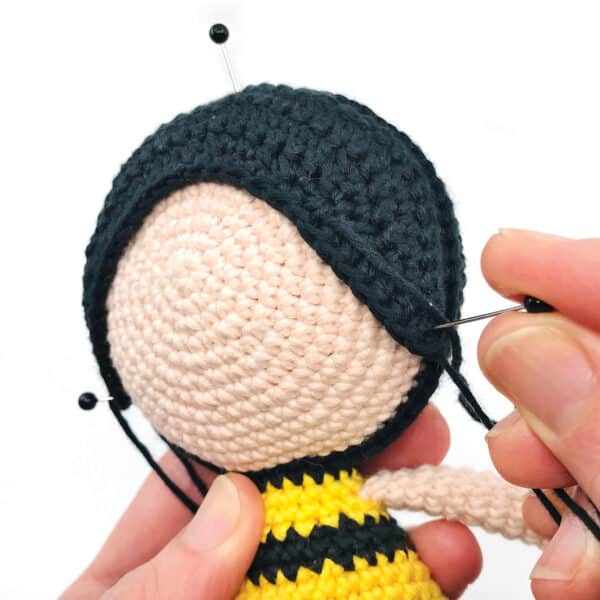
- Hold the Front and Back together with right sides facing outwards, and Front of Head facing you. (image left)
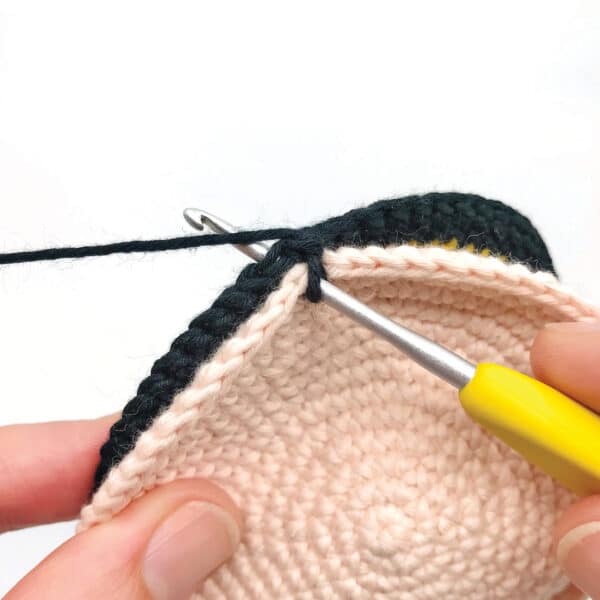
- With Color B, insert hook in both the next stitch on Front and corresponding stitch on Back (image right) and work a single crochet stitch. This is the first stitch of the “Hoodline”.
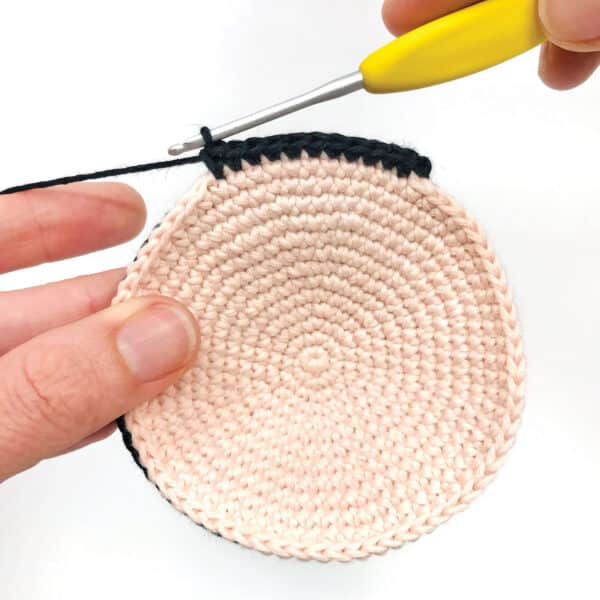
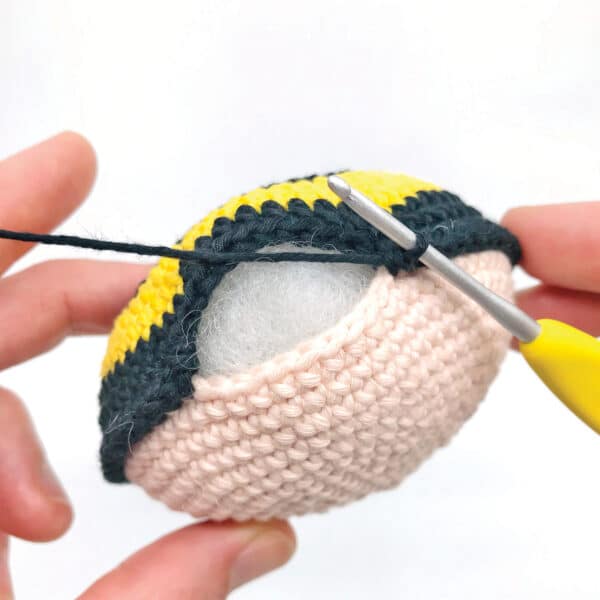
3. Working through both Front & Back together, single crochet in each of next 65 stitches to complete the Hoodline (66 stitches) (image left), stuffing Head firmly before finishing the round. (image right)
4. Join the round with a slip stitch in the first single crochet stitch.
5. Fasten off and weave in ends. (image above)
6. Set Head aside.
ARMS
Round 1: With MC, make a magic ring, 6 sc in ring. (6 sc)
Round 2: Inc in each st around. (12 sc)
Rounds 3-4: (2 rounds) Sc in each st around. (12 sc)
Round 5: Sc in each of next 6 sts, [dec] 3 times. (9 sc)
Rounds 6-14: (9 rounds) Sc in each st around. (9 sc)
Round 15: Dec, sc in each of next 7 sts. (8 sc) Sc in each of next 3 sts (to position decreases on outer Arm).
Fasten off.
LEGS & BODY
First Leg
Round 1: With MC, make a magic ring, 6 sc in ring. (6 sc)
Round 2: Inc in each st around. (12 sc)
Rounds 3-12: (10 rounds) Sc in each st around. (12 sc)
Fasten off.
Second Leg
Rounds 1-12: (12 rounds) With MC, repeat Rounds 1-12 of First Leg.
Change to Color A. Continue with Body.
Body
Round 1: (Joining Legs) From Second Leg (with Color A), ch 3; working on First Leg, sc in next st, sc in each of next 11 sts; working in ch-3, sc in each of next 3 ch; working on Second Leg, sc in each of next 12 sts; working on other side of ch-3, sc in each of next 3 ch. (30 sc)
Round 2: Sc in each of next 6 sts, inc in next st, sc in each of next 14 sts, inc in next st, sc in each of next 8 sts. (32 sc)
Round 3: [Sc in each of next 3 sts, inc in next st] 8 times. (40 sc)
Change to Color B.
Stuff the Legs.
Rounds 4-5: (2 rounds) Sc in each st around. (40 sc)
Change to Color A.
Rounds 6-8: (3 rounds) Sc in each st around. (40 sc)
Change to Color B.
Round 9: Sc in each of next 8 sts, dec, sc in each of next 18 sts, dec, sc in each of next 10 sts. (38 sc)
Round 10: Sc in each of next 8 sts, dec, sc in each of next 17 sts, dec, sc in each of next 9 sts. (36 sc)
Change to Color A.
Round 11: [Sc in each of next 4 sts, dec] 6 times. (30 sc)
Rounds 12-13: (2 rounds) Sc in each st around. (30 sc)
Change to Color B.
Round 14: [Sc in each of next 3 sts, dec] 6 times. (24 sc)
Round 15: Sc in each st around. (24 sc)
Change to Color A.
Start stuffing Body.
Round 16: [Sc in each of next 4 sts, dec] 4 times. (20 sc)
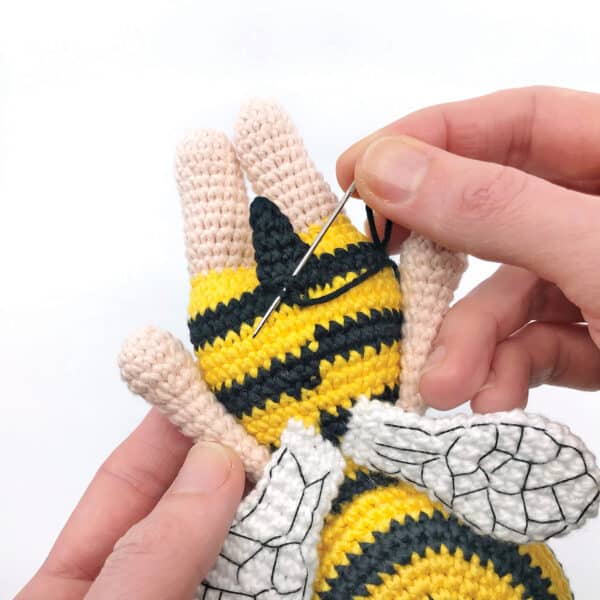
Note: When attaching each Arm, flatten the top of the Arm and hold against the Body with the decrease stitches on Arm Round 5 facing outwards. Work the “attaching” stitches through both the layers of the Arm and the Body together.
Round 17: (Attaching Arms) Sc in each of next 4 sts; working on First Arm & Body, sc in each of next 4 sts (First Arm attached); working on Body only, sc in each of next 8 sts; working on Second Arm & Body, sc in each of next 4 sts (Second Arm attached). (20 sc)
Round 18: Sc in each of next 4 sts, [dec] 2 times, sc in each of next 8 sts, [dec] 2 times. (16 sc) Change to Color B.
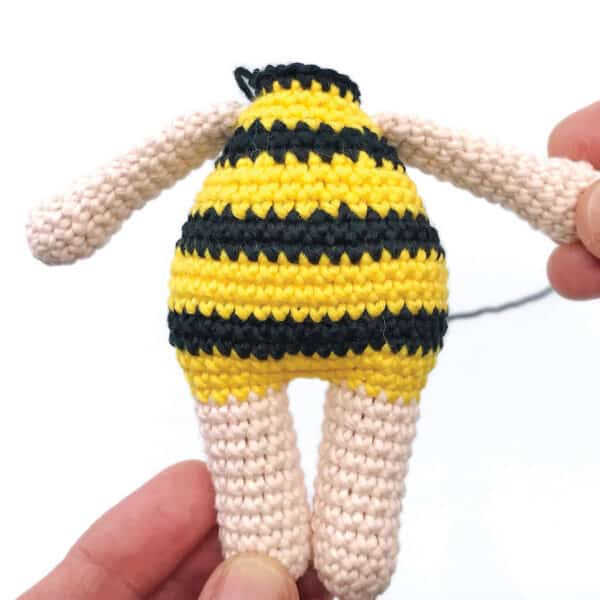
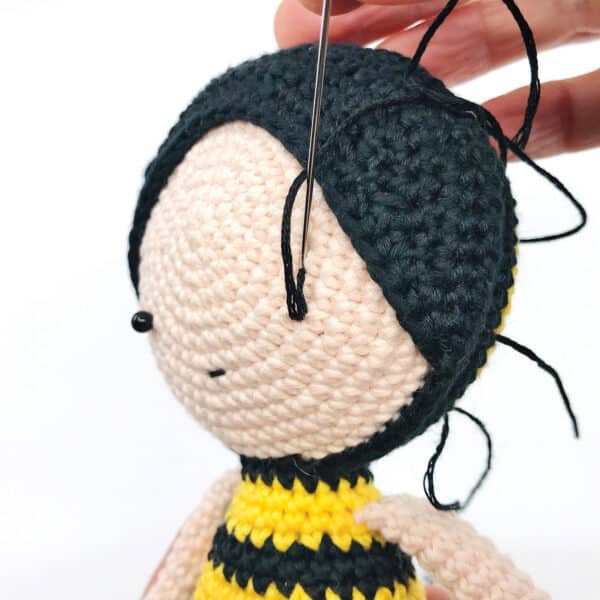
Round 19: (Neck) Sc in each st around. (16 sc) (image above)
Fasten off, leaving a long tail for sewing.
DOLL ASSEMBLY
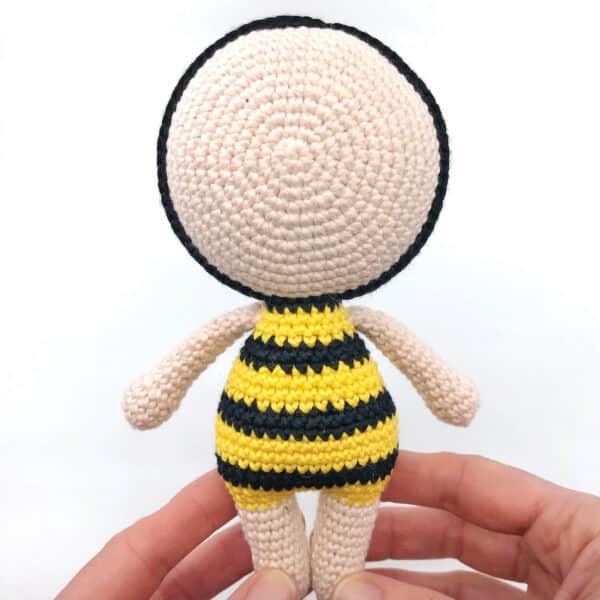
- Finish stuffing the Body.
- Using long tail and yarn needle, sew Body to Head, working through all 16 sts around Neck. (images above)
TIP: Maintain a wide, round Neck opening, adding extra stuffing before finishing.
HOOD
Row 1: (Wrong Side) With Color B, ch 36, sc in 2nd ch from hook, sc in each of next 34 ch. (35 sc)
Row 2: (Right Side) Ch 1, turn, skip first st, dec (using next 2 sts), [sc in each of next 4 sts, dec, sc in each of next 4 sts] 3 times, dec (using last 2 sts). (29 sc)
Row 3: Ch 1, turn, skip first st, dec, sc in each of next 24 sts, dec. (26 sc)
Row 4: Ch 1, turn, skip first st, dec, sc in each of next 3 sts, [dec, sc in each of next 5 sts] 2 times, dec, sc in each of next 2 sts, dec. (20 sc)
Row 5: Ch 1, turn, skip first st, dec, sc in each of next 15 sts, dec. (17 sc)
Row 6: Ch 1, turn, skip first st, sc in each of next 3 sts, [dec, sc in each of next 2 sts] 3 times, sl st into last st. (13 sts)
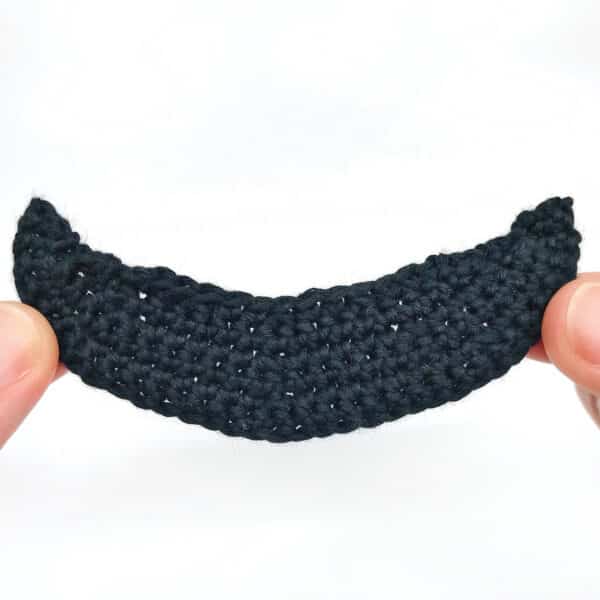
Fasten off and weave in ends. (image left)
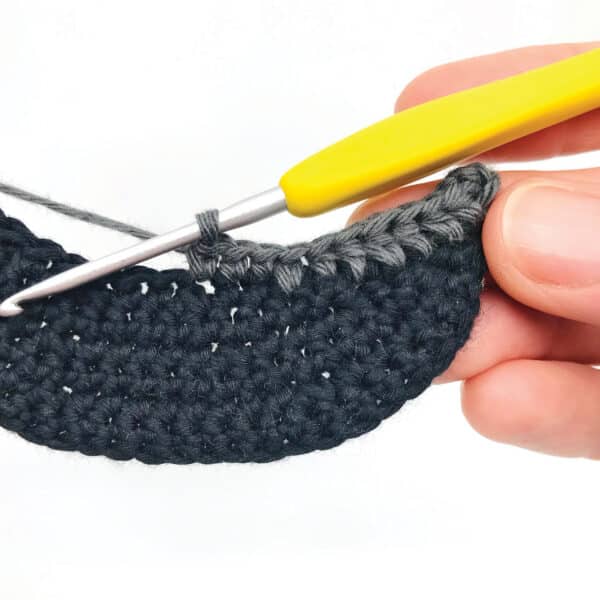
Edging: With right side facing, attach Color B to end of Row 1; ch 2 (counts as first hdc), working in sides of rows, hdc in same Row 1, hdc in each of next 5 rows; working across Row 6, sc-sp in first st, sc in each of the next 11 sts (image right), sc-sp in last st; working in sides of rows, hdc in each of next 5 row, 2 hdc in Row 1. (14 hdc, 11 sc, & 2 sc-sp)
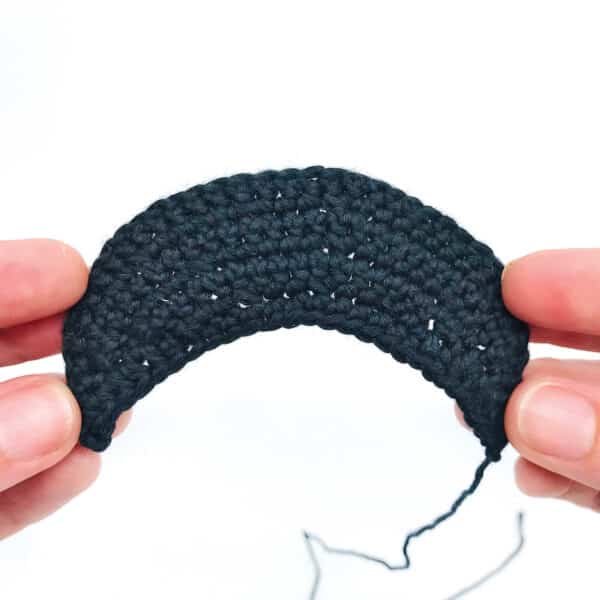
Fasten off, leaving a long tail for sewing. (image left)
- Position the Hood, centered at top of Head. Gently stretch the Hood to fit around face, and pin in place. (image right)
- Use long tail and yarn needle to whipstitch the starting chain of Hood to Hoodline.
FACE – use photos as guide
TIP: Use straight pins to mark positions of facial features, based on preferred placement.
- With Black Floss (using 4 to 6 strands, depending on preferred thickness), embroider Mouth over Round 8 on Face.
- For Eyes, embroider several vertical straight stitches (over 2 stitches each). (image above)
- Use 2 strands of Floss to add eyelashes and eyebrows
Cheek (Make 2)
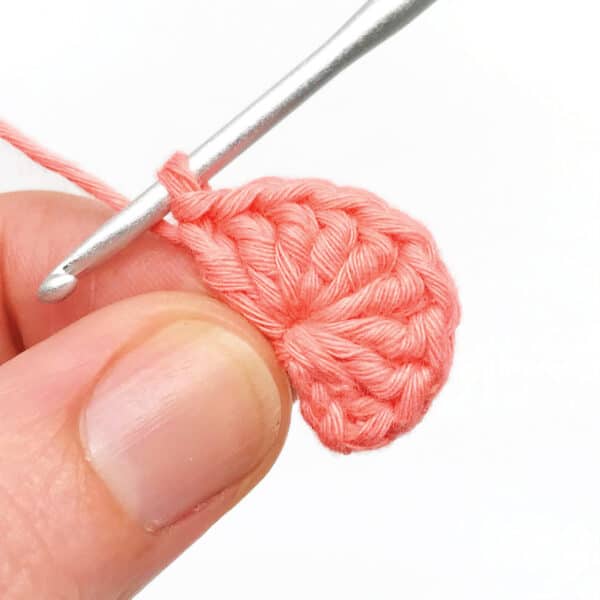
Row 1: With Color D, make a magic ring, ch 3, 9 dc in ring. (9 dc) Tighten ring but do not join round, shaping cheeks as half-circles. (image left)
Fasten off, leaving a long tail for sewing.
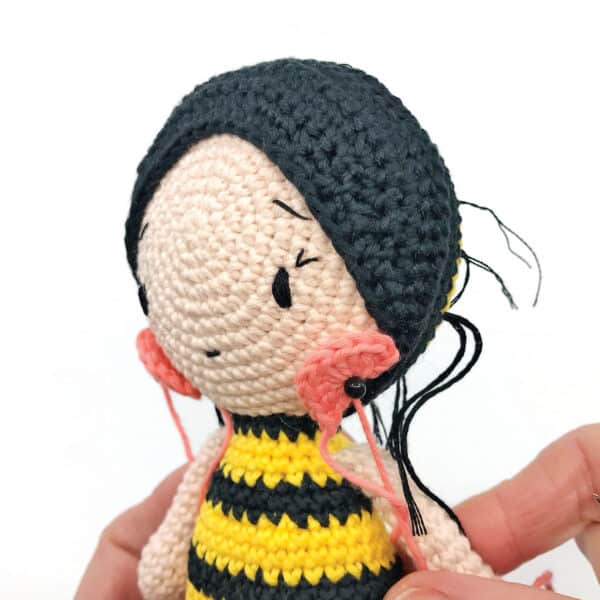
- Position Cheeks just below the end of the Hood, with the straight edge along the Hoodline. (image right)
- Use long tails and yarn needle to sew Cheeks in place.
ANTENNA (Make 2)
Row 1: With Color B, ch 12; working in back bumps of chain stitches, hdc in 2nd ch from hook, sl st in each of next 10 ch. (1 hdc & 10 sl sts)
Fasten off, leaving a long tail for sewing.
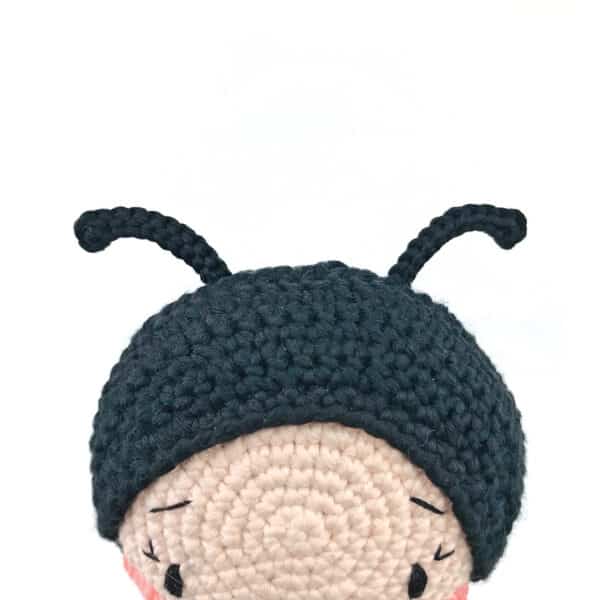
- Sew Antennae to top of Head, just behind Hoodline, with about 8 stitches between them. (image above)
WING (Make 2)
Round 1: With Color C, make a magic ring, 6 sc in ring. (6 sc)
Round 2: Inc in each st around. (12 sc)
Round 3: Sc in each st around. (12 sc)
Round 4: [Sc in next st, inc in next st] 6 times. (18 sc)
Rounds 5-7: (3 rounds) Sc in each st around. (18 sc)
Round 8: [Sc in next st, dec] 6 times. (12 sc)
Rounds 9-10: (2 rounds) Sc in each st around. (12 sc)
Round 11: [Sc in each of next 2 sts, dec] 3 times. (9 sc)
Rounds 12-15: (4 rounds) Sc in each st around. (9 sc)
Fasten off, leaving a long tail for sewing.
Wing Detail – use photos as guide
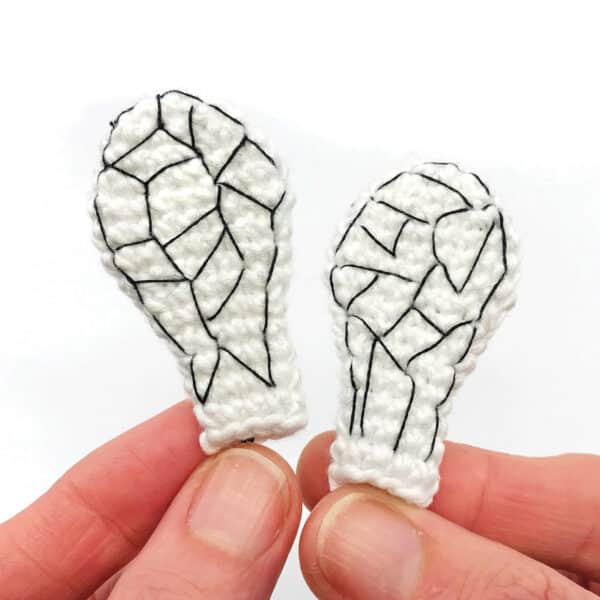
- Flatten Wings and embroider Wing Veins, using a single strand of Black Floss. Start by making a rough outline around one side of Wing, then add a random pattern of geometric shapes within outline, using straight stitches.
- Repeat on other side of Wing.
- Repeat steps 1 & 2 on second Wing. (image left)
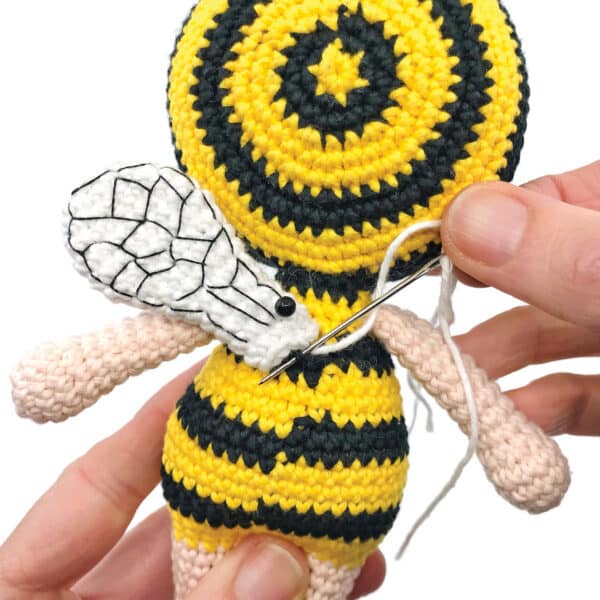
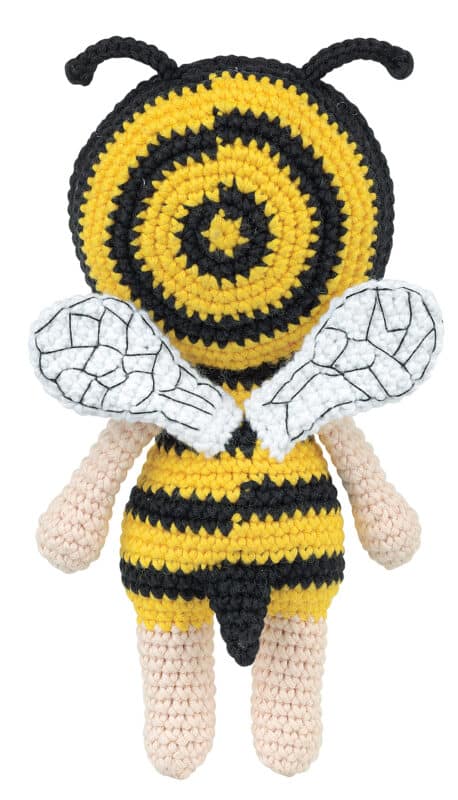
- Using long tails and yarn needle, sew Wings to back of Body (between Arms) over Rounds 14 to 17. (image right)
STINGER

Round 1: With Color B, make a magic ring, 5 sc in ring. (5 sc)
Round 2: Sc in each of next 2 sts, inc in next st, sc in each of next 2 sts. (6 sc)
Round 3: Sc in each st around. (6 sc)
Round 4: [Inc in next st, sc in next st] 3 times. (9 sc)
Round 5: Sc in each st around. (9 sc)
Fasten off, leaving a long tail for sewing.
- Flatten Stinger and use yarn needle to sew to center back of Body, over Round 5. (images above)
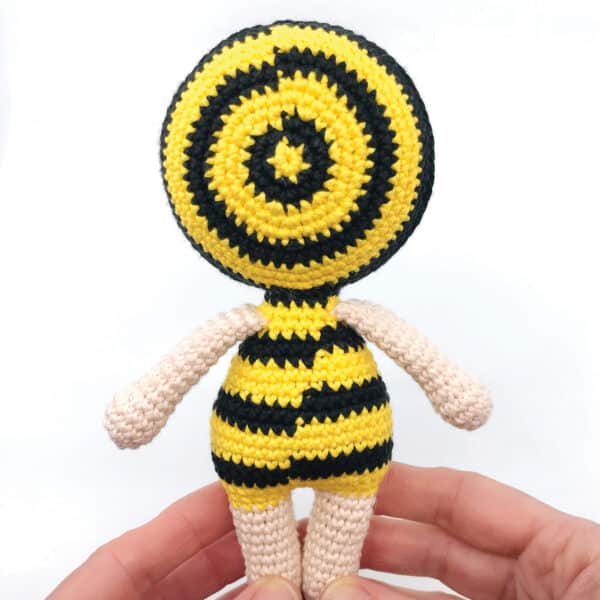
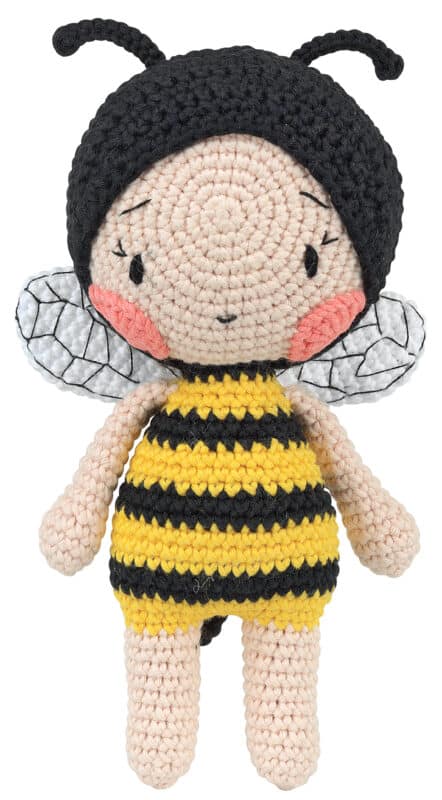
And your adorable Bee Crochet Doll by Clare Cooper is finished!! Isn’t she lovely? This is a great example of of how cute Clare’s projects are! And how the patterns in her fantastic book are structured, layout, as well as supported by a wonderful set of additional photos!
The main problem you will have, is choosing which of the lovely dolls to make first! Be sure to get a copy here today:
You can buy Amigurumi Adventures from Gifts to Me for only £12 (+P&P)! Usual RRP £15.99
Visit giftstome.co.uk and use the offer code R6128
Offer ends 30th September 2026
Alternatively get yourself a copy on Amazon