
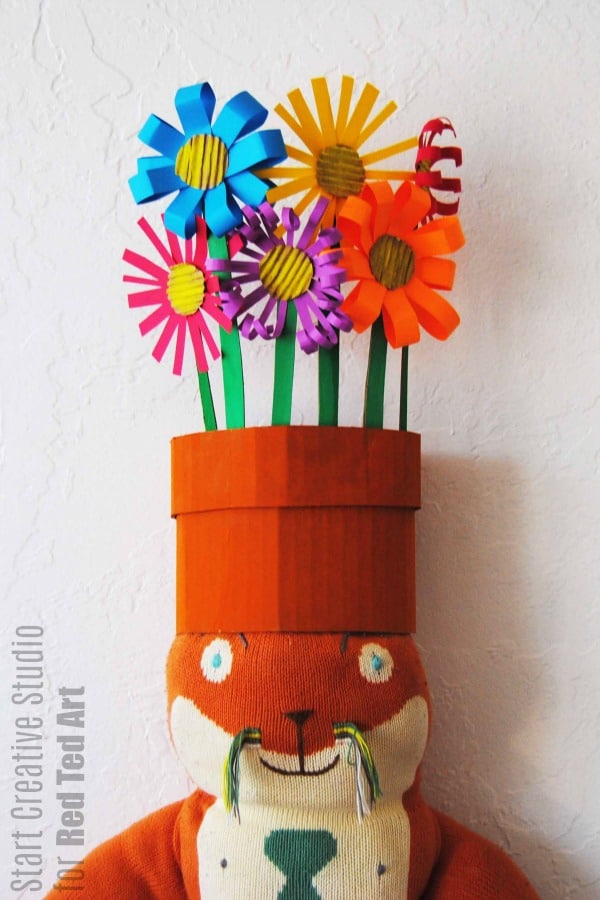
Cardboard Flower Pot Hat
Time to welcome be the lovely Start Creative Studio who will show us one her fabulous Cardboard Corwns again! This time it is a fabulous Cardboard Flower Pot hat!
Do you plant a garden in the Spring? Maybe a bed of flowers? We planted some sunflowers last year and had a fun time watching them grow. This year, we haven’t planted anything but were inspired by all of the colorful flowers we’ve seen popping up and made a flower pot crown! Check out the rest of Start Creative Studio’s guest crafts here on Red Ted Art!
To make a Cardboard Flower Pot Crown, you will need
- Cardboard, Textured and Plain
- Cardstock
- Paint
- Paintbrush
- Scissors
- Glue
- Stapler
How to make a Flower Pot Hat from Cardboard
Create it!
Make the Flower Pot from Cardboard
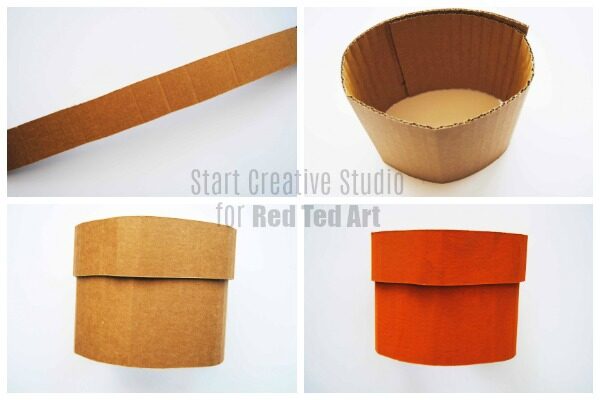
Step 1: Cut a strip of cardboard long enough to wrap around your little one’s head. Remove and staple the ends together.
Step 2: Cut a second strip, approximately 3 inches in height and long enough to fit around the crown.
Step 3: Glue the smaller strip around the top of the crown.
Step 4: Paint the flower pot and allow it to dry.
Prepare the flowers

Step 5: From cardboard, cut strips that will become flower stems. Paint green and allow to dry.
Step 6: Cut circles from textured cardboard. Paint and allow to dry.
Step 7: Cut strips of colored cardstock. Fold strip so both ends meet and glue the ends together.

Step 8: Continue Step 7 and glue the cardstock pieces to the textured circles, creating flowers.
Finishing of your flower pot crown

Step 9: Glue the flowers to the stems.
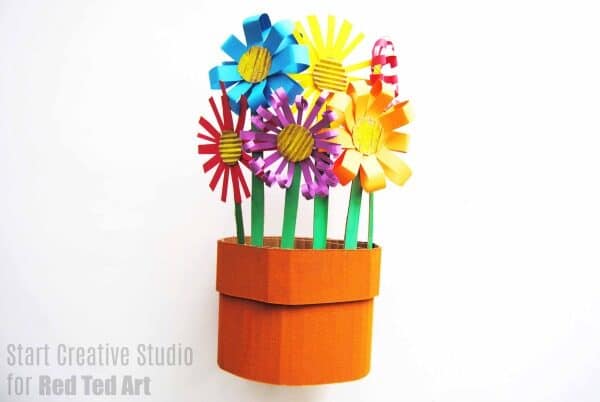
Step 10: Glue the stems to the front inside of the flower pot.
A fun and simple way to celebrate all of the beautiful colors of Spring!

Thank you so much to Start Creative Studio for such an amazing crafty and eco friendly contribution to Red Ted Art!

See all of Start Creative Guest Posts Here.