
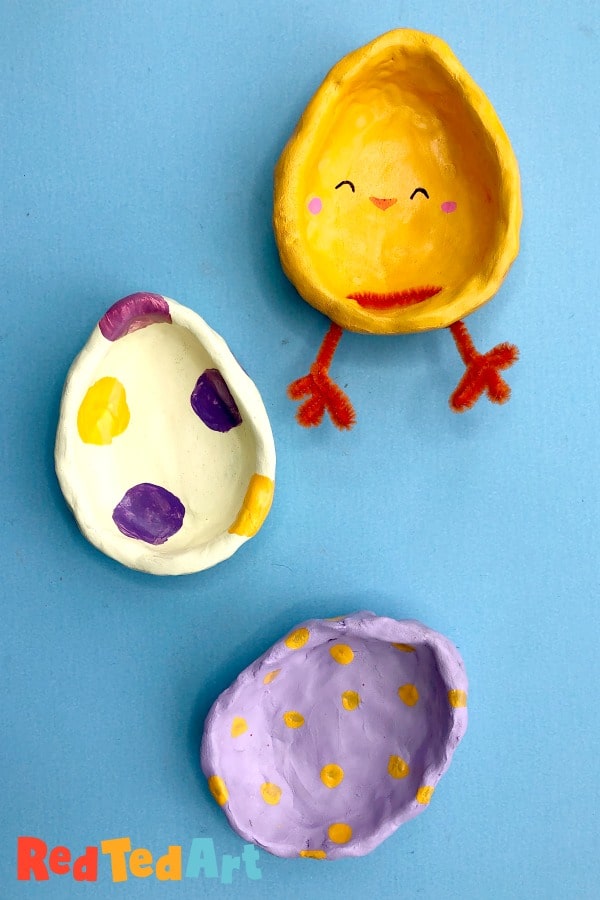
Easter Pinch Pot Idea – Chicks & Eggs
Time for some lovely Easter Clay Ideas. We love wotking with air dry clay at Red Ted Art HQ and we also love making simple Pinch Pot Projects all year round. And have a specail Easter Pinch Pot Idea for you today. These Easter Egg Pinch Pots are super easy and can be decorated in many ways.
Cute Easter Clay Idea for Kids
Note: affiliate links have been added to this post – should you choose to purchase via these, I will earn a small commission that goes towards the upkeep of this site!
Today, we decorated our pinch pots as Easter Eggs and Chicks. However, the gorgeous Make It Your Own also has a Bunny Pinch Pot and Hatching Egg Pinch Pot that you may also want to check out later! And do check out the rest of our Air Drying Clay Ideas!
We got the idea for the Chick’s Pipecleaner legs from Make It Your Own’s Snowman Pinch Pot arms! So fun.
To make Pinch Pots you will need:
- Air Drying Clay
- Acrylic paints
- Paint pens (optional)
We like to buy clay in bulk – and usually get clay like this:
- grey clay (the best for buying in bulk)
- terracotta clay (great for earthy projects)
But this white clay is also popular
- white air drying clay (a lovely clay for when you want that clean white finish without painting, however it is MUCH more expensive and therefor best for small projects such as ornaments)
If you have some harden air drying clay, this is how you can soften air drying clay to reuse. It only works for natural clay though and not polymer clays.

How to make a Pinch Pot Chick & Egg
Watch the video tutorial on auto play or follow the instructions below!
Start with the ball of clay for the pinch pot

Making pinch pots really is very easy!!! Personally I find working from a basic round shape best! So begin with the basic shape and go from there.
Begin by kneeding your clay into a nice smooth ball. If you clay is a little hard, you can a little water as you go. If it is VERY hard, do soften your air drying clay the day before you use it.
Start shaping your pinch pot with your thumbs

Once you have a ball of clay that fits nicely into the palm of your hand, take your two thumbs and press into the middle.
Using your thumb and index finger start shaping the sides of the walls. And smoothing down cracks with water as you go.
Shaping the pinch pot into an egg

Once you are happy with your basic shape, gently pinch one end of your bowl to make it a bit more oval and egg shaped.
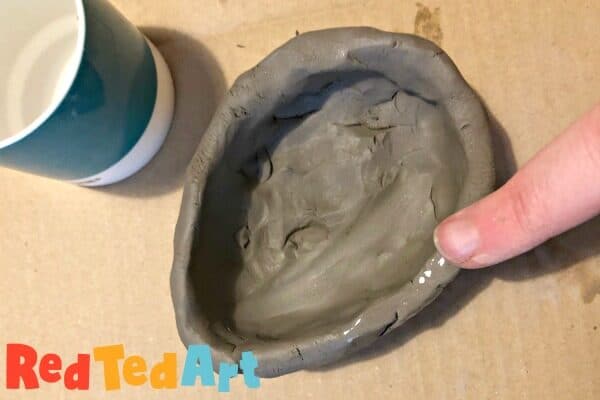
Spend a good 5 minutes and with a little water smooth down the walls, sides and insides of the egg pinch pot.
If you wish, you can use a chop stick or similar to make two holes at the bottom of the egg pinch pot. These holes can later be used to add some pipecleaner legs for your chick pinch pot version!!
Now let your Egg Pinch Pot dry fully – this can take a few days, depending on how warm and dry it is where you live.

Once fully dry.. paint in the desired colours using acrylic paints, gloss enamels or posca pens!
Ta-daaaaa your Easter Clay Idea is finished. I love the little chick. So fun!

As mentioned before we have a whole set of Creative Pinch Pot Ideas for all seasons here on Red Ted Art. Do check them out. Which is your favourite?

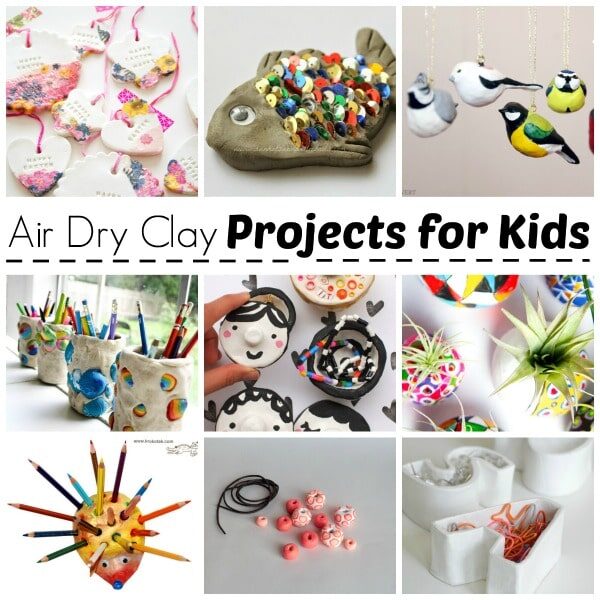
Want to level it up? Try these other Air Drying Clay Projects for Kids:
Happy Easter Pinch Pot making!!
This video tutorial is also available on Youtube with voice over: