Red Ted Art - Make crafting with kids easy & fun

Cute & Easy Crafts for Kids

  • Home
  • START HERE
  • Preschool Crafts
  • Easy Kids Crafts
  • Paper Crafts
  • Free Printables
  • About
  • Join Our Newsletter
  • Cookies, Privacy Policies & Disclosure

How to… Make Lollibops (Guest Post)

August 26, 2011

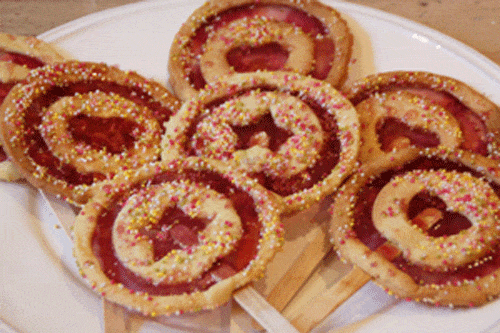
Candy biscuits Stained glass window biscuitsWelcome to this week’s lovely “How to Make Lollibops”. By now we have all seen Annabel Karmel’s Stained Glass Window biscuits – I have seen in it various guises around the internet with varying degrees of success. BUT. Have you seen the Lollipops? Take stained glass window biscuits ONE step further and create these truly lovely and creative biscuit lollies/ lollipops. Carla & Bekka fromSisters Guild came up with this beautifully delicious idea! Move over Annabel (and followers) and make way for Carla and the girls!

And whilst on the topic of Carla – Sisters Guild is a beautiful online children’s boutique – well worth a look!  And as if window shopping isn’t enough, they also have a beautiful blog and a Monday Makery section. What more do you want?! Do stop by for a nosey!

Over to Carla!

Candy biscuits

It’s been a while since we’ve brought a recipe to the makery so in the spirit of Willie Wonka and with Lollibop in our minds we’ve been concocting lollipops with a twist. These are fantastic to make, with baking, bashing, and designing some bright stain glassed biscuit lollipops.
The smell of almond and lemon drifting through the house is pretty delicious too. These lollibops make great party bag treats and look pretty impressive on a party table too.

here’s what you’ll need:

  • wooden lollipop sticks
  • 200g individually wrapped sugar drops
  • hundreds and thousands
  • 125g unsalted butter – softened
  • 1 lemon
  • almond essence – 1 teaspoon
  • 110g caster sugar
  • 250g plain flour
  • 2 eggs
  • greaseproof paper
  • rolling pin

Stained glass window biscuits

Here’s how:

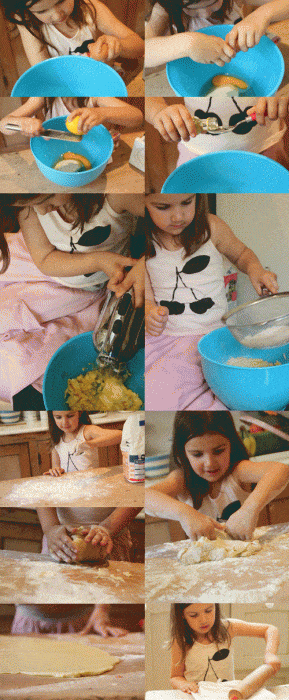
  1. To make the biscuit dough put the butter, 1tsp almond essence, 1 egg and the grated rind of one lemon into a bowl and mix it all up with an electric mixer, start adding the flour little by little sifting as you go.
  2. Now you’ll need to kneed; sprinkle an ample amount of flour over the table and kneed your dough adding more flour, sprinkle by sprinkle if it starts to get too sticky.
  3. Time to cool off; cut two sheets of grease proof paper and roll out your dough between the two sheets. Once its rolled evenly (about 1/2 centimetre thick) place in the fridge to cool for about half an hour.
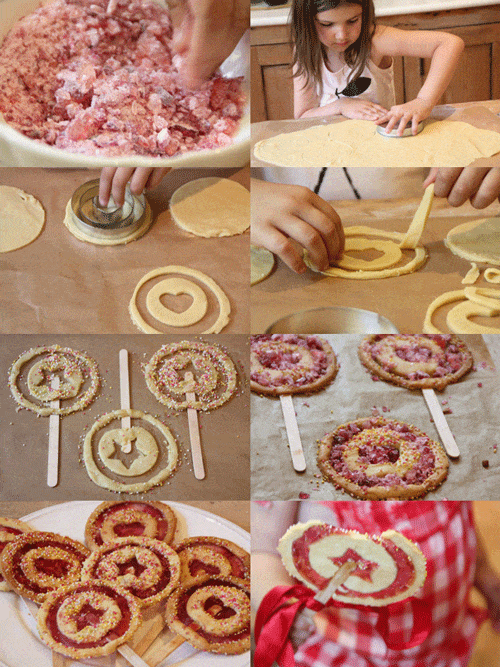
  4. Whilst waiting for the dough, you can get bashing the sweets. Unwrap the sweets and separate by colour. Place the sweets into a sandwich bag, wrap in a tea towel and place on top of a chopping board (to protect your work surface) now take your rolling pin and bash bash bash with all your might! Repeat the process with all the different colours.
  5. Preheat the oven to 180C or 160C fan assisted.
  6. Take your dough from the fridge and using the largest of your round cutter cut out as many rounds as fits onto the sheet of dough. You can re-roll the dough again to make more later.
  7. Move each round onto another baking sheet.
  8. Now using your other cutters place the second largest on top followed by the next largest and finally your centre circle, we used a heart for some of our centres and stars for others.
  9. Remove the dough from the first inner circle and then the dough from the middle. Leaving two rings within the whole circle. Repeat with the other rounds.
  10. Brush with egg white and sprinkle with hundreds and thousands then carefully slide a lollipop stick underneath and into the central space.
  11. Now pop into the oven for 10 minutes.
  12. Remove from the oven and fill the gaps with your bashed up sweets. Put them back into the oven for a further 5 minutes.
  13. Remove from the oven and leave to cool on the trays

stained glass window biscuits

I tied a ribbon around the stick to finish off the our lollibops. I think they look pretty yummy. The biscuit has a delicate lemon and almond taste and just the perfect crunch. The stained glass centre cracks in the mouth and the combination of the two is really delicious.

Now.. aren’t these lollibops simply devine? A truly creative take on the now popular Stained Glass Window biscuits. Beautiful. Creative. Delicious.

Now go and visit the sisters and check out their Monday Makery or their beautiful shop.

«
»

Filed Under: Christmas, How To's, Recipes 24 Comments

Comments

  1. JDaniel4's Mom says

    August 26, 2011 at 8:13 am

    What a pretty cookie!

    Reply
  2. Red Ted Art says

    August 26, 2011 at 8:14 am

    Aren’t they just? The will look fab at a party or Christmas!!!!

    Reply
  3. Caz says

    August 26, 2011 at 8:49 am

    They look wonderful, I can almost taste them! I think these would be lovely to make for Christmas too.

    Reply
  4. Esther says

    August 26, 2011 at 2:54 pm

    Yummy Cookies! love the sprinkles!

    Reply
  5. Anthea Barton says

    August 26, 2011 at 5:34 pm

    Love this take on the sweety cookie. They would make great presents with a small bow on the stick and wrapped in cellophane. Might make some to put in girls party bags!

    Reply
  6. Elaine Livingstone says

    August 26, 2011 at 5:51 pm

    wow brilliant recipe, futtery but different

    Reply
  7. Red Ted Art says

    August 26, 2011 at 6:11 pm

    Yes – *everyone* – I can’t wait to have a go at these with the children! They would definitely look fabulous with cellophane and a bow! And I think the sprinkles really “make” them!

    Reply
  8. Rebecca @MelbaLondon says

    August 27, 2011 at 6:56 pm

    Maggy, and Carly, wow! these are so clever… will get the MIL on the case with these for the next party! (and pretend I made them…)

    teehee, thanks – first time I’ve commented on a blog, 🙂

    R x

    Reply
  9. Red Ted Art says

    August 27, 2011 at 7:11 pm

    Hooray for first comments! Love the idea of getting the MIL to make some… 😉

    Reply
  10. erica says

    August 28, 2011 at 9:22 pm

    These are really adorable! They’d be super cute for the 4th of July!

    Reply
  11. Red Ted Art says

    August 29, 2011 at 9:29 am

    Oh good point! Perfect for 4th July!

    Reply
  12. Isil says

    August 29, 2011 at 11:59 am

    oh my these are so pretty.Will be definitely try them.My daughter would ADORE these. She will be very happy 🙂 Thanks!

    Reply
  13. Vicky says

    August 29, 2011 at 10:09 pm

    Those are gorgeous as well as yummy looking. I think they would be a big hit with my kids.

    I am a new follower from the Sunday Showcase. If you have a moment come by http://messforless.blogspot.com and say hi!

    Thanks!

    Reply
  14. Mamie@bride speechfather of the bride speech says

    August 30, 2011 at 3:04 pm

    Super cute the cookies are, its lollipop.. I love the sprinkle. The one whose doing it is so adorable..

    Reply
  15. Audra says

    August 31, 2011 at 2:03 am

    Oh my these look tasty!! I’d love for you to link up at my link party! Hope to see you there!

    http://www.thekurtzcorner.com/2011/08/tuesday-tutorials-link-party-no-4.html

    Reply
  16. Red Ted Art says

    August 31, 2011 at 7:08 am

    Thank you for the party invite and linked!

    Vicky, will come and have a look 🙂

    Reply
  17. Jerri says

    September 2, 2011 at 2:17 am

    These are so cute! I’d like to invite you to link up at my Friday Favorites party!

    Reply
  18. Red Ted Art says

    September 2, 2011 at 7:00 am

    Done! Thank you for the invite!!!

    Reply
  19. mummiafelice says

    September 2, 2011 at 2:17 pm

    Oh my!!! Those are amazing!!!! I think I’ll be making theseinstead of cake pops for a change! Wow! Thanks for linking up to Handmade Thursday

    Reply
  20. Red Ted Art says

    September 2, 2011 at 3:52 pm

    You regularly make cake pops!?? I want to live at your house!

    Reply
  21. Bernadette - Mom to 2 Posh Lil Divas says

    September 4, 2011 at 3:09 am

    beautiful and they sound yummy! 🙂

    Thanks for sharing on the Sunday Showcase. Looking forward to seeing what you have to share this week.

    Bern
    http://momto2poshlildivas.blogspot.com/search/label/Sunday%20Showcase

    Reply
  22. Love In The Nest says

    September 6, 2011 at 7:57 am

    I love these! They look fantastic!

    Reply
  23. Laura@howtocookgoodfood says

    December 12, 2011 at 8:36 pm

    Such a clever take on the stained glass cookies you see at this time of the year. Novel & imaginative idea!

    Reply
  24. Red Ted Art says

    December 13, 2011 at 9:21 am

    Laura – aren’t they just!? The Sisters Guild really has some great ideas! Such a fabulous duo!

    Reply

Leave a Reply Cancel reply

Your email address will not be published.

Recipe Rating


Welcome!

Welcome

Hello! I am Maggy and I love all things crafty and sharing my craft ideas and how tos.

The aim of this site is to provide easy, do-able and fun crafts for all ages.

Categories

Archives

Crafty Blogs

Copyright © 2021 · Website Design By Jumping Jax Designs

We use cookies to ensure that we give you the best experience on our website. These cookies feedback information to our analytics and advertisers. We track views of the site - which pages are visited, whether you are a regular or returning visitor to help generate a more personalised experience. You can switch cookies off or follow the READ MORE link for more and information on how to.OkRead more