Easy Paper Dragon Puppet Craft For Kids
Disclaimer: This post is brought to you in collaboration with Bostik Glu Dots
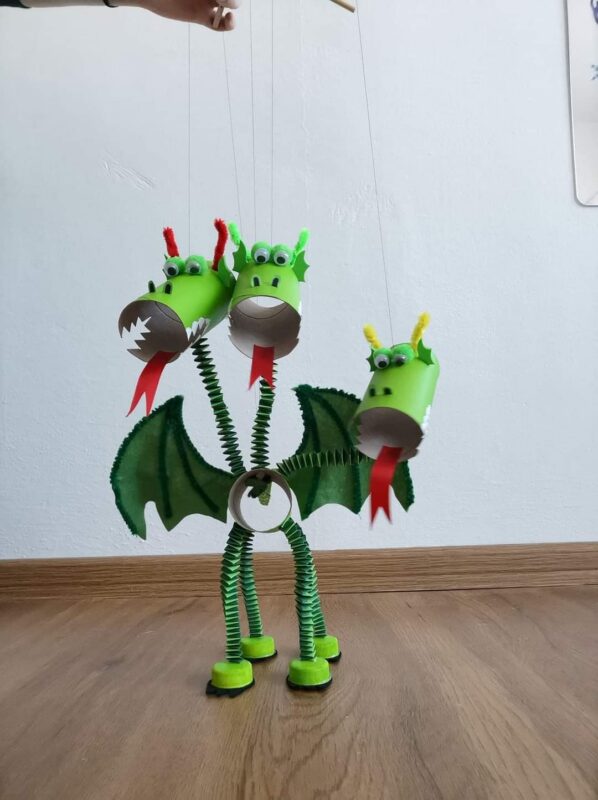
I have been wanting to create a Paper Roll Dragon Marionette for a while now. I know how much you all love the Giraffe Marionette from many moons ago… so when Bostik challenge me to create a brand new craft using their awesome Glu Dots, I instantly thought of this Paper Dragon Puppet Craft! The Glu Dots make it a super easy, no mess craft!

I love how bright and colourful these dragons are! You can use any colour combination to personalise. And the Glu Dots make this a really low mess, quick drying activity!
Take a peak at how easy they are to make today! There’s a certain excitement that comes with creating any dragon based craft and this one is no exception! It also comes in handy for special dragon themed days like Chinese New Year or St David’s Day.
Dragon Puppet – Materials:

- Long cardboard tube or two toilet paper rolls
- Coloured paper in desired dragon colours (I used, red, green and yellow)
- Googly eyes
- Some baker’s twine
- 2 chopsticks or sticks from a walk
- Beads (or something similar to help way the dragon’s feet down)
- Scissors
- Glu Dots and a little Blu Stick (though you can make this craft ONLY using Glu Dots as well!) – more info here for removable Glu Dots and Blu Sticks
How to use Glu Dots
Glu Dots are super fun to work with and so so sooo easy to use.
You can find out more about removable Glu Dots here!
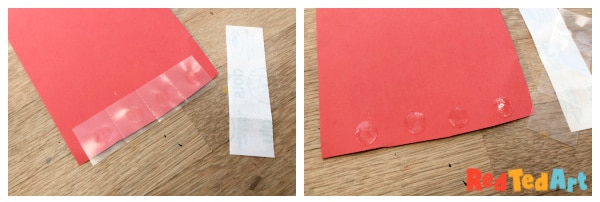
Using Glu Dots is REALLY easy! Peel off the white backing.
Place the glue dots where you need them. I used a whole strip in this image, but you can separate them and use one at a time too.
Then peel off the clear backing, and you are ready to go! Easy.
Top Tip: avoid touching the Glu Dots with your fingers!
How to make a Paper Dragon Puppet
You can watch the little “overview” video or follow the step by step instructions below!
Prep the cardboard tubes

We used a kitchen paper towel tube for this Dragon Marionette. Cut it roughly 2/3 and 1/3 along, for the body and head. But you can also use two toilet paper rolls, with one of the rolls cut down a little.
Align your paper rolls with the red paper and wrap around to see how much you need. Cut two rectangles that fit your rolls. Make sure they are little wider than your rolls.
Add your Glu Dots along one edge of the paper.
Now secure to your paper roll!
Repeat for the other end!
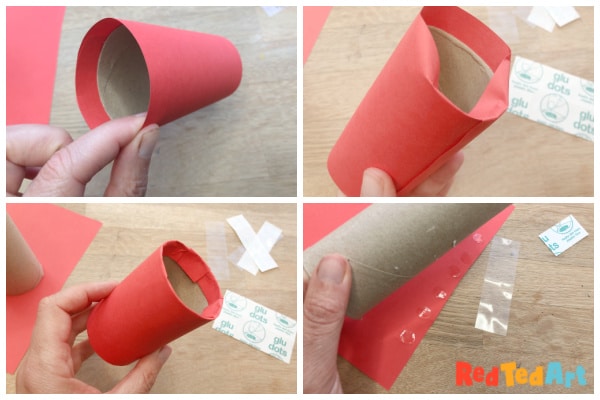
Your red paper will be wider than the cardboard tube. Simply tuck these edges, in for a nice, neat finish! Repeat for the other end.
Now do the whole process again for the second cardboard tube.
Make the paper dragon puppet’s spikes and tail

Now it is time to make the spikes, as well as connect the head to the body.
Cut two red strips of paper and one slightly wider yellow strip of paper. Ours were approximately 15cm x 1.5cm – but it is a question of preference. Work with the off cuts you have, rather than cut into a new sheet of paper.
Glue the two red strips together with your Blu Stick. This will strengthen it a little and avoid the neck “ripping” when playing. The Blu Stick is super handy – as the blue glue shows you where you have added glue, but dries clear.
Now, fold the yellow paper in half lengthwise and cut some triangles.
Glue the yellow strip onto the red strip.
With a Glu Dot, secure first to the head and then to the body of the Dragon.

Now, let’s make a tail. It is the same process as for the neck, except that the red paper is a little wider at one end and tapers down at the other end to shape it.
Using the Blu Stick, glue the red pieces of paper together – but leave an opening one end, to secure to the body with the Glue Dots.
Cute more yellow spikes and glue along the back right down to the bottom of the tail.
Finally, cut two yellow triangles and glue them to the end of the tail.
Add the dragon’s paper wings and ears

I love making these paper dragon wings. I think they look super effective but are still easy to make.
Using a large sheet of paper, fold one corner up to make a triangle. Trim the excess off and open up. You will have a square with a diagonal fold. Cut along the diagonal fold to make two large triangles. One for each wing.
Take your triangle and fold in half (bottom left image).
Fold again (middle image).
Now cut a curve out (bottom right image).

When you unfold the paper, you should have a green wing. You will have to recrease the creases a little to make them go in opposite directions.
Secure the paper wing in place with a Glu Dot.
Repeat with the second paper dragon wing!
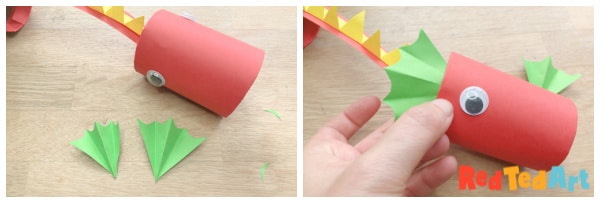
The ears are exactly the same, but I used the off cuts from the above piece of paper to make smaller paper ears.
Again, I secured the ears to the dragon’s head with some Glu Dots.
Add the strings to the dragon puppet

Time for the final assembly and some feet.
The feet are the same as the dragon wings/ ears but in yellow! I made four of these.
Make holes to the bottom of your cardboard tube with some pointy scissors (adults only!).
Thread the baker’s twine through these holes.
Add a bead and also thread through the feet (having made a small hole in these first). Repeat for the next set of two feet.
For the head – add one hole at the top of the head and thread the baker’s twine.
The back – make a hole at either end of the dragon’s back and thread the baker’s twine through.
Secure with little knots inside the tube.
Take two chopsticks or sticks from a walk. Cross them over and wrap some baker’s twine around them to secure.
Finally, attach the string from the body of the dragon and the dragon’s head to the chopsticks.

Finished! Your Paper Dragon Puppet is now finished!!
What I loved about the Glu Dots, is that they really sped up the process – there was no glue drying times and no “things popping off” as the glue sets. I love that it turned googly eyes into stickers, in seconds. So fun and so quick and easy!!! No need to get your paints out to paint your paper tubes first!
If you would like to give Glu Dots a go, head over to removable Glu Dots and Blu Sticks for info!

Here is a fabulous version made of our Dragon Puppet/ Giraffe Puppet on Pinterest – The legs are made using the technique of our Giraffe Puppet: