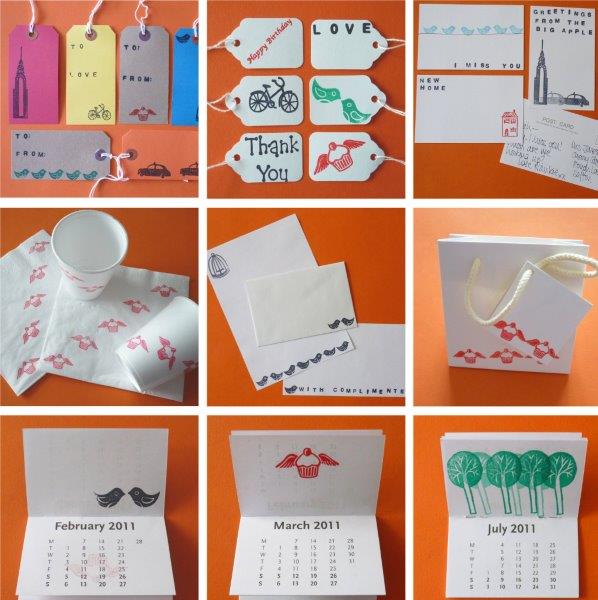
How to… make beautiful Ink Stamp Cards & Things (Guest Post)
![18e770567c443e8dd9a5d4d072ab6ae5[1]](https://www.redtedart.com/wp-content/uploads/2011/01/18e770567c443e8dd9a5d4d072ab6ae51.jpeg) I don’t know about you, but I am a bit of a collector and horder of things. Especially all things crafty.. I actually have a number of wonderful and beautiful stamps – some I picked up in the V&A (wonderful wood carvings), some I have been dragging around with me for years (I have a little Woodstock from Snoopy) and others from as afar as Japan – as holiday momentos. But have I ever used them? Like properly?!?!?! No. And I have no excuses, I even have lots of different coloured ink pads. Well. Excuses no more… Katie from confessions of a design geek has done this wonderful Guest Post for us – yes, you do need stamps to begin with, but if you are like me, you may actually have a number lurking in your drawers. Go on.. get them out and make some wonderfully crafty things!!!
I don’t know about you, but I am a bit of a collector and horder of things. Especially all things crafty.. I actually have a number of wonderful and beautiful stamps – some I picked up in the V&A (wonderful wood carvings), some I have been dragging around with me for years (I have a little Woodstock from Snoopy) and others from as afar as Japan – as holiday momentos. But have I ever used them? Like properly?!?!?! No. And I have no excuses, I even have lots of different coloured ink pads. Well. Excuses no more… Katie from confessions of a design geek has done this wonderful Guest Post for us – yes, you do need stamps to begin with, but if you are like me, you may actually have a number lurking in your drawers. Go on.. get them out and make some wonderfully crafty things!!!
And if you love design, I mean LOVE design, then go and visit confessions of a design geek – or visit her anyway, show your appreciated for writing this post!
Materials:
Ink stamp pads, ideally in a few colours.
(These are available from most stationery and craft shops. Mine are either from WHSmith – or came with the ink stamps.)
Ink stamps, ideally some with pictures and some with letters.
(I have a selection from Yellow Owl Workshop, Skull and Cross Buns, Muji and Tiger – or you can make your own by carving erasers, or even potatoes!)
Things to stamp on.
(This is where you can get quite creative, I’ve used everything from blank greetings cards and postcards to luggage tags, napkins and polystyrene party cups.)
Instructions:
1. Decide what you want to make. Let’s start with a simple greetings card.
2. Select your stamps and think about the design you’re going to create with them. (You might want to practice on a piece of paper first.)
3. Ink them up – and get stamping.
4. How about a slightly more complex greetings card, this time using a blank card, and also a luggage tag? Start by sticking the luggage tag string down the inside of the card, using some clear tape.
5. Ink up your stamps in your chosen design – I’m putting my message on the luggage tag and pictures on the card itself.
6. Et voila!
7. Then off you go….
8. Don’t worry if the prints aren’t quite perfect – little imperfections are all part of the handmade look.
9. And don’t forget to put your name on the back, so the recipient knows you made it yourself.
Links:


