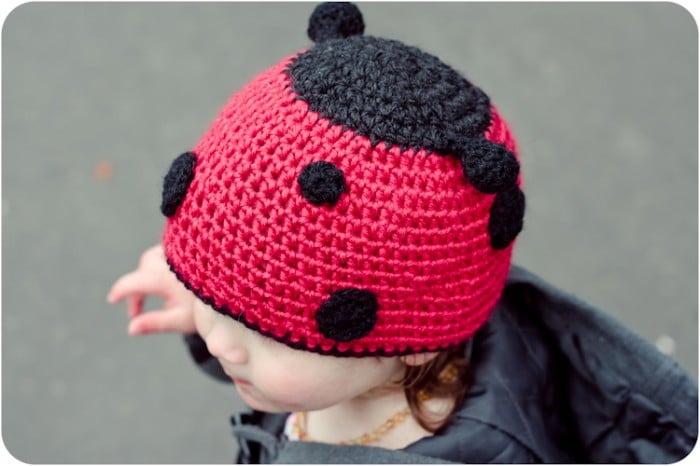
How to… Crochet a Little Bug Ladybug Hat
I am so pleased to welcome Kat from Slugs on the Refrigerator, who is sharing her Ladybird Hat Crochet Pattern – she has a number of sizes and here she shares the 1-3yrs old size. Kat is is wonderfully creative and has come up with a fantastic set of crochet patterns, designs and ideas – many of which are available for free on her website, whilst others you can purchase on Kat’s etsy shop Kat Goldin Designs. Both are well worth a visit! So. Over to Kat and this adorable crochet hat pattern.
If you haven’t tried crochet before, but are tempted. I wrote a “How to Teach Yourself to Crochet” post that you may find useful. And you may like the Amigurumi Teddies and Bunnies pattern fun!
This pattern can be completed in any Worsted or Aran weight yarn.
© Kat Goldin 2011: While you have permission to sell finished items from this pattern, I ask that all items sold credit me, Kathryn Goldin, as the designer with a link back to my website Slugs on the Refrigerator . Under all circumstances rewriting, reselling, distributing, or copying the pattern itself is prohibited. Thanks for your understanding and cooperation.
Basic Construction
The hat is worked in the round, with the increase section worked in black, then switching to red for the main hat body. The spots and antenna are worked separately.
Supplies
Any Worsted or Aran Weight Yarn in colours suitable for the:
› The Main Body 70 meters/ 80 yards
› Black for top of hat and details 30 meters/ 30 yards
Hooks
› 5 mm/H-8 Hook
› 4mm/ G-6 Hook for anntena
Gauge
13.5 HDCs and 11 rounds = 4 inches/10cm square
Stitches and Abbreviations
Ch = Chain
HDC = Half Double Crochet (UK half treble)
SC = Single Crochet (UK double crochet)
HDC2TOG = Half Double Crochet 2 Together
Magic Loops (hat and goggles) Instructions for magic loop at the bottom of this pattern
Size
1-3 years (Newborn, Baby, 4+ and Adult sizes are available for purchase from Kat’s Etsy Shop).
Finished Measurements
16.6 inches / 41 cm round 7 inches / 18 cm tall
To Fit Head Sizes
18 – 20 inches45.7 – 51 cm
***Head sizes vary greatly. For best results, measure!!***
1-3 Years
Starting with black yarn and 5mm hook.
Round 1: Using a magic loop*, Ch2 and make 8HDC into the loop. Join into the 2nd stitch of the Ch2. Pull loop tight to close the bottom of the stitches. (8)
Round 2: Ch2. *2HDC into each stitch* repeat from * around. Join. (16)
Round 3: Ch2, *HDC1, 2HDC into the next* repeat from * around. Join. (24)
Round 4: Ch2, *HDC2, 2HDC into the next* repeat from * around. Join. (32)
Round 5: Ch2, *HDC3, 2HDC into next* repeat from * around. Join. (40)
Round 6: Ch2, *HDC4, 2HDC into next* repeat from * around. Join. (48)
Round 7: Ch2, *HDC5, 2HDC into next* repeat from * around. Join. (56) Break black yarn and join the red colour.
Round 8: Ch2, HDC56. Join.
Round 9-19: Repeat round 8. Break yarn.
Finishing
Edging:
Join the black yarn to the bottom of the hat. Ch1 and SC around the edge to finish off the hat.
Antennae (x2):
Using the black yarn and 4mm/J hook
– Before starting the anntenae, you will need 2 small balls of yarn, wound to roughly 1 inch/2.5cm diameter to act as stuffing.
Round 1: Using a magic loop. Ch2. SC6 into hook. Join. (6)
Round 2: Ch2, 2SC into each stitch. Join. (12)
Round 3: Ch2, *SC1, 2SC into next* repeat from * around. Join. (18)
Round 4: Ch2, SC18, Join.(18)
Round 5: Ch2, SC18, Join. (18)
Round 6: Wind a small ball of yarn, just smaller than the diameter of the ‘cup’ you’ve just made. Place inside as stuffing. Ch2, *SC1, SC2tog* repeat from * around. Join (12)
Round 7: Ch2, *SC2tog* around (6)
Round 8: Ch2, SC6 to form the stalk for the antenna. Continue until stalk measures 1.5 inches/ 3.8 cm. Cut yarn, leaving a long tail for sewing onto hat. Weave in ends.
Small Spots (make 5):
Using black yarn and 4mm/J hook.
Round 1: Using a magic loop, Ch2 and make 8HDC into the loop. Join into the 2nd stitch of the Ch2. Pull loop tight to close the bottom of the stitches. (8).
Break yarn leaving a long tail to sew them onto the hat.
Large Spots (make 5):
Using black yarn and 4mm/J hook.
Round 1: Using a magic loop, Ch2 and make 8HDC into the loop. Join into the 2nd stitch of the Ch2. Pull loop tight to close the bottom of the stitches. (8)
Round 2: Ch2. *2HDC into each stitch* repeat from * around. Join. (16). Break yarn leaving a long tail to sew them onto the hat.
Magic Loop:
- Make a loop with the yarn. Ensure that the tail of the yarn is behind and pointing to the left.
- Pinch the bottom of the loop. Put your hook through the loop and place yarn over the hook as you would normally to make a stitch. Pull through.
- Chain 2 more to secure.
- Continue as normal, making stitches into the bottom loop.
- When desired number of stitches in complete, join round.
- Pull tail tightly to close the hole at the bottom of your stitches. Its important that this tail is securely tied when sewing in the ends so that the hole doesn’t open again.
For a variety of other finished crochet designs (including Little Bug Ladybug Hats) and other handmade items, please check out my etsy shop.
Thank you Kat for sharing this wonderful Ladybug pattern. So cute! I hope you have been inspired today to have a go! And don’t forget, if you need a little help, I have a “How to Teach Yourself to Crochet” post to help you along the way!


