Kawaii Crochet Dolls Patterns – Mimi
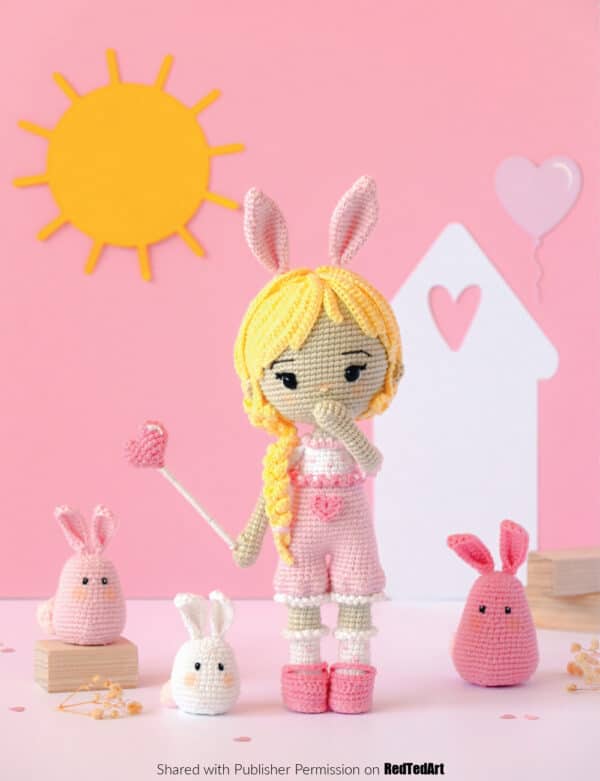
Today, I have a very special treat! A wonderful Kawaii Crochet Doll... from the fantastic book of the same name: Kawaii Crochet Dolls! We get to have a to at Doll Mimi, with her cute companions. She is a wonderful crochet doll to make for either Valentine’s Day (who doesn’t love the little heart crochet) or Easter (with her cute bunny ear accessories and little Bunny companion)… so… why not have a go at Mimi today.. and be inspired to grab yourself a copy of the book!
Please note: this project has been reproduced with permission from the publisher and is not allowed to be republished in any way, without their consent. It is for personal use only.
Also note: affiliate links have been added to these post – should you choose to purchase via these, I will earn a small commission that goes towards the upkeep of this site!
Kawaii Crochet Dolls by Elise Brocard
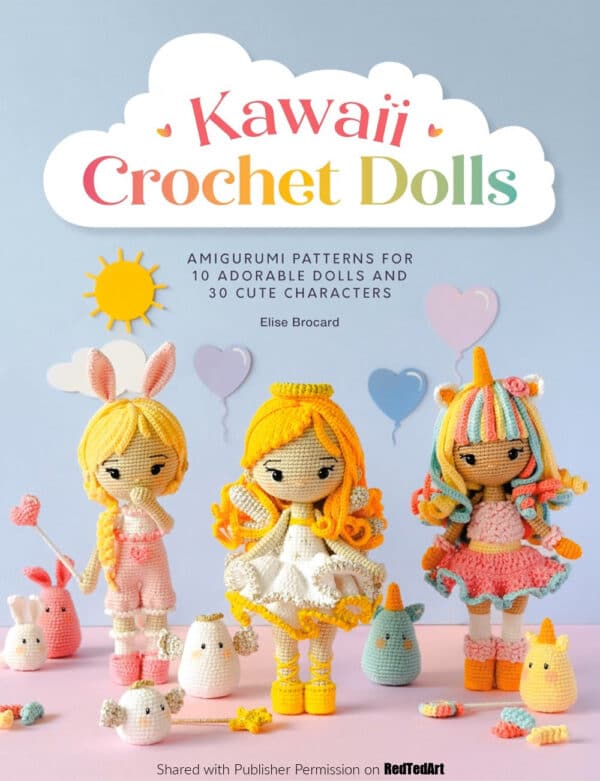
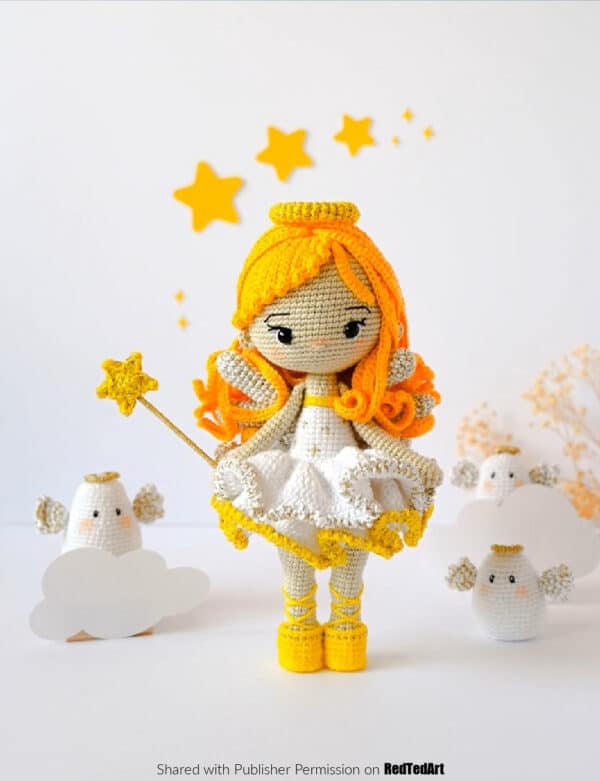
Kawaii Crochet Dolls by Elise Brocard
You may know Elise as Petite Peste on instagram. If not, this is a great opportunity to discover a new to you crochet creator and give her a quick follow! Her work and her account are beautiful (as you can tell from this gorgeous book!)
Reading this in the run up to Christmas? Then you really DO HAVE TO get a copy of the book.. as you simply have to make Tenshi – Christmas Angel Doll, with her adorable angel companions. There isn’t just Tenshi the Angel Doll, but also Yuki is none other than Santa’s right-hand girl, while Koneko loves beautiful snowy landscapes and sleeping snuggled up to her little companions. So plenty to crochet during the Christmas season. Tenshi would also double up nicely as a “regular” fairy, you want to make the rest of the year..
But I am getting ahead of myself.
About the book. So. The book has 10 beautiful detailed dolls, each with a set of the cutest little companions. To me (!!) the themes of the dolls “loosely” fall throughout the year. You have a darling Ladybird Doll in the Summer and (as already mentioned) a Christmas Doll for, well, Christmas and then there is everything in between.
As with all crochet books, there is a great section at the front taking you through all the supplies you will need, the crochet stitches used and tips and tricks to master key techniques needed to make the dolls. And as you will see from the sample project here today – the dolls come with lots of fantastic step photos to really help you succeed in making your projects a success!
Grab a copy of the book here today – it is available on Amazon and all good bookstores!
Supplies
This is a complete supplies list for all the dolls and kawaii characters in the book! The book expands on these a little, but I have summarised the supplies list for the purpose of the sample project!
- US 4 (2.00mm) hook
- The yarn in this books are yarns from the brand Yarn and Colors:
Must-Have (100% mercerized cotton, 13/4oz (50g), 137yds (125m)) (for Mimi Doll and companion, you will need the following colors: Ecru (n° 003 × 1), Peony Pink (n° 038 × 1), Marble (n° 102 × 1), Marble (n° 102 × 1), Blossom (n° 045 × 1))
Furry (100% polyester, 13/4oz (50g), 82yds (75m)) in color: Pearl (n° 043 × 1) - 2 x 7mm plastic safety eyes (if gifting to children under 3mm, please embroider the eyes)
- Toy stuffing
- Embroidery floss: white, black, brown, blue, and/or purple
- Chenille stems
- Aluminum wire
- Stitch markers
- Yarn needle
- Pair of scissors
- Pins
- Blush
- Toothpick (for the wands)
- All-purpose glue for sticking cotton to cotton
Basic Stitches & Techniques
The book guides you through the basic stitches, which some great and detailed crochet graphics! Which are well worth it! You can refresh you memory with our How to learn to crochet guide here.
The book also guides you through embroidery basics as well as techniques such as (but with many more details)
- Working in Joined Rounds
- Working into a Foundation Chain
- Joining New Yarn
- Finishing a Spherical Piece
- 3 Single Crochet Bobble
- Joining the Legs (added below)
- Strengthening the Neck (added below)
- Attaching the Head (added below)
Crochet Abbreviations
- 2hdc-bo : 2hdc bobble
- 3sc-bo : 3sc bobble
- 3hdc-bo : 3hdc bobble
- BLO : work into the back loop only of the previous round/row
- ch : chain
- dc : double crochet
- dc-dec : 2dc together
- dc-inc : 2dc in same st/sp
- dec : sc invisible decrease
- FLO : work into the front loop only of the previous round/row
- hdc : half double crochet
- hdc-dec : 2hdc together
- hdc-inc : 2hdc in same st/sp
- inc : 2sc in sam st/sp
- MR : magic ring
- sc : single crochet
- sk : skip
- slst(s) : slip stich(es)
- sp: space
- tr : treble crochet
- tr-inc : 2tr in sam st/sp
[…] : a group of stitches to be repeated or worked in a specific place (e.g. leg 1).
(…) : in stitch instructions, work the action described in brackets into one stitch. At the end of a row, round brackets contain stitch counts.
Strengthening the neck
You will need this technique below later on in the pattern. This is an example of the extra information provided in the book for success!
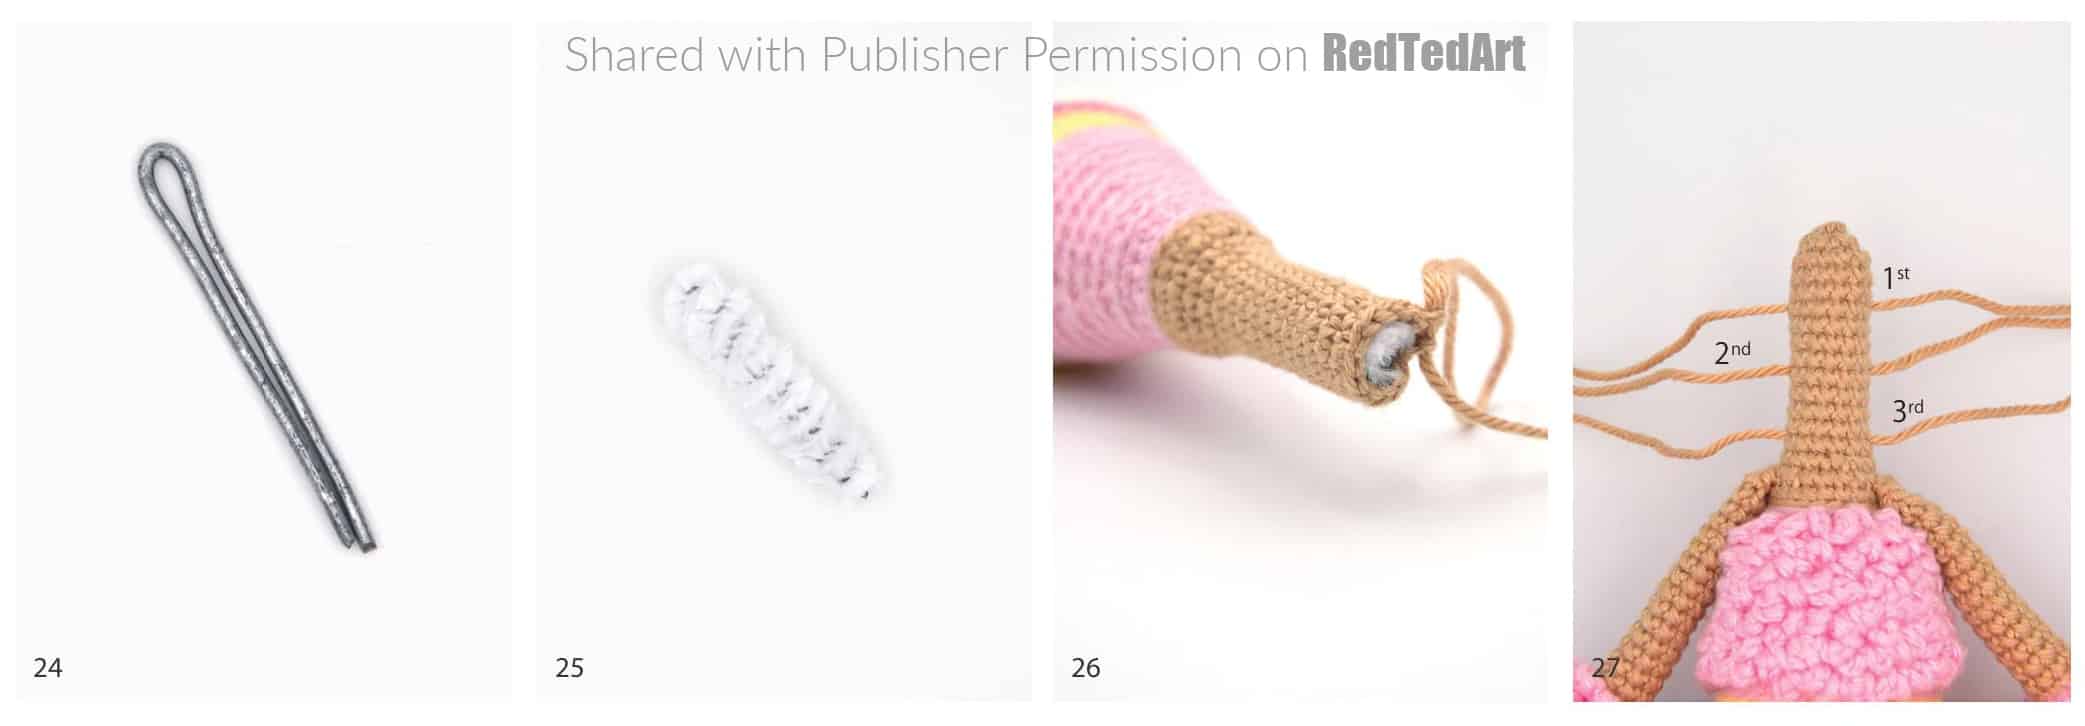
Cut a 3¼in (8cm) length of 0.06in (1.5mm) aluminum wire and fold it in half (image 24). Wrap a chenille stem around the length of (wire image 25) then insert into the neck (image 26).
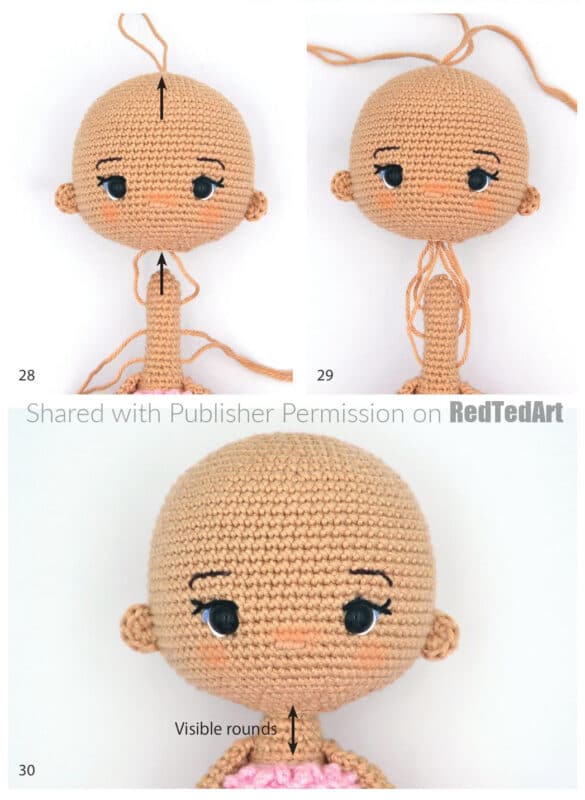
Attaching the Head Use the color given in the instructions. Thread three strands of yarn through the neck (image 27).
Thread both ends of the first strand up through the head, bringing them out in the center of the magic ring at the top of the head (image 28).
Do the same with the second and third strands (image 29).
Pull on all the strands so the neck sits snugly inside the head. Leave visible the number of rounds specified in the instructions (image 30).
Knot the first strand and weave it into the head. Do the same with the second and third strands. The head is now in place and is movable.
Mimi Crochet Doll Pattern
Kawaii Crochet Dolls by Elise Brocard
Mimi and her little companions love playing hide-and-seek in their cozy forest. But what they love the most is cuddles.
Finished Size Mimi: approx 9½in (24cm) tall Companions: between 2¼in (6cm) and 3in (7.5cm) tall Note: Size may vary depending on your gauge (tension) and the yarn used.
Note: always use X-shaped stitches (this is a smaller stitch than the traditional method) and joined rounds, unless stated otherwise. (These are both explained in detail in the book!)
Legs (make 2)
16 Using Marble, make MR.
Round 1: 6 sc into MR, slst to join. (6 sts)
Round 2: ch1, inc in each st around, slst to join. (12 sts)
Round 3: ch1, [1 sc, inc] 6 times, slst to join. (18 sts)
Rounds 4 and 5 (2 rounds): ch1, 1 sc in each st around, slst to join.
Round 6: ch1, 6 sc, dec 3 times, 6 sc, slst to join. (15 sts)
Round 7: ch1, 5 sc, dec, 1 sc, dec, 5 sc, slst to join. (13 sts)
Rounds 8–12 (5 rounds): ch1, 1 sc in each st around, slst to join.
Round 13: ch1, 2 sc, inc, 7 sc, inc, 2 sc, change to Ecru, slst BLO to join. (15 sts)
Round 14: ch1, 1 sc BLO of each st around, slst to join.
Rounds 15 and 16 (2 rounds): ch1, 1 sc in each st around, slst to join.
Round 17: ch1, 2 sc, dec, 7 sc, dec, 2 sc, slst to join. (13 sts)
Round 18: ch1, 2 sc, inc, 7 sc, inc, 2 sc, slst to join. (15 sts) Stuff the foot.
Round 19: ch1, 3 sc, inc, 7 sc, inc, 3 sc, slst to join. (17 sts)
Round 20: ch1, 1 sc in each st around, slst to join.
Round 21: ch1, 4 sc, inc, 7 sc, inc, 4 sc, change to Blossom, slst BLO to join. (19 sts)
Round 22: ch1, inc BLO of each st around, slst to join. (38 sts)
Round 23: ch1, 1 sc in each st around, slst to join.
Round 24: ch1, [4 sc, dec] 6 times, 2 sc, slst to join. (32 sts)
Round 25: ch1, [3 sc, dec] 6 times, 2 sc, slst to join. (26 sts)
Round 26: ch1, [3 sc, dec] 5 times, 1 sc, slst to join. (21 sts)
Round 27: ch1, 1 sc in each st around, slst on RS to join.
Mark last slst.
Leg 1: fasten off and weave in ends.
Stuff leg firmly.
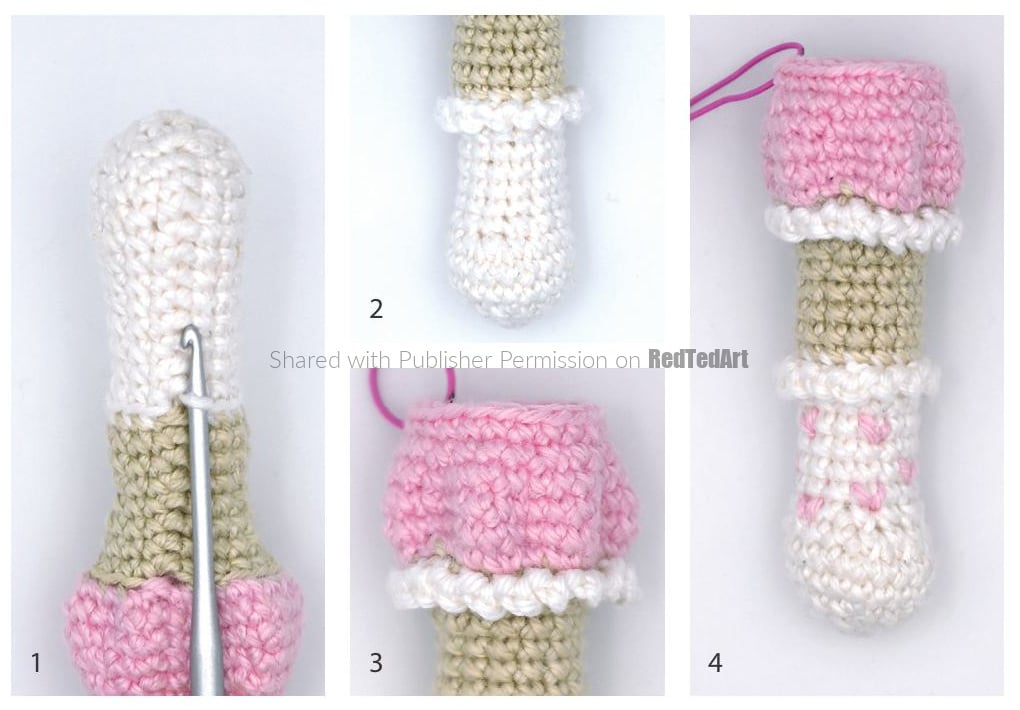
Holding the leg with the foot uppermost, join Marble yarn FLO of first st of Round 13 (image 1), [ch2, slst] 15 times.
Fasten off and weave in ends (image 2).
Join Marble FLO of first st of Round 21 in the same way as previously, [ch2, slst] 19 times.
Fasten off and weave in ends (image 3).
Using Blossom, embroider little “V”s on the sock (image 4).
Set aside.
Leg 2: repeat the steps as for leg 1, but work last slst on WS to join.
Stuff leg firmly. Do not mark last slst, do not cut yarn.
Body
Note: see Diagram 2, Techniques: Joining the Legs
Joining the Legs All the dolls begin with the legs, which are worked separately, then joined just before crocheting the body. In the book, there are two different ways of joining the legs (Diagrams 1 and 2). For today’s doll we use Diagram 2 which has been reproduced here with permission. The book has more information for the other dolls!
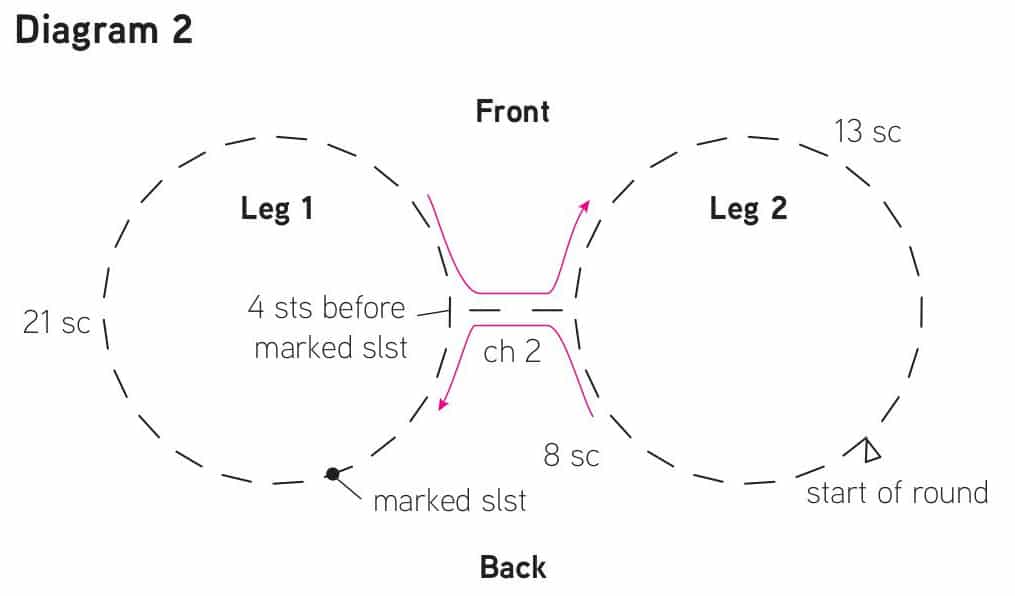
Round 28: ch1, 8 sc into leg 2, ch2, [1 sc into fourth st before marked slst, 3 sc, 1 sc into same st as marked slst, 16 sc] on leg 1, 2 sc into ch2 and 13 sc into remaining sts of leg 2, slst to join. (46 sts)
Round 29: ch1, 8 sc into leg 2, 2 sc in opposite side of ch2, [dec, 21 sc] on leg 1, [dec, 11 sc] on remaining sts of leg 2, slst to join. (44 sts)
Note: stuff as you go along.
Rounds 30–33 (4 rounds): ch1, 1 sc in each st around, slst to join.
Round 34: ch1, 1 sc in each st around, work an additional 10 sc in order to start next round in middle of back, slst to join.
Round 35: ch1, 14 sc, dec, 11 sc, dec, 15 sc, slst to join. (42 sts)
Round 36: ch1, 1 sc in each st around, slst to join.
Round 37: ch1, 13 sc, dec, 11 sc, dec, 14 sc, slst to join. (40 sts)
Round 38: ch1, 1 sc in each st around, slst to join.
Round 39: ch1, [8 sc, dec] 4 times, slst to join. (36 sts)
Rounds 40 and 41 (2 rounds): ch1, 1 sc in each st around, slst to join.
Round 42: ch1, [7 sc, dec] 4 times, slst to join. (32 sts)
Round 43: ch1, 1 sc in each st around, slst to join.
Round 44: ch1, (6 sc, dec) 4 times, change to Marble, slst BLO to join. (28 sts)
Round 45: ch1, 1 sc BLO of each st around, slst to join.
Round 46: ch1, [5 sc, dec] 4 times, slst to join. (24 sts)
Round 47: ch1, 1 sc in each st around, slst to join.
Round 48: ch1, 6 sc, dec, 10 sc, dec, 4 sc, slst to join. (22 sts)
Round 49: ch1, 1 sc in each st around, slst to join.
Round 50: ch1, 5 sc, dec, 9 sc, dec, 4 sc, change to Ecru, slst BLO to join. (20 sts)
Round 51: ch1, [3 sc BLO, dec BLO] 4 times, slst to join. (16 sts)
Round 52: ch1, [3 sc, dec] twice, 4 sc, dec, slst to join. (13 sts)
Rounds 53–63 (11 rounds): ch1, 1 sc in each st around, slst to join.
Round 64: ch1, 5 sc, dec, 6 sc, slst to join. (12 sts)
Note: strengthen the neck (see Techniques: Strengthening the Neck).
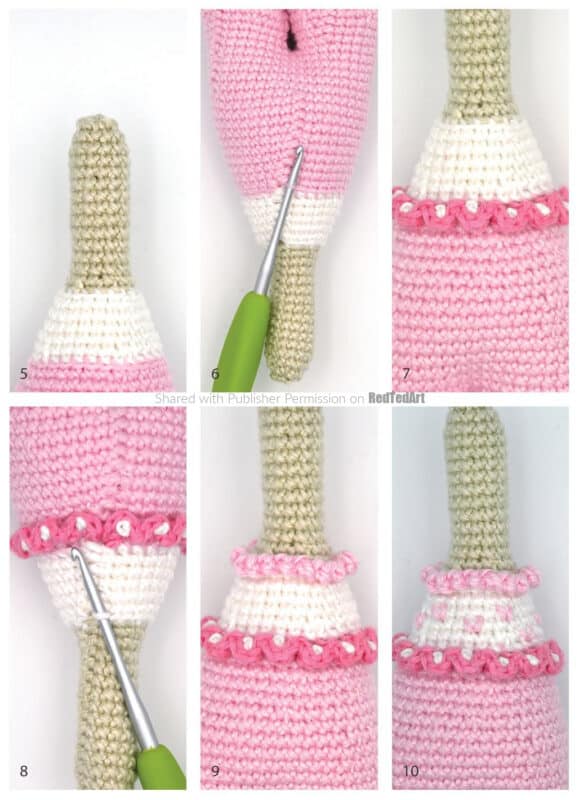
Round 65: ch1, dec 6 times, slst to join. (6 sts)
Cut the yarn and fasten off (image 5).
Holding the body neck down, join Peony Pink yarn to FLO of first st of Round 44 (image 6), [(1 sc, 2 hdc, 1 sc) FLO of same st, slst] 14 times.
Fasten off and weave in ends.
Using Marble, embroider French knots in the 14 “wavelets” to hold them against the body (image 7).
Holding the body neck down, join Blossom yarn to FLO of first st of Round 50 (image 8), [ch2, slst] 20 times.
Fasten off and weave in ends (image 9).
Using Blossom, embroider little “V”s on the top of the body (image 10).
HEART
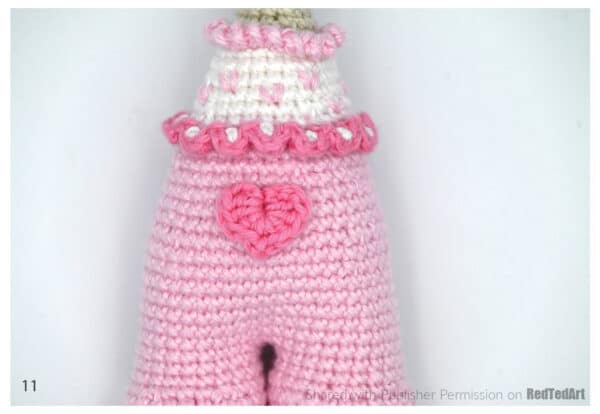
Using Peony Pink, make MR.
Round 1: ch3, 2 dc, 1 hdc, 1 sc, ch2, 1 sc, 1 hdc, 2 dc, ch3, slst into MR.
Fasten off and cut, leaving enough yarn for sewing to the body. Sew the heart to center front of body (image 11).
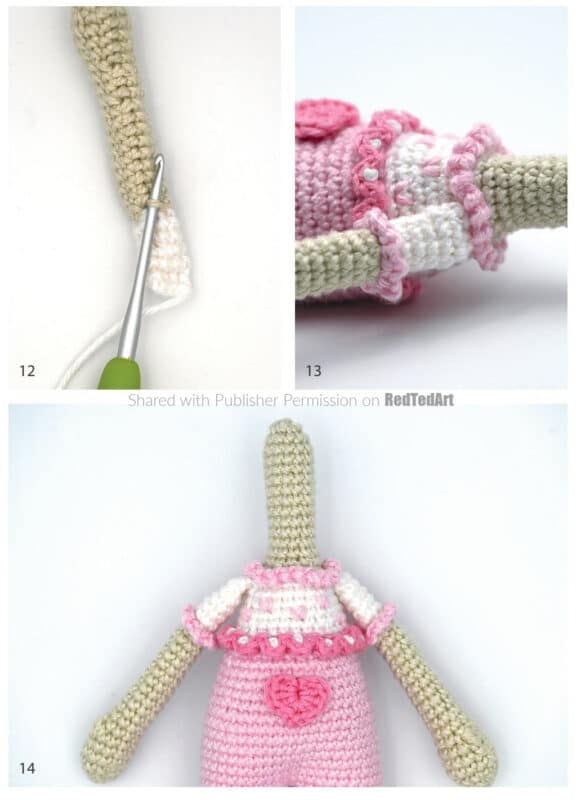
Fasten off and cut, leaving enough yarn for sewing to the body.
Join Blossom yarn to FLO of first st of Round 19 (image 12), [ch2, slst] 7 times.
Fasten off and weave in ends.
Sew one arm to each side of the body, just below the neck, ensuring that the thumbs are positioned at the front (images 13, 14).
Head
Using Ecru, make MR.
Round 1: 6 sc into MR, slst to join. (6 sts)
Round 2: ch1, inc in each st around, slst to join. (12 sts)
Round 3: ch1, [1 sc, inc] 6 times, slst to join. (18 sts)
Round 4: ch1, [1 sc, inc, 1 sc] 6 times, slst to join. (24 sts)
Round 5: ch1, [3 sc, inc] 6 times, slst to join. (30 sts)
Round 6: ch1, [2 sc, inc, 2 sc] 6 times, slst to join. (36 sts)
Round 7: ch1, [5 sc, inc] 6 times, slst to join. (42 sts)
Round 8: ch1, [3 sc, inc, 3 sc] 6 times, slst to join. (48 sts)
Round 9: ch1, [7 sc, inc] 6 times, slst to join. (54 sts)
Round 10: ch1, [4 sc, inc, 4 sc] 6 times, slst to join. (60 sts)
Round 11: ch1, 1 sc in each st around, slst to join.
Round 12: ch1, [9 sc, inc] 6 times, slst to join. (66 sts)
Round 13: ch1, 1 sc in each st around, slst to join.
Round 14: ch1, 16 sc, inc, 32 sc, inc, 16 sc, slst to join. (68 sts)
Rounds 15–23 (9 rounds): ch1, 1 sc in each st around, slst to join.
Round 24: ch1, 28 sc, ch1, sk 1 st, 10 sc, ch1, sk 1 st, 28 sc, slst to join.
Round 25: ch1, 28 sc, 1 sc into ch, 10 sc, 1 sc into ch, 28 sc, slst to join.
Round 26: ch1, 16 sc, dec, 32 sc, dec, 16 sc, slst to join. (66 sts)
Round 27: ch1, 1 sc in each st around, slst to join.
Round 28: ch1, 15 sc, dec, 32 sc, dec, 15 sc, slst to join. (64 sts)
Insert the eyes into the holes formed by the skipped sts in Round 24.
Round 29: ch1, [14 sc, dec] 4 times, slst to join. (60 sts)
Round 30: ch1, [4 sc, dec, 4 sc] 6 times, slst to join. (54 sts)
Round 31: ch1, [7 sc, dec] 6 times, slst to join. (48 sts)
Round 32: ch1, [4 sc, dec] 8 times, slst to join. (40 sts)
Round 33: ch1, [3 sc, dec] 8 times, slst to join. (32 sts)
Start to stuff.
Round 34: ch1, [2 sc, dec] 8 times, slst to join. (24 sts)
Round 35: ch1, [1 sc, dec] 8 times, slst BLO to join. (16 sts)
Round 36: ch1, 1 sc BLO of each st around, slst to join.
Rounds 37–41 (5 rounds): ch1, 1 sc in each st around, slst to join.
Fasten off and weave in ends. Complete the stuffing.
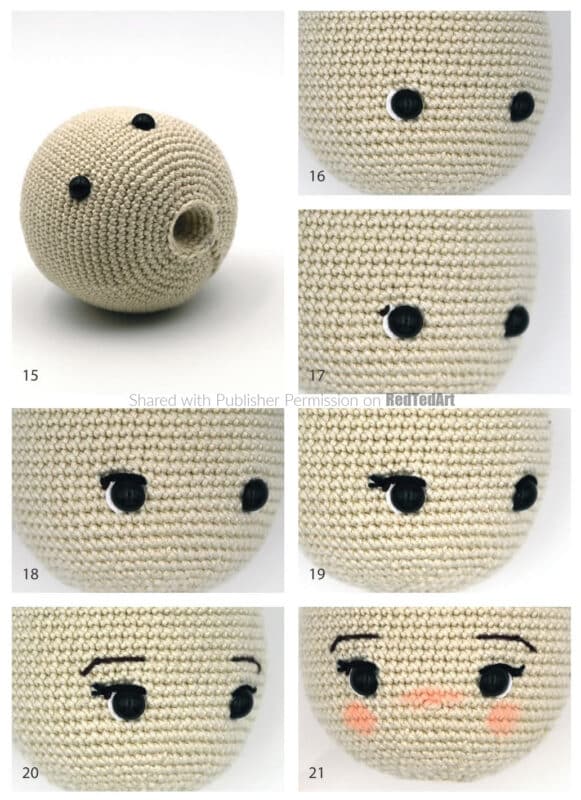
Push Rounds 36–41 inside the head (image 15).
Using White floss, embroider the whites of the eyes (image 16), then add a touch of Brown floss to the sides of the eyes (image 17).
Using Black floss, embroider the black above the eyes (image 18) and finish by embroidering the eyelashes (image 19).
Using the Brown floss, embroider the eyebrows between Rounds 20 and 22 (image 20).
Using Ecru, embroider the nose between Rounds 26 and 27 (image 21).
Use a brush and some blush to add a little color to the cheeks and above the nose (image 21).
Note: the circumference of the head once stuffed is approximately 7½in (19cm).
EARS (MAKE 2)
Using Ecru, make MR.
Round 1: 1 sc, 4 hdc, 1 sc into MR. (6 sts)
Fasten off, leaving sufficient yarn for sewing to the head.
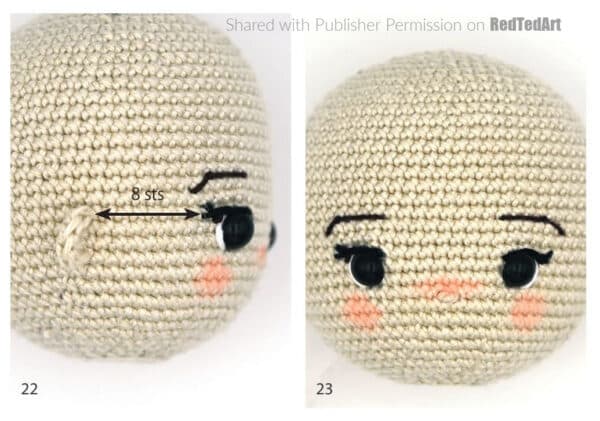
Sew one ear to each side of the head between Rounds 23 and 27, leaving a gap of 8 sts between ear and eye (image 22, image 23).
ATTACH THE HEAD
Using Ecru, attach the head according to instructions in Techniques: Attaching the Head. Leave 3 rounds in Ecru visible.
Hair
PART 1
Using Vanilla, make MR.
Round 1: 6 sc into MR, slst to join. (6 sts)
Round 2: ch1, inc in each st around, slst FLO to join. (12 sts)
Round 3: ch1, [1 sc FLO, inc FLO] 6 times, slst FLO to join. (18 sts)
Round 4: ch1, [1 sc FLO, inc FLO, 1 sc FLO] 6 times, slst to join. (24 sts)
Round 5: ch1, [3 sc, inc] 6 times, slst to join. (30 sts)
Do not cut the yarn and continue with the strands of hair.
Note: it is the WS of the strands of hair that will be visible.
Note: if you are left-handed, reverse the order: start with strand 20 and finish with strand 1.
Strand 1: ch35, and starting in second ch from hook: slst, 33 sc, slst into next st of Round 5 to join.
Strand 2: ch19, and starting in second ch from hook: slst, 1 sc, 16 hdc, slst into next st of Round 5 to join.
Strand 3: ch17, and starting in second ch from hook: slst, 1 sc, 14 hdc, slst into next st of Round 5 to join.
Strand 4: ch15, and starting in second ch from hook: slst, 1 sc, 12 hdc, slst into next st of Round 5 to join.
Strand 5: ch11, and starting in second ch from hook: slst, 1 sc, 8 hdc, slst into next st of Round 5 to join.
Strand 6: ch21, and starting in second ch from hook: slst, 1 sc, 18 hdc, slst into next st of Round 5 to join.
Strand 7: ch23, and starting in second ch from hook: slst, 1 sc, 20 hdc, slst into next st of Round 5 to join.
Strand 8: ch35, and starting in second ch from hook: slst, 33 sc, slst into next st of Round 5 to join.
Strand 9: ch23, and starting in second ch from hook: slst, 1 sc, 20 hdc, slst into next st of Round 5 to join.
Strands 10–19 (10 strands): ch30, and starting in third ch from hook: 28 hdc, sk 1 st, slst into next st of Round 5 to join.
Strand 20: ch17, and starting in second ch from hook: 16 sc, slst into next st of Round 5 to join.
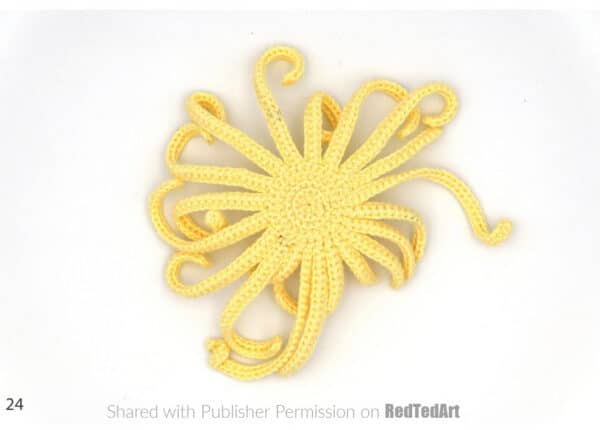
Fasten off and weave in ends (image 24 below).
PART 2
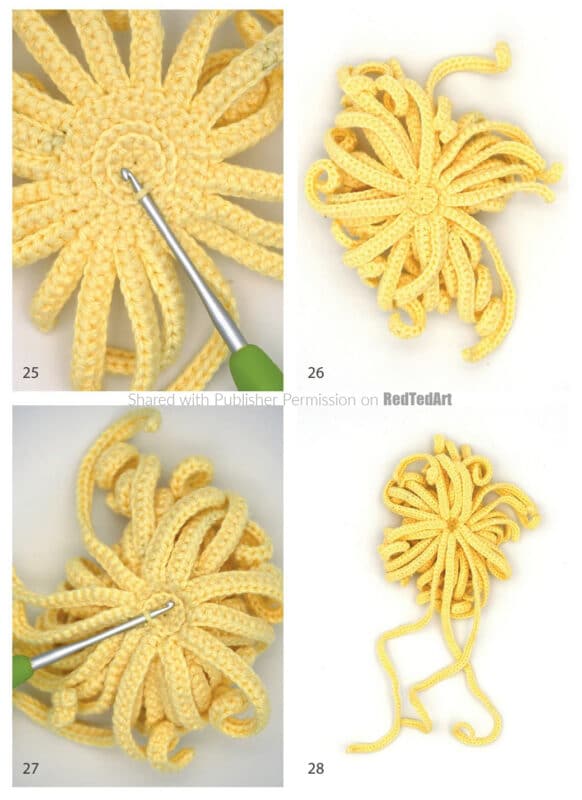
Join Vanilla yarn to BLO of first st of Round 3 of Part 1 (image 25).
Note: if you are left-handed, reverse the order: start with strand 12 and finish with strand 1.
Strand 1: ch33, and starting in second ch from hook: slst, 31 sc, slst BLO of next st of Round 3 to join.
Strand 2: ch20, and starting in second ch from hook: slst, 18 sc, slst BLO of next st of Round 3 to join.
Strands 3 and 4 (2 strands): ch18, and starting in second ch from hook: slst, 16 sc, slst BLO of next st of Round 3 to join.
Strand 5: ch33, and starting in second ch from hook: slst, 31 sc, slst BLO of next st of Round 3 to join.
Strands 6–11 (6 strands): ch33, and starting in third ch from hook: 31 hdc, sk 1 st, slst BLO of next st of Round 3 to join.
Strand 12: ch33, and starting in third ch from hook: 31 hdc, slst BLO of next st of Round 3 to join.
Fasten off and weave in ends (image 26).
PART 3
Join Vanilla yarn to BLO of first st of Round 2 of Part 1 (image 27).
Note: if you are left-handed, reverse the order: start with strand 8 and finish with strand 1.
Strand 1: ch33, and starting in third ch from hook: 31 hdc, sk 1 st, slst BLO of next st of Round 2.
Strands 2–4 (3 strands): ch80, and starting in second ch from hook: slst, 78 sc, slst BLO of next st of Round 2.
Strands 5–7 (3 strands): ch33, and starting in third ch from hook: 31 hdc, sk 1 st, slst BLO of next st of Round 2.
Strand 8: ch33, and starting in third ch from hook: 31 hdc, slst BLO of first st of Round 2.
Fasten off and weave in ends (image 28).
ATTACH THE HAIR
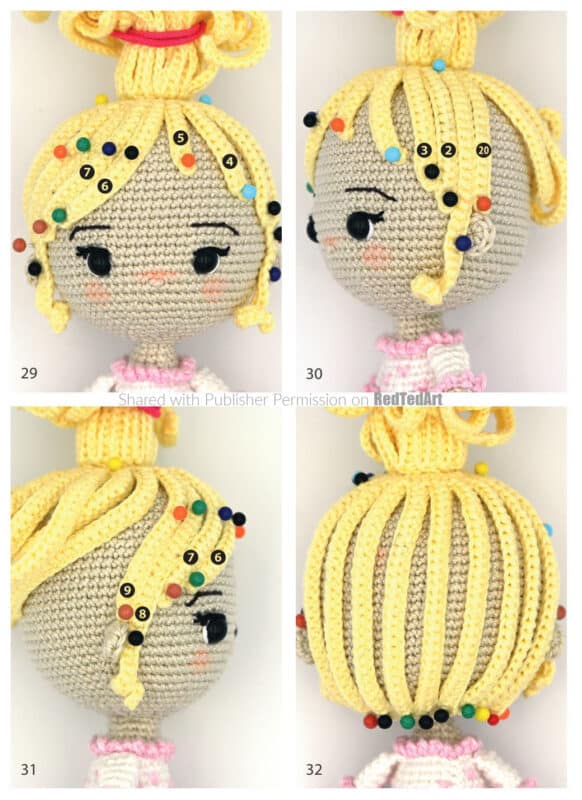
Arrange the hair on the head, starting by placing the center of the MR of the hair on the center of the MR of the head.
Hold in place with a pin. Holding Parts 2 and 3 together on top of the head with hair elastic will make things easier.
Part 1: position strands 1–9 and strand 20 on the forehead and the sides (images 29–31).
Position strands 10–19 around the head (image 32). It does not matter if there are a few little gaps between the strands – they will be filled in later.
Stick down the strands one by one, applying glue to each strand. Hold in place with pins until the glue has dried.
Part 2: stick strands 2–4 to the forehead (image 33).
Stick the other strands around the head (image 34).
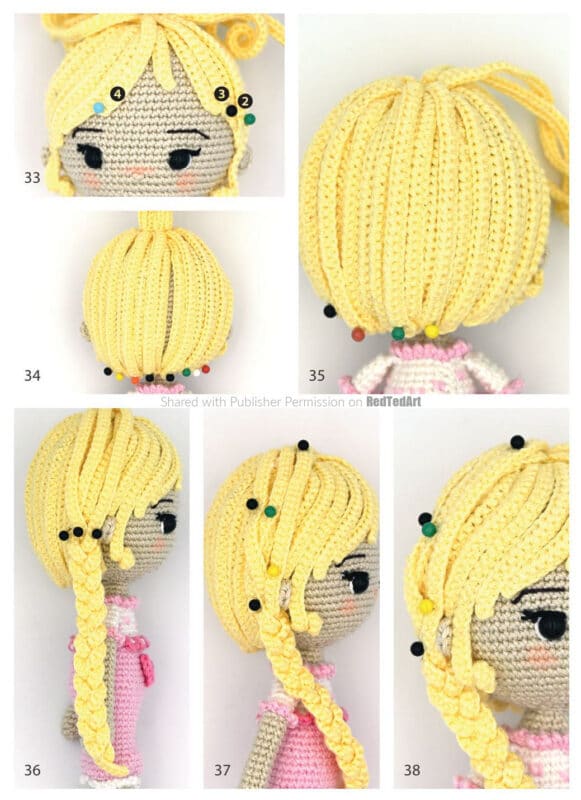
Part 3: stick all the strands (except strands 2–4) around the head (image 35).
Pin the 3 remaining strands to the side of the head and plait a braid. Glue the end so it does not come undone (image 36).
Stick the top of the braid to the head, bringing it a little towards you (image 37,image 38).
Tie a strand of Blossom yarn around the braid (image 39 below).
RABBIT EARS (MAKE 2)
Note: do not stuff. Work in spiral rounds.
Using Blossom, make MR.
Round 1: 6 sc into MR. (6 sts)
Round 2: [1 sc, inc] 3 times. (9 sts)
Round 3: 1 sc in each st around.
Round 4: [2 sc, inc] 3 times. (12 sts)
Round 5: [3 sc, inc] 3 times. (15 sts)
Round 6: [4 sc, inc] 3 times. (18 sts)
Round 7: 1 sc in each st around.
Round 8: [5 sc, inc] 3 times. (21 sts)
Rounds 9 and 10 (2 rounds): 1 sc in each st around. (21 sts)
Round 11: [5 sc, dec] 3 times. (18 sts)
Round 12: 1 sc in each st around.
Round 13: [4 sc, dec] 3 times. (15 sts)
Round 14: 1 sc in each st around.
Round 15: [3 sc, dec] 3 times. (12 sts)
Rounds 16 and 17 (2 rounds): 1 sc in each st around.
Fasten off, leaving sufficient yarn for sewing to the head.
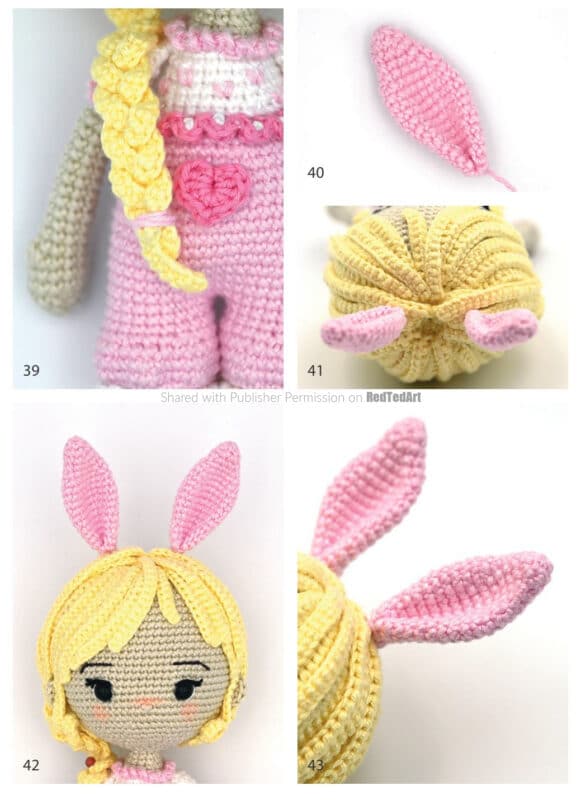
Fold the base of the ear and sew (image 40 above).
Sew the ears to the top of the head (images 41–43 above).
MAGIC WAND
Note: work in spiral rounds.
Using Peony Pink, make MR.
Round 1: 5 sc into MR. (5 sts)
Round 2: inc in each st around. (10 sts)
Cut the yarn and work an invisible finish.
Repeat Rounds 1 and 2, but do not cut the yarn. Bring the pieces together as follows:
Round 3: 10 sc into first piece, 10 sc into second piece. (20 sts)
Round 4: 1 sc in each st around.
Round 5: [3 sc, dec] 4 times. (16 sts)
Round 6: [2 sc, dec] 4 times. (12 sts)
Round 7: [1 sc, dec] 4 times. (8 sts)
Stuff.
Round 8: dec 4 times. (4 sts)
Cut the yarn and fasten off.
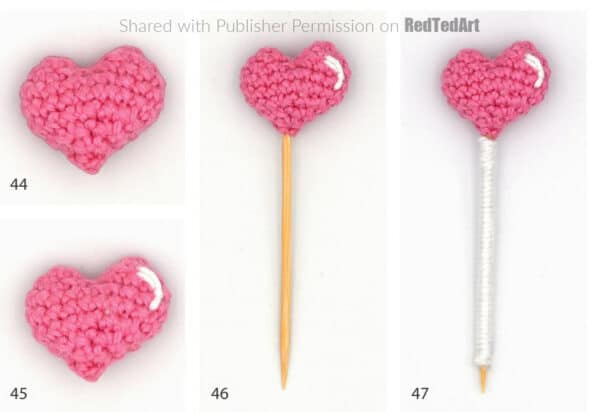
Using Peony Pink, close the hole between the 2 “bumps” of the heart (images 44).
Using Marble, embroider a little “comma” on the side of the heart (images 45).
Apply some glue to one end of a toothpick and insert into the heart (images 46).
Wind the Marble yarn around the toothpick, gluing as you go, leaving one end free (images 47).
Shoes (make 2)
SOLES Using Peony Pink, make the soles.
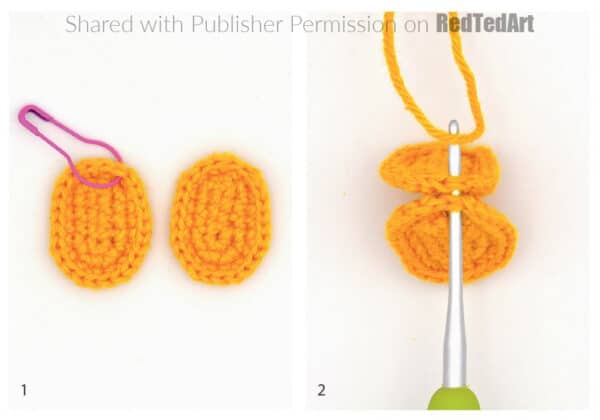
Note: work the soles in ovals around a foundation chain.
Using Peony Pink, ch5, and start in the second ch from hook. (Note the color in the image is different, as this is part of the “general” instructions of the book – your soles need to be made using Peony Pink).
Round 1: inc, 2 sc, 4 sc into last ch to pass to other side of foundation chain, 3 sc. (11 sts)
Round 2: inc twice, 2 sc, inc 4 times, 2 sc, inc. (18 sts)
Round 3: [1 sc, inc] twice, 2 sc, [1 sc, inc] 4 times, 3 sc, inc. (25 sts)
Cut the yarn and work an invisible finish.
Mark the finishing stitch. Work another identical sole, but without marking the finishing stitch (image 1).
Lay one piece on top of the other, WS together, aligning the sts.
Taking the 2 pieces together, join the color given in the instructions into the finishing stitch and the stitch facing it (image 2), and work as follows:
Round 1: 25 slst. (25 sts)
Fasten off and weave in ends. Then continue the shoes according to the instructions given for the different projects.
MAIN BODY OF SHOE
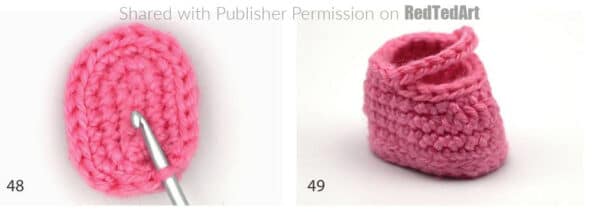
Join Peony Pink yarn to BLO of third slst of previous round (image 48).
Round 1: 25 sc BLO, slst to join. (25 sts)
Round 2: ch1, 1 sc in each st around, slst to join.
Round 3: ch1, 9 sc, 3 hdc, 3 dc, 3 hdc, 7 sc, slst to join.
Round 4: ch1, 9 sc, dec twice, 1 sc, dec twice, 7 sc, slst to join. (21 sts)
Round 5: ch1, 7 sc, 10 slst, 4 sc. Round 6: 7 slst, ch10, sk 10 sts, 4 sc. Fasten off and weave in ends (image 49).
The Little Companions
Mimi’s little companion is the “big companion” from the main section of the book. The companions all share the Big, Medium or Small body shape. Here we will give the Big Companion a go!
BIG COMPANION – BODY
Using Peony Pink, make MR, and crochet in joined rounds.
Round 1: 6 sc into MR, slst to join. (6 sts)
Round 2: ch1, inc in each st around, slst to join. (12 sts)
Round 3: ch1, [1 sc, inc] 6 times, slst to join. (18 sts)
Round 4: ch1, [1 sc, inc, 1 sc] 6 times, slst to join. (24 sts)
Round 5: ch1, 1 sc in each st around, slst to join.
Round 6: ch1, [7 sc, inc] 3 times, slst to join. (27 sts)
Round 7: ch1, 1 sc in each st around, slst to join.
Round 8: ch1, [4 sc, inc, 4 sc] 3 times, slst to join. (30 sts)
Round 9: ch1, 1 sc in each st around, slst to join.
Round 10: ch1, [9 sc, inc] 3 times, slst to join. (33 sts)
Round 11: ch1, 1 sc in each st around, slst to join.
Round 12: ch1, [5 sc, inc, 5 sc] 3 times, slst to join. (36 sts)
Round 13: ch1, 1 sc in each st around, slst to join.
Round 14: ch1, [11 sc, inc] 3 times, slst to join. (39 sts)
Round 15: ch1, 1 sc in each st around, slst to join.
Round 16: ch1, [6 sc, inc, 6 sc] 3 times, slst to join. (42 sts)
Round 17: ch1, 1 sc in each st around, slst to join.
Round 18: ch1, [13 sc, inc] 3 times, slst to join. (45 sts)
Round 19: ch1, 1 sc in each st around, slst to join.
Round 20: ch1, [7 sc, inc, 7 sc] 3 times, slst to join. (48 sts)
Rounds 21 and 22 (2 rounds): ch1, 1 sc in each st around, slst to join.
Round 23: ch1, [6 sc, dec] 6 times, slst to join. (42 sts)
Round 24: ch1, [5 sc, dec] 6 times, slst BLO to join. (36 sts)
Round 25: ch1, [4 sc BLO, dec BLO] 6 times, slst to join. (30 sts)
Round 26: ch1, [3 sc, dec] 6 times, slst to join. (24 sts)
Round 27: ch1, [2 sc, dec] 6 times, slst to join. (18 sts) Stuff.
Round 28: ch1, [1 sc, dec] 6 times, slst to join. (12 sts)
Round 29: ch1, dec 6 times, slst to join. (6 sts)
Cut the yarn and fasten off.
Using the Black floss, embroider the eyes on Round 10, leaving a gap of 4 sts between them. Using the White floss, embroider 1 st in each eye. (More step images are provided in the book)
Ears (make 2)
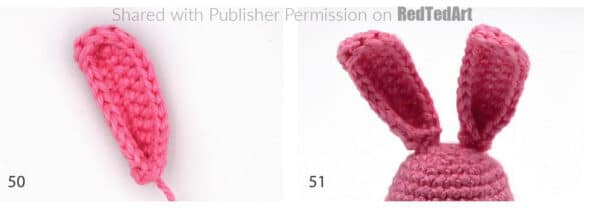
Note: work the ears along a foundation chain for Row 1 and as an oval in Round 2. Using Peony Pink, ch11 and start in second ch from hook.
Row 1: 3 sc into same st, 9 sc, ch1, turn. (12 sts)
Round 2: 1 sc, 1 hdc, 7 dc, dc-inc 3 times to pass to other side of chain, 7 dc, 1 hdc, 1 sc. (24 sts)
Fasten off, leaving sufficient yarn for sewing to to body.
Fold the base of the ear in half and sew (image 50). Sew the ears to the top of the body (image 51).
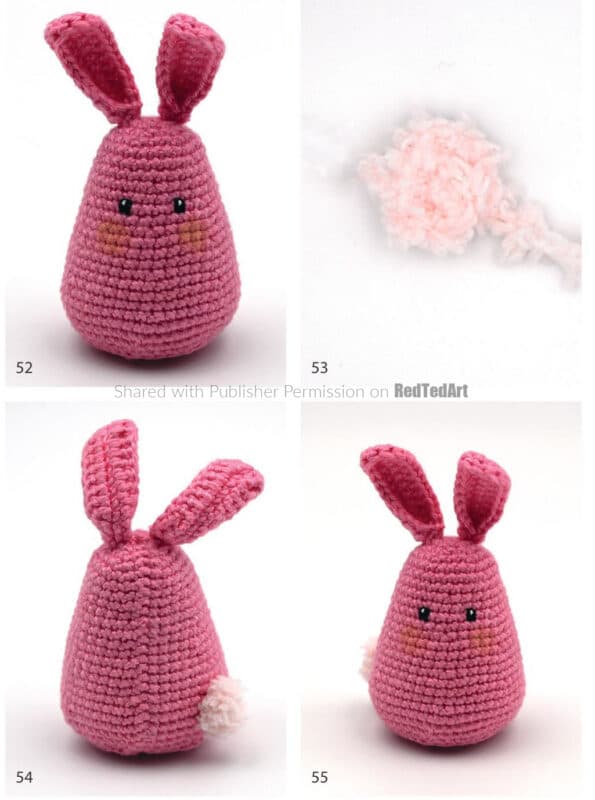
Add some blush under the eyes (image 52 below).
Tail
Using Pearl, ch10.
Roll up the chain to form a circle and sew into place (image 53).
Sew the tail to the back, offset from center (image 54, image 55).
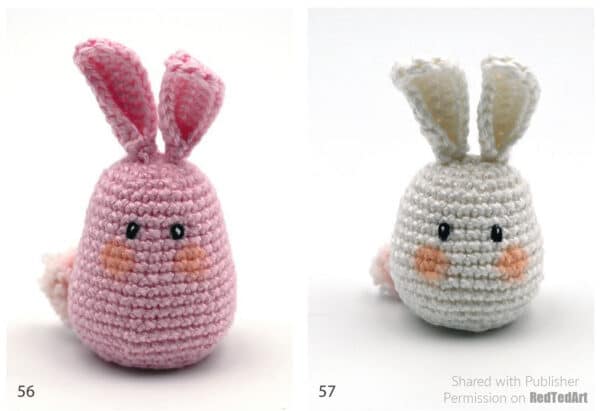
In the book, you get to make a set of medium and small little companions too! Aren’t they super cute too?
Your Mimi Crochet Doll, with accessories and companion, is finished! Congratulations of crocheting your Kawaii Crochet Doll. Isn’t it gorgeous!
LOVED the pattern? GRAB the book – available on Amazon and all good bookstores!
More wonderful titles for you to try out by David & Charles publishing:
- Quick and easy Candy Cane Crochet Ornament from Kawaii Crochet Christmas
- Have a go at an Amigurumi Lemon from the Kawaii Crochet Card Deck – a super handy card deck, to help you “crochet on the go” or use the resource in a classroom/ group environment
- Take a look at this adorable Amigurumi Walrus from A Year of Amigurumi Friends – 24 adorable characters to crochet throughout the year
- Have a go at this gorgeous pattern crochet throw from Maximalist Mosaic Crochet