
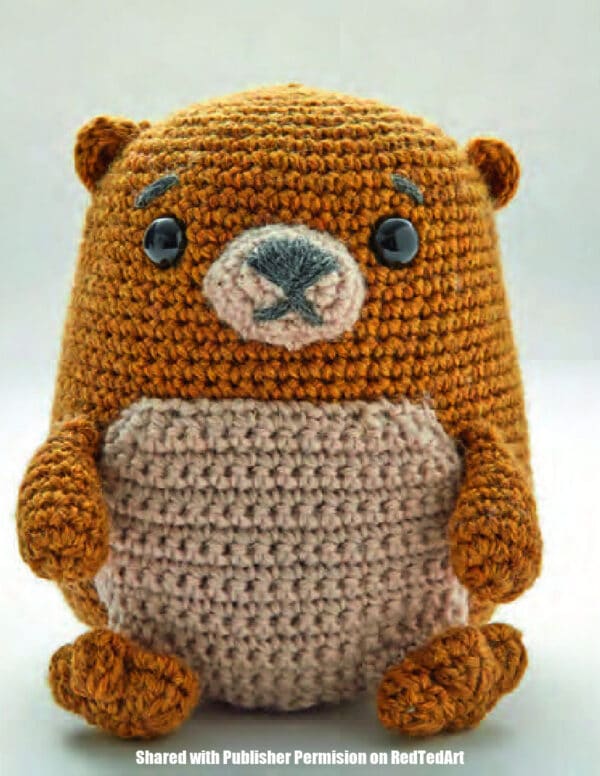
Free Badlans Prairie Dogs Crochet Pattern
Another day, another super duper cute crochet pattern! Today, we are taking a look at Crocheting the National Parks book (more info below), with a fantastic try before you buy projects of the Badlands Pairie Dog Crochet Pattern! It is a super cute pattern – that works up a as a fantastically huggable toy. You could even use some plush yarn for the extra cuddles!

Please note: this project has been reproduced with permission from the publisher and is not allowed to be republished in any way, without their constent. It is for personal use only.
Also note: affiliate links have been added to this post – should you choose to purchase via these, I will earn a small commission that goes towards the upkeep of this site!
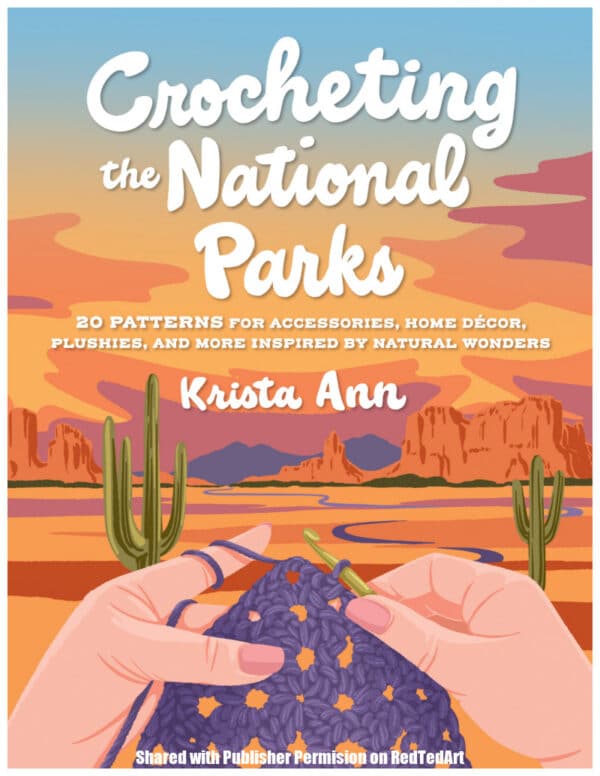
Crocheting the National Parks by Krista Ann
If you love the crocheting and you love the great outdoors, then here is a super lovely book for you to try out: Crocheting the National Parks!
The book is available on Amazon or on the Quarto website!
A collaborative book curated by Krista Ann this book will take you on a wonderful outdoor adventure. Whilst building on the crochet skills from a team of out door loving crocheters. Krista Ann is a wonderful knitter and crocheter, who is passionate about the nature and great outdoors. So what better way to inspire your outdoor aventures with a set of wonderful crochet patterns! From National Parks inspired cozy socks, to handy tote bags and of course today’s sample – cute animal crochet projects. This book of 20 projects contains something for everyone.
Many of crochet patterns by Krista Ann herself, but also a set of fantastic projects by fellow crafters – give you a really fantastic variety of ideas!
The book is available on Amazon or on the Quarto website and other major booksellers!
And now to a Taste from the Book!
The Pairie Dog Crochet Pattern is from the West Coast Wilderness chapter, so let’s get started there!
West Coast Wilderness
From hot and desolate deserts to temperate rainforests, the national parks spread throughout the West Coast are an unexpected range of landscapes ripe with inspiration. You can watch the grizzly bears in Katmai National Park and Preserve gorge themselves on salmon during the summer months. Traveling to the Southwest, while in Saguaro National Park, enjoy the scratchy chatter of a cactus wren as it builds a nest in the nook of a saguaro cactus arm. You can’t help but fall in love with the sounds of Yosemite Falls as it drops 135,000 gallons (511,030 L) of water over its ledge every minute in the ever-popular Yosemite National Park. With thousands of miles of hiking trails spread across the Western United States, there are endless ways to crochet a bit of nature wherever you are.
Badlands Prairie Dog Plushie
by Brenda K.B. Anderson, selected, edited and introduce by Krista Ann
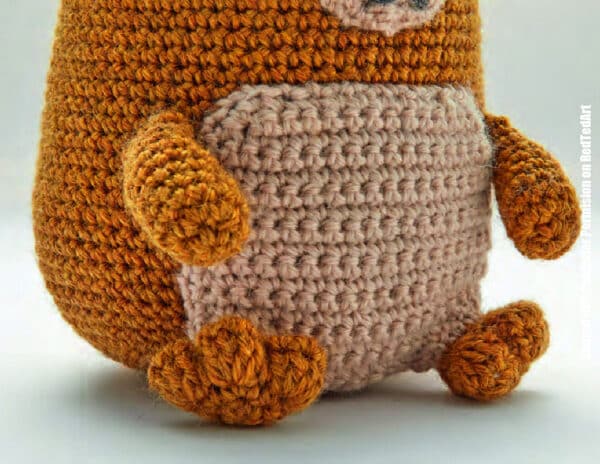
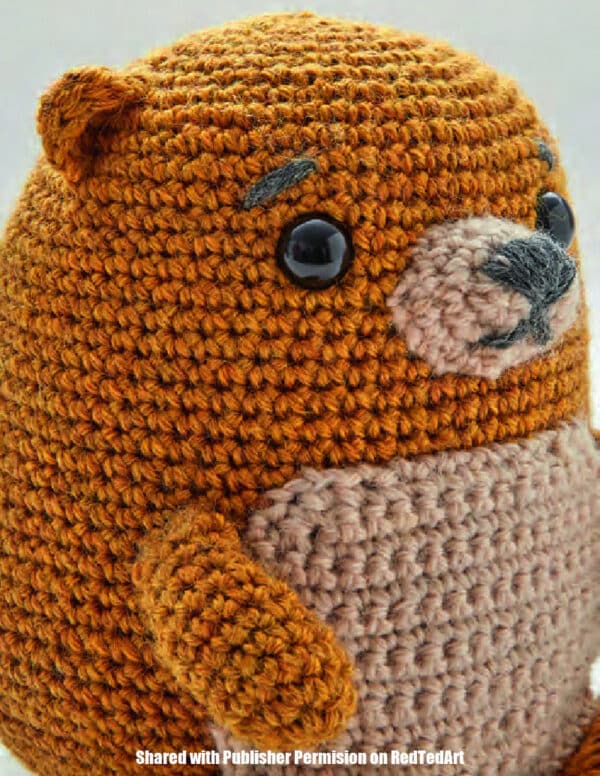
Badlands National Park is home to Roberts Prairie Dog Town, a large colony visible along Badlands Loop Road. Here you can see playful prairie dogs popping in and out of their underground homes, yipping and barking to each other. Now you can make your very own prairie dog for your burrow! This chubby little guy will warm your heart and remind you of the precious wildlife in our parks.
DIFFICULTY LEVEL
Intermediate
FINISHED SIZE
About 6″ (15 cm) tall.
YARN
Worsted Weight (#4 Medium) – Shown in: Knit Picks/We Crochet Wool of the Andes Superwash (100% Superwash Wool; 110 yd [100 m]/1.75 oz [50 g]):
- #26319 Brass Heather (MC), 2 balls,
- #26317 Oyster Heather (C1), 1 ball, and
- a very small amount of 26304 Cobblestone Heather (C2) for tail tip, ear accent, and embroidery of features.
HOOK
Size E/4 (3.5 mm). Adjust hook size as needed to obtain gauge.
NOTIONS
- Yarn needle;
- stitch markers;
- fiberfill;
- two 13 mm black safety eyes;
- quilter’s pins.
GAUGE
Work through Rnd 8 of Head directions. Circle measures 3″ (7.5 cm) in diameter. Gauge isn’t
important for this project. Achieving a sturdy fabric that will not show stuffing between
stitches when it stretches a bit is much more important.
NOTES
The Head/Body is worked in continuous rounds (spiral) from the top down.
Remember to place safety eyes before finishing Body.
Arms, Feet, and Ears are each worked separately in continuous rounds (spiral) and
stitched to body. Belly patch is worked in turned rows from the bottom up, and stitched to body.
Tail is worked in the round, from the top down, (changing color for the tip) and stitched
to body.
Eyebrows, Nose, and Mouth are embroidered with yarn.
Making decreases evenly:
When instructed to work a number of rounds that have decreases
in them, be sure to space out your decreases. Place decreases in a different location each
round (avoid placing a decrease near a decrease from previous rnd). This will ensure
that you have a smooth shape and make your decreases less noticeable.
Using a modified inv-dec:
If you wish your decreases to be less noticeable, try this method:
Insert your hook under the front lp of the next st, and then under both lps of the
following stitch, yo, and pull lp through to front of work, yo and pull through both lps.
Making increases evenly:
When instructed to work a number of rounds that have increases in them, be sure to space out your increases. Place increases in a different location each round (avoid placing an increase near an increase from previous rnd). This will ensure that you have a smooth shape and make your increases less noticeable.
STITCH GUIDE
Standard stitches are used throughout, with these speciality stitches as extras.
Double crochet five stitches together (dc5tog):
This decrease is worked over the next 5 stitches, and decreases your stitch count by 4 stitches. Yo, insert hook into next st, yo and pull up lp, yo and pull through two lps, [yo, insert hook into following st, yo and pull up lp, yo and pull through 2 lps] 4 times, yo and pull through all six lps.
Invisible single crochet decrease (inv-dec):
Insert hook in front lp only of each of next 2 sts, yarn over and draw through both sts,
yarn over and draw through 2 lps on hook— 1 st decreased.
Prairie Dog Crochet Instructions
Head/Body
Rnd 1: With MC, make an adjustable lp, 6 sc into lp, pull on beg yarn tail to close lp, do not join but work in a spiral. Use marker to keep track of bor—6 sts.
Rnd 2: 2 sc into each st—12 sts.
Rnd 3: [Sc in next st, 2 sc in next st] 6 times—18 sts.
Rnd 4: [2 sc in next st, sc in next 2 sts] 6 times—24 sts.
Rnd 5: [Sc in next st, 2 sc in next st, sc in next 2 sts] 6 times—30 sts.
Rnd 6: Before starting Rnd 6, collect 5 stitch markers in a contrasting color from bor marker. Sc in next 3 sts, 2 sc in next st, sc in next st, [sc in next 3 sts, place a contrasting color marker in the first of the last 3 sc made, 2 sc in next st, sc in next st] 5 times—36 sts (6 sts between markers).
Rnds 7–9: Sc in each st around making 1 increase between each set of markers—54 sts (9 sts between markers) after working Rnd 9. Notes: To make an increase, work 2 sc in 1 st. Place increases in a different location each rnd; avoid placing an increase directly above an increase from the prev rnd.
Remove 5th and 6th stitch markers. There are now 3 shorter sections of equal length between the first 4 markers, and one longer one following the 4th marker. Increases will be made only into the 3 shorter sections in following rnds.
Rnd 10: Sc in each st around making 1 increase into each of the first 3 sections between markers—57 sts (10 sts in first 3 sections, 27 sts in last section).
Rnd 11: Sc in each st around.
Rnds 12 and 13: Rep Rnds 10 and 11—60 sts (11 sts in first 3 sections, 27 sts in last section).
Rnd 14: Sc in each st around making 1 increase into each of the first 3 sections between markers—63 sts (12 sts in first 3 sections, 27 sts in last section).
Rnds 15–17: Sc in each st around.
Place eyes before continuing:
The section that lies between the 4th stitch marker and the last st of the rnd is the center front of the Prairie Dog’s face. Place safety eyes between Rnds 14 and 15, with 11 sts (10 holes between sts) between the posts of the safety eyes. Attach backings to secure in place.
Rnds 18–29: Rep Rnds 14–17 another 3 times—72 sts (15 sts in first 3 sections, 27 sts in last section).
Rnds 30–37: Sc in each st around.
Remove all st markers except bor marker.
Do not fasten off.
Decrease for bottom.
Rnd 38: [Sc in next 10 sts, inv-dec, place marker in inv-dec just made] 5 times, sc in next 10 sts, inv-dec— 66 sts (11 sts between markers).
Rnd 39: Sc in each st around.
Rnd 40: Sc in each st around making 1 inv-dec between each set of markers—60 sts (10 sts between markers).
Rnd 41: Sc in each st around.
Rnds 42–45: Rep Rnd 40—36 sts (6 sts between markers) after working Rnd 45.
Stuff head/body firmly, continuing to add stuffing as work progresses.
Rnds 46–49: Repeat Rnd 40—12 sts after working Rnd 49.
Fasten off. Using yarn needle, weave yarn tail through front lps of rem 12 sts and pull tight to close hole.
Muzzle
Rnd 1: With C1, make an adjustable lp, 6 sc into lp, pull on beg yarn tail to close lp, do not join but work in a spiral. Use a marker to keep track of bor—6 sts.
Rnd 2: 2 sc into each st—12 sts.
Rnd 3: [Sc in next st, 2 sc in next st] 6 times—18 sts.
Rnd 4: Sc in each st around.
Slip st and fasten off, leaving a long tail for sewing.
Arms (Make 2)
Rnd 1: With MC, make an adjustable lp, 6 sc into lp, pull on beg yarn tail to close lp, do not join but work in a spiral. Use a marker to keep track of bor—6 sts.
Rnd 2: 2 sc into each st—12 sts.
Rnds 3–5: Sc in each st around—12 sts.
Rnds 6–10: Sc in each st around making 1 inv-dec per rnd—7 sts in Rnd 10.
Fasten off, leaving a long tail.
Tummy Patch
(contrast color patch)
With C1, ch 13.
Row 1: Starting with second ch from hook and working into the bottom of the ch, 2 sc in next ch, sc in each of next 10 ch, 2 sc in next ch, turn—14 sts.
Rows 2 and 3: Ch 1, 2 sc in next st, sc in each st across to last st, 2 sc in last st, turn—18 sc in Row 3.
Rows 4–15: Ch 1, sc in each st, turn.
Rows 16 and 17: Ch 1, sc2tog, sc in each st to last 2 sts, sc2tog, turn—14 sts in Row 17.
Row 18: Ch 1, sc2tog twice, sc in next 6 sts, sc2tog twice, turn—12 sc.
Do not fasten off.
Tummy Patch Edging
Keeping same side facing, rotate Tummy Patch (like turning a steering wheel) in order to work along the row ends. Use a stitch marker to divide the side edge of the tummy into two equal sections. 7 sc into each of the two sections along the side-edge of Tummy Patch*.
Rotate in order to work along foundation chain of Tummy Patch.
1 sc into each of the 12 sts across foundation edge of Tummy Patch, repeat from * to ** once more, sl st in first st at top edge of tummy and fasten off, leaving a long tail for sewing.
Feet (Make 2)
Rnd 1: With MC, make a magic ring, 6 sc into ring, pull on beg yarn tail to tighten ring, do not join now but work in a spiral. Use a stitch marker to keep track bor—6 sts.
Rnd 2: 2 sc into each st—12 sts.
Rnd 3: Sc in next 3 sts, [5 dc in next st, sc in next st] 3 times, sc in next 3 sts—24 sts.
Rnd 4: Sc in next 3 sts, [dc5tog, sc in next st] 3 times, sc in next 3 sts—12 sts.
Rnd 5: [Sc in next st, sc2tog] 4 times, sl st in first st and fasten off—8 sts. Stuff foot and toes with fiberfill stuffing.
Rnd 6: Pull up a lp of C1 in sl st at back of ankle, ch 1, 2 sc in each st, sl st in first sc of rnd and fasten off, leaving a long tail for sewing—16 sts.
Ears (Make 2)
Row 1: With MC, make a magic ring, 6 sc into ring, pull on beg yarn tail to tighten ring, turn—6 sts.
Row 2: Ch 1, sc in each st, turn.
Row 3: Ch 1, sl st in each st.
Fasten off, leaving a long tail for sewing.
Tail
Rnd 1: With C2, make a magic ring, 8 sc into ring, pull on beg yarn tail to close ring, do not join now but work in a spiral—8 sts.
Rnds 2–5: Sc in each st around.
Sl st and fasten off.
Rnd 6: Leaving long tail, make slip knot with MC and place on hook. With slip knot of MC on hook, and starting with any st from last rnd of C2, sc in each st, do not join but work in a spiral. Leave beg yarn tail hanging on outside of tail as it is created. This will be used later for
embroidered detail.
Rnd 7: Sc in next 4 sts, 2 sc in next st, sc in next 3 sts— 9 sts.
Rnds 8–14: Sc in each st.
Fasten off, leaving a long tail for sewing. Stuff tail lightly with fiberfill.
Use MC beg yarn tail to embroider 8 to 9 vertical lines of MC that extend into the C2 section.
Finishing
Block any pieces if necessary.
Stuff Muzzle with fiberfill, then pin Muzzle to face using photos for reference.
The top of the Muzzle should align with the rnd between eyes. Use yarn tails to whip stitch edges of Muzzle in place.
Pin Tummy Patch to front of Body, whip stitch in place around all edges. Stuff each foot with fiberfill, then pin each foot to front of Body, just within lower corners of Tummy Patch. With C1 yarn tails, stitch each foot to Body.
Stuff each arm with a small amount of fiberfill. Flatten arm opening, pin to Body just to the
outside of Tummy Patch and whip stitch arms in place.
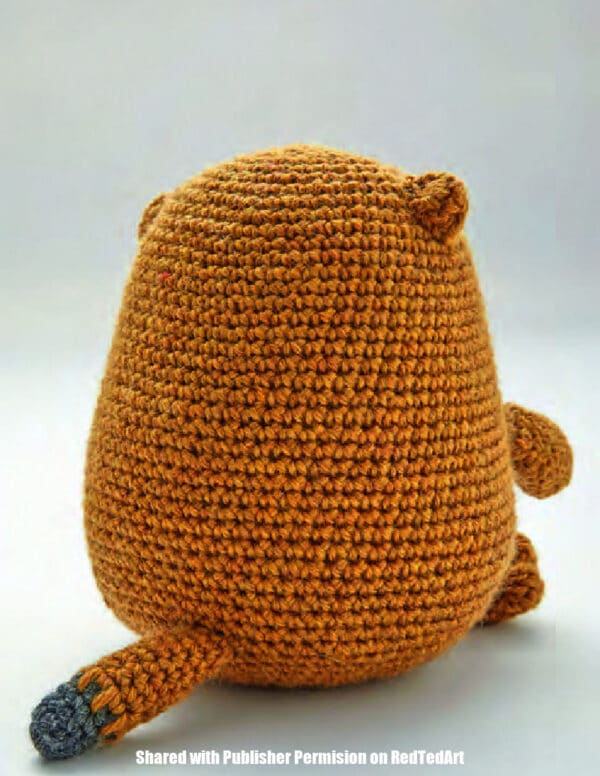
Stuff Tail lightly, then sew Tail to back of Prairie Dog using yarn tails and yarn needle. Using yarn needle and C2, embroider a triangle for a nose, make a short vertical stitch beneath nose, and make an upside down V for mouth. With C2, make a short, dashed line above each eye for eyebrows using photos for reference.
Weave in ends.
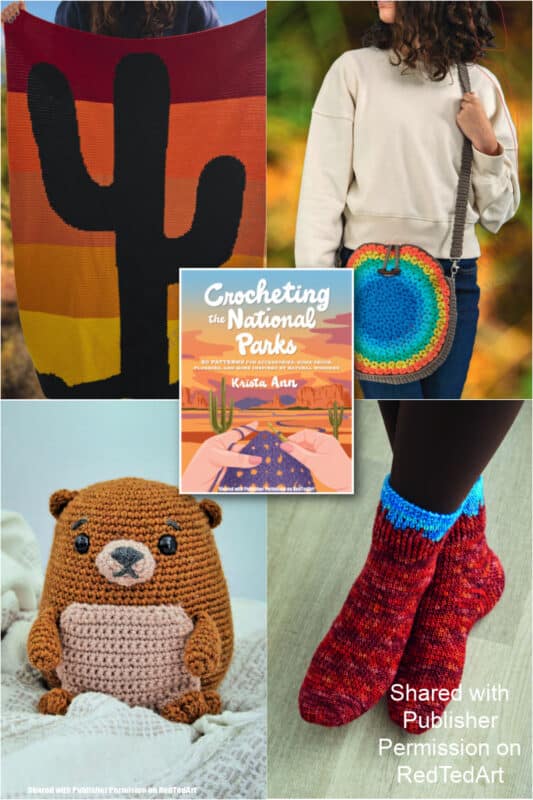
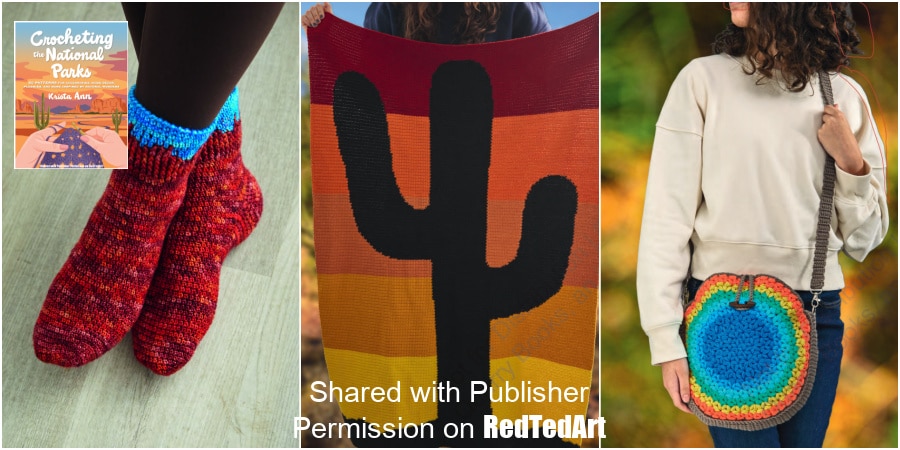
Now you have made your adorable Badlans Pairie Dog Softie… you really do need to check out the rest of the National Parks Crochet Patterns.. what will be next? Will you make yourself some delightfully cozy Bryce Canyon Hoodoo Socks? Or will you go big and make Saguaro at Sunset Blanket? I know what I want to make.. the Yellowstone Grand Prismatic Crossbody Bag!! Whatever you decide on next, be sure to grab yourself a copy of the Crocheting the National Parks book! Available on Amazon or from Quarto directly!
Happy Crochetting!