
Free Girl Elf Crochet Pattern from the Amigurumi Holiday Crochet Book
The holidays are coming closer and with that we get to explore a “Try before you Buy” crochet pattern from a gorgeous new Holiday Amigurumi book. Today, you get a peak at the amazing Amigurumi Girl Elf Crochet Pattern: Holly The Elf.

Please note: this project has been reproduced with permission from the publisher and is not allowed to be republished in any way, without their constent. It is for personal use only.
Also note: affiliate links have been added to this post – should you choose to purchase via these, I will earn a small commission that goes towards the upkeep of this site!
The BOOK
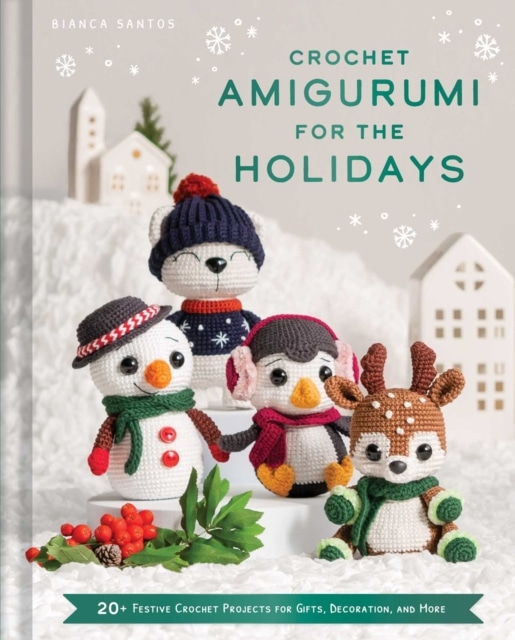
Crochet Amigurumi for the Holidays: 20 FESTIVE CHRISTMAS CROCHET PATTERNS FOR GIFTS, DECORATION AND MORE – by Bianca Santos
by Bianca Santos from Crocheniacs
Soooo to the book. Oh my oh my oh my. This is probably the cutest Holiday Amigurumi Crochet Book out on the market right now! Well, I say right now, it is available for pre-order and will be shipped to you on the 20th Novemeber. YOU HAVE TO GET IT!!!
Bianca is an incredibly talented crochet design, that you may have found on Instagram, Youtube or her website. Each of her patterns is gorgeously designed, with attention to every detail to make it just perfect!
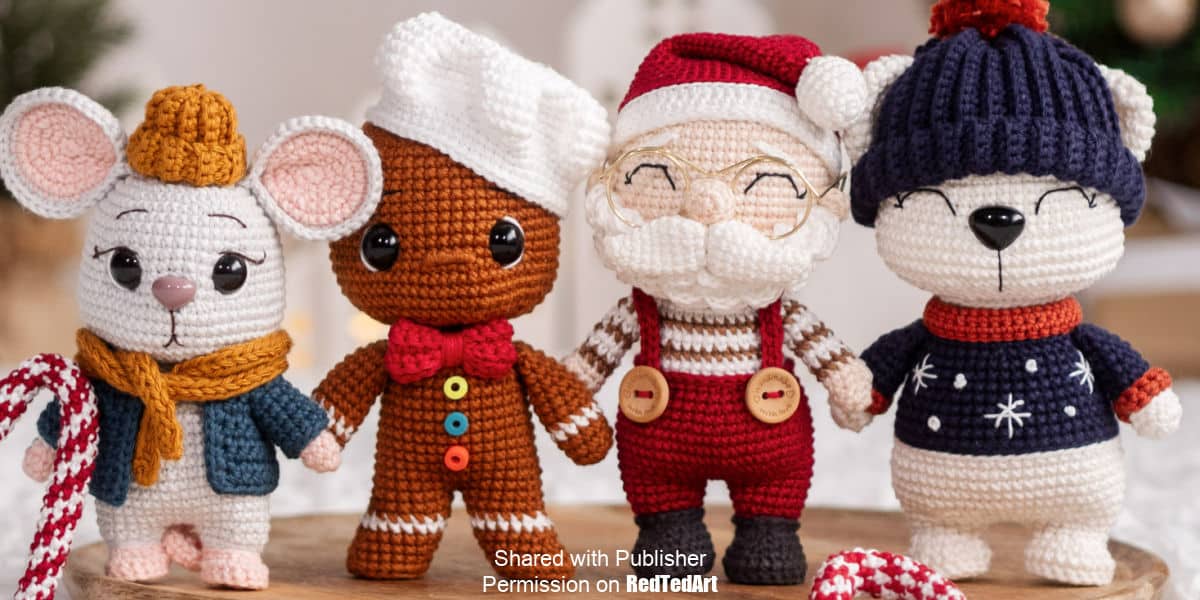
It has 20 cutest of cute projects – perfect for Christmas but also the Winter season beyond (I mean, who doesn’t love that Polar Bear and Snowman on the front cover?!). But of course, you will also find Santa and Mrs Clause, the Elves, Gingerbread people and more more more – such as a cute little bell, candy canes and small gift boxes. Every amigurumi crochet need for the Christmas season.
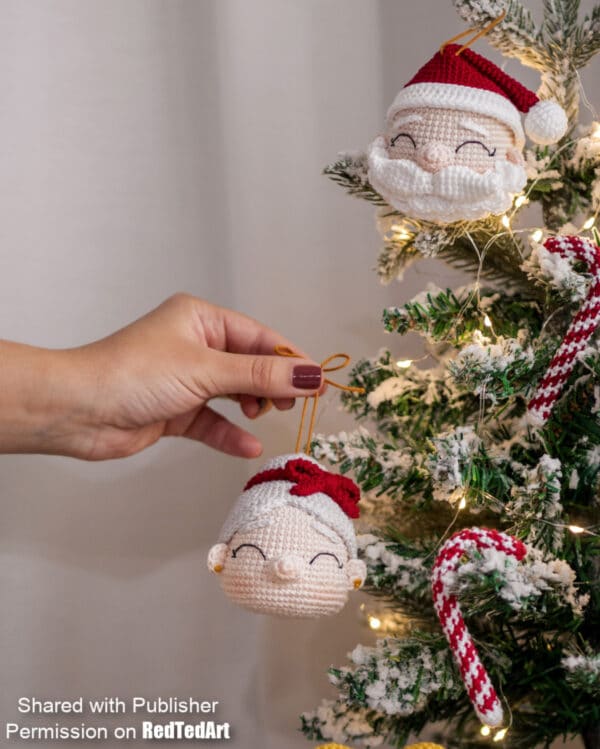
The book is beautifully printed in hardback! And contains a number of QR codes for extra resources, such as – how to turn your Santa Doll into a Christmas ornament. Making this a really versatile project book!
UNSURE? Take a look at the pattern below, see all the additional resources and then grab a copy of the book – it is SO MUCH nice to work “off a book”, than a website.
Get the book on the Insight Editions Website, Amazon and all good (US) retailers!

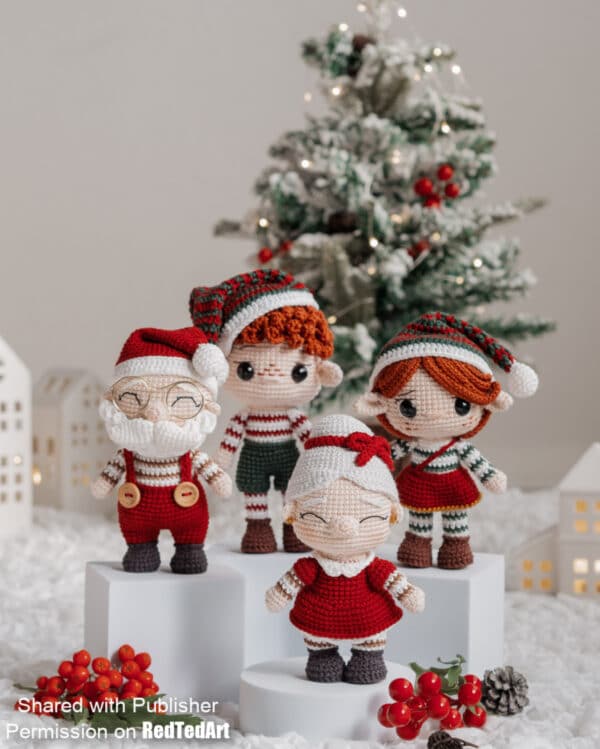
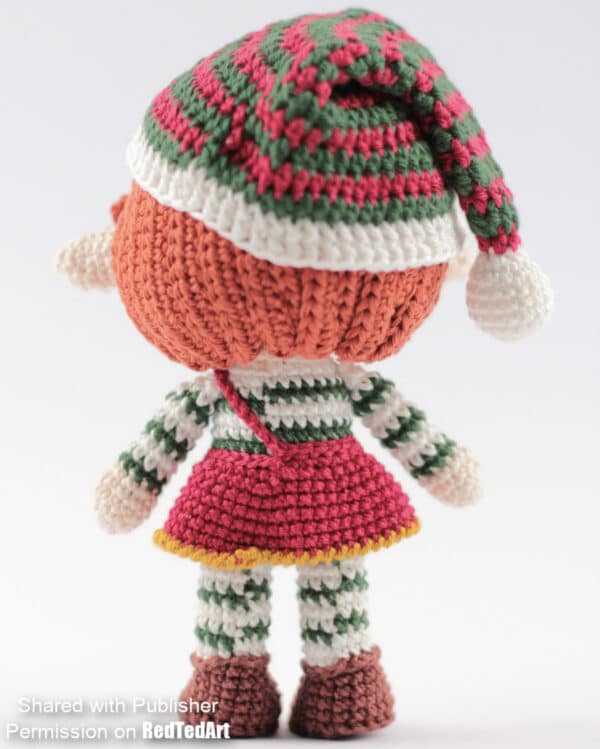
Holly the Elf
by Bianca Santos from Crocheniacs
Elves have always been a beloved part of Christmas, known for their playful spirit and tireless work helping Santa prepare gifts. Holly and Jolly, with their ginger hair, freckles, and the red and green outfits, capture this spirit perfectly.
NOTE USEFUL RESOURCES are available here:
In the book these are linked via QR codes, making the crochet projects in this book incredibly accessible to all!
- General tips and tricks (e.g. don’t over stuff, how to sew a head on correctly etc)
- Holly the Elf specifics (e.g. advice on eye placement and hair)
FINISHED MEASUREMENTS
WHOLE BODY HEIGHT: 5.5 in. / 14 cm
WIDTH: 1.5 in. / 4 cm
HEAD HEIGHT: 2.4 in. / 6 cm
HEAD WIDTH: 3.55 in. / 9 cm
GAUGE
Gauge is not critical for this project. Ensure your stitches are tight so the stuffing won’t show through.
YARN
1 skein of each of these colors:
Fingering weight (#1 super fine) yarn, shown in Hobbii Friends Cotton 8/4 Mercerized (100% cotton, 174 yd. / 160 m per 1.75 oz / 50 g skein
- Skin – 04 Cream (or any skin tone of choice)
- Boots – 12 Chocolate
- Outfit – 01 White & 112 Bottle Green
- Dress/ Hat – 43 Cranberry
- Hair – 17 Cognac
Lace yarn (#0 lace), shown in Hobbii Rainbow Lace (100% cotton, 306 yd. / 280 m per 1.75 oz / 50 g ball)
- Enbroidery – 006 Light Brown
Fingering weight (#1 super fine) yarn, Hobbii Tencel Bamboo Fine (40% Tencel, 60% bamboo viscose, 230 yd. / 210 m per 1.8 oz / 50 g skein)
- Skirt Detail – 17473 Curry
HOOK
NOTIONS
- Polyester stuffing
- Tapestry needle
- Removable stitch markers
- Straight pins
- Craft glue
- Makeup blush (optional)
- Pair of pointy tweezers
- Pair of 12 mm safety eyes
ABBREVIATIONS USED
Terminology throughout uses U.S. terminology
- Ch: Chain
- Sc: Single crochet
- Hdc: Half-double crochet
- D c: Double crochet
- Sl st: Slip stitch
- BLO: Back loop only
- FLO: Front loop only
- Inc: Increase
- Dec: Invisible decrease
- Sc2tog: Sc 2 st together
- St: Stitch/stitches
- Rnd: Round

Holly the Elf’s HEAD
With smaller hook and Cream, make a magic ring.
Rnd 1: 8 sc in ring
Rnd 2: 8 inc [16]
Rnd 3: (1 sc, 1 inc) x 8 [24]
Rnd 4: 1 sc, 1 inc, (2 sc, 1 inc) x 7, 1 sc [32]
Rnd 5: (3 sc, 1 inc) x 8 [40]
Rnd 6: 2 sc, 1 inc, (4 sc, 1 inc) x 7, 2 sc [48]
Rnd 7: (5 sc, 1 inc) x 8 [56]
Rnds 8–17: 56 sc (10 rounds)
Rnd 18: (3 sc, 1 inc) x 14 [70]
Insert the Eyes between rounds 16 and 17 with 7 sc of visible distance.
Rnds 19–21: 70 sc (3 rounds)
Rnd 22: (3 sc, 1 dec) x 14 [56]
Rnd 23: 56 sc
Rnd 24: 1 sc, 1 dec, (2 sc, 1 dec) x 13, 1 sc [42]
Rnd 25: (5 sc, 1 dec) x 6 [36]
Rnd 26: 2 sc, 1 dec, (4 sc, 1 dec) x 5, 2 sc [30]
Rnd 27: (3 sc, 1 dec) x 6 [24]
Rnd 28: 1 sc, 1 dec, (2 sc, 1 dec) x 5, 1 sc [18]
Rnd 29: (1 sc, 1 dec) x 6 [12]
Rnd 30: 6 dec [6]
Stuff the Head before finishing off with the inverted magic ring.
Make the Nose between rounds 17 and 18, 2 sc away from the Eyes, using the space of 3 sc.
With Light Brown embroider the Eyebrows between rounds 11 and 12, using the space of 4 sc.
With Light Brown embroider the Eyelashes.
With White embroider the eye contour on the outer corner of the Eyes.
With Cognac, make the freckles on the doll’s face, always using the space of 1 sc. Make these stitches just below the Eyes, so that they are:
- 1 stitch between rounds 19 and 20.
- 3 stitches between rounds 20 and 21.
- 1 stitch between rounds 21 and 22.
You can space them however you feel is more harmonic, and even make more or
less freckles.
ELF EARS (Make 2)
With smaller hook and Cream, make a magic ring.
Rnd 1: 6 sc in ring
Rnd 2: (1 sc, 1 inc) x 3 [9]
Rnd 3: 9 sc
Rnd 4: (2 sc, 1 inc) x 3 [12]
Rnds 5–6: 12 sc (2 rounds)
Do not stuff the Ears. Pinch closed the Ears opening and make 6 sc to close it.
Leave a long thread to sew.
Sew the Ears between rounds 16 and 18, 3 sc away from the Eyes.
The Girl Elf’s HAIR
Click on the “Hair Tab” here for additional instructions.
With larger hook and Cognac, make a magic ring.
Rnd 1: 8 sc in ring
Rnd 2: 8 inc [16]
Rnd 3: (1 sc, 1 inc) x 8 [24]
Rnd 4: 1 sc, 1 inc, (2 sc, 1 inc) x 7, 1 sc [32]
Now we will work around the 32 sc of round 4 to make the Hair strands.
Sts 1–9: 22 chains, and from the second chain make 21 Hdc, sc in the next st.
St 10: 9 chains, and from the second chain make 8 Hdc, sc in the next st.
St 11: 1 sc
St 12: 11 chains, and from the second chain make 10 Hdc, sc in the next st.
St 13: 1 sc
St 14: 13 chains, and from the second chain make 12 Hdc, sc in the next st.
St 15: 1 sc
St 16: 15 chains, and from the second chain make 14 Hdc, sc in the next st.
St 17: 1 sc
St 18: 21 chains, and from the second chain make 20 Hdc, sc in the next st.
St 19: 1 sc
St 20: 13 chains, and from the second chain make 12 Hdc, sc in the next st.
St 21: 1 sc
St 22: 11 chains, and from the second chain make 10 Hdc, sc in the next st.
St 23: 9 chains, and from the second chain make 8 Hdc, sc in the next st.
Sts 24–31: 22 chains, and from the second chain make 21 Hdc, sc in the next st.
Note that the marker is behind the Head. The reverse side of the magic ring should stay up.
The strands 1 to 9 and 24 to 32 are behind the Ears. Strands 10 and 23 are above the Ears. Strands 12 to 18 are on the right side and strands 20 and 22 are on the left side.
LEFT LEG
With smaller hook and Chocolate.
We will work on both sides of the chains. Start with 5 chains and from the second chain make:
Rnd 1: 3 sc, in the last chain 3 sc, continue on the other side of the chain 2 sc, 1 inc [10]
Rnd 2: 1 inc, 2 sc, 3 inc, 2 sc,2 inc [16]
Rnd 3: (1 sc, 1 inc), 2 sc, (1 sc, 1 inc) x 3, 2 sc, (1 sc, 1 inc) x 2 [22]
Rnd 4: BPsc 22
Rnds 5–6: 22 sc (2 rounds)
Rnd 7: 6 sc, (1 sc, 1 dec) x 3, 7 sc [19]
Rnd 8: 6 sc, 3 dec, 7 sc [16]
Rnd 9: 6 sc, 1 dec triple, 7 sc [14]
Rnd 10: 14 sc
Rnd 11: FLO 14 sl st
Rnd 12: Change to White. BLO (5 sc, 1 dec) x 2 [12]
Rnd 13: 12 sc
Rnd 14: Change to Bottle Green. 12 sc
Rnds 15–16: Change to White. 12 sc (2 rounds)
Rnd 17: 12 sc
Rnds 18–19: 12 sc (2 rounds)
Rnd 20: 12 sc
Stuff the Leg and fasten off.
If you want your Elf to have flat Feet to stand, make sure that you don’t stuff
them too much and leave them concave.
RIGHT LEG AND BODY
Repeat rounds 1 to 20 of the Left Leg. With the Right Leg, make more 3 sc to reach the side of the Leg using White.
Be sure that both Feet are facing forward at the junction of the Legs.
Make 2 chains and fasten them with 1 sc on the Left Leg. This will be the first stitch of the round.
Rnd 21: 12 sc, 2 sc in the chain, 12 sc, 2 sc in the chains [28]
Rnds 22–27: 28 sc (6 rounds)
Rnd 28: BLO 28 sc
Rnd 29: 28 sc
Rnds 30–31: 28 sc (2 rounds)
Rnd 32: 28 sc
Rnd 33: 28 sc
Rnd 34: (5 sc, 1 dec) x 4 [24]
Rnd 35: Change to Cream, BLO (4 sc, 1 dec) x 4 [20]
Stuff the Body and leave a long thread to sew.
SKIRT
With smaller hook and Cranberry.
Insert the hook in the first loop from round 28.
Rnd 1: 28 sl st
Rnd 2: BLO (3 sc, 1 inc) x 7 [35]
Rnd 3: 2 sc, 1 inc, (4 sc, 1 inc) x 6, 2 sc [42]
Rnd 4: 42 sc
Rnd 5: (5 sc, 1 inc) x 7 [49]
Rnds 6–7: 49 sc (2 rounds)
Rnd 8: Change to Curry and make 49 crab stitches. Finish off.
Insert the hook in the first loop of round 2. Make 18 sl st and 21 chains. Close it with 1 sl st in the last loop of round 2. Keep making sl st in the opposite direction in round 2 (10 sl st), until you reach the base of the Suspender strap. Fasten off.
Elf ARMS (Make 2)
With larger hook and Cream, make a magic ring.
Rnd 1: 6 sc in ring
Rnd 2: (1 sc, 1 inc) x 3 [9]
Rnd 3: 8 sc, 3 Hdc in the same st [11]
Rnd 4: 8 sc, 1 dec triple [9]
Rnd 5: 9 sc
Rnd 6: Change to Green: 9 sc
Rnd 7: Change to White: 9 sc
Rnd 8: 9 sc
Rnd 9: Change to Green: 9 sc
Rnd 10: Change to White: 9 sc
Rnd 11: 9 sc
Rnd 12: Change to Green: 9 sc
Rnd 13: Change to White: 9 sc
Rnd 14: 9 sc
Slightly stuff half of the Arms (until round 8) and leave a
long thread to sew.
Pinch closed the Arm opening and sew it together with the remaining yarn.
Sew the Arms between rounds 33 and 34 with the thumb of the hands facing upward (the thumbs are the 3 Hdc of round 3).
Adjust the strap of the Skirt Suspender by running it over one Arm.
Make the HAT
With smaller hook and White, make a magic ring.
Rnd 1: 6 sc in ring
Rnd 2: 6 inc [12]
Rnd 3: (1 sc, 1 inc) x 6 [18]
Rnds 4–6: 18 sc (3 rounds)
Rnd 7: (1 sc, 1 dec) x 6 [12]
Rnd 8: 6 dec [6]
Rnd 9: Change to Cranberry. 6 Hdc
Rnd 10: Change to Bottle Green. (1 Hdc, 1 inc Hdc) x 3 [9]
Rnd 11: Change to Cranberry. 9 Hdc
Rnd 12: Change to Bottle Green. (2 Hdc, 1 inc Hdc) x 3 [12]
Rnd 13: Change to Cranberry. 12 Hdc
Rnd 14: Change to Bottle Green. 12 Hdc
Rnd 15: Change to Cranberry. 12 Hdc
Rnd 16: Change to Bottle Green. 12 Hdc
Rnd 17: Change to Cranberry. 12 Hdc
Rnd 18: Change to Bottle Green. (1 Hdc, 1 inc Hdc) x 6 [18]
Rnd 19: Change to Cranberry. 18 Hdc
Rnd 20: Change to Bottle Green. 1 Hdc, 1 inc Hdc, (2 Hdc, 1 inc Hdc) x 5, 1 Hdc [24]
Rnd 21: Change to Cranberry. 24 Hdc
Rnd 22: Change to Bottle Green. (2 Hdc, 1 inc Hdc) x 8 [32]
Rnd 23: Change to Cranberry. 32 Hdc
Rnd 24: Change to Bottle Green. (3 Hdc, 1 inc Hdc) x 8 [40]
Rnd 25: Change to Cranberry. 40 Hdc
Rnd 26: Change to Bottle Green. (2 Hdc, 1 inc Hdc), (4 Hdc, 1 inc Hdc) x 7, 2 Hdc [48]
Rnd 27: Change to Cranberry. 48 Hdc
Rnd 28: Change to Bottle Green. (5 Hdc, 1 inc Hdc) x 8 [56]
Rnd 29: Change to Cranberry. 3 Hdc, 1 inc Hdc, (6 Hdc, 1 inc Hdc) x 7, 3 Hdc [64]
Rnd 30: Change to Bottle Green. 64 Hdc
Rnds 31–32: Change to White: 64 Hdc (2 rounds)
Finish off.
If you want to create rosy Cheeks, apply some blush to your Elf’s Cheeks and Nose. Sew the Body to the Head.
TIP: Use pins to keep the pieces aligned while you sew, which helps maintain the correct placement throughout the process.

LOVE this pattern?? TREAT YOURSELF to amazing new book by Bianca Santos from Crocheniacs:
Get the book on the Insight Editions Website, Amazon and all good (US) retailers!