Red Ted Art's Blog

Bringing Colour & Art to Children's Hearts

  • Home
  • About
  • Preschool Crafts
  • Easy Kids Crafts
  • Paper Crafts
  • Free Printables
  • Join Our Newsletter
  • Cookies, Privacy Policies & Disclosure

How to… Crochet a Little Bug Ladybug Hat

April 6, 2012

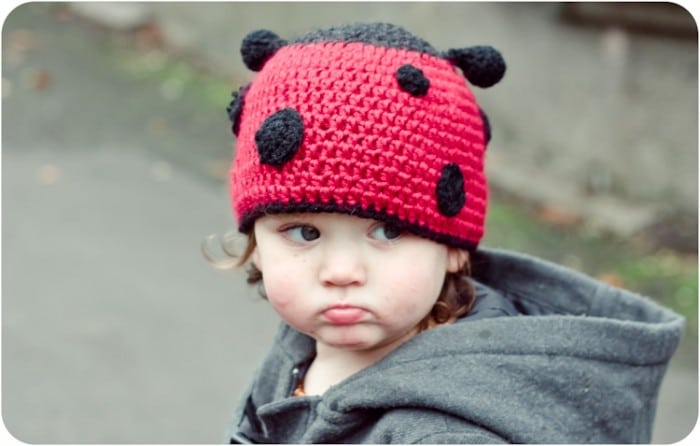
Ladybird Hat Crochet Pattern

I am so pleased to welcome Kat from Slugs on the Refrigerator, who is sharing her Ladybird Hat Crochet Pattern – she has a number of sizes and here she shares the 1-3yrs old size. Kat is  is wonderfully creative and has come up with a fantastic set of crochet patterns, designs and ideas – many of which are available for free on her website, whilst others you can purchase on Kat’s etsy shop Kat Goldin Designs. Both are well worth a visit! So. Over to Kat and this adorable crochet hat pattern.

If you haven’t tried crochet before, but are tempted. I wrote a “How to Teach Yourself to Crochet” post that you may find useful. And you may like the Amigurumi Teddies and Bunnies pattern fun!

This pattern can be completed in any Worsted or Aran weight yarn.

Ladybird Hat Crochet Pattern

© Kat Goldin 2011: While you have permission to sell finished items from this pattern, I ask that all items sold credit me, Kathryn Goldin, as the designer with a link back to my website Slugs on the Refrigerator . Under all circumstances rewriting, reselling, distributing, or copying the pattern itself is prohibited.  Thanks for your understanding and cooperation.

Basic Construction

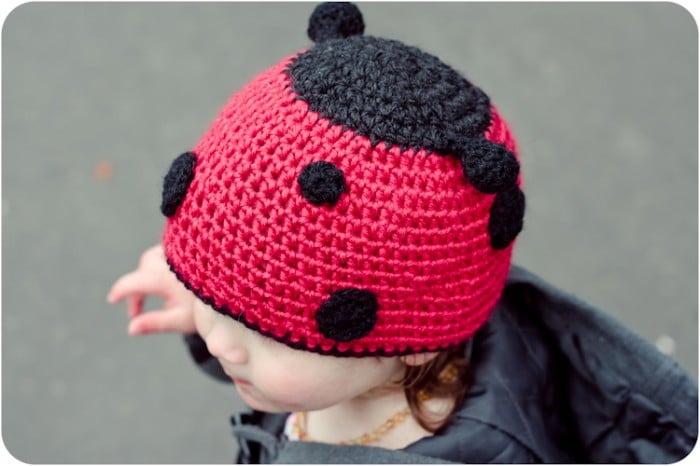
The hat is worked in the round, with the increase section worked in black, then switching to red for the main hat body.  The spots and antenna are worked separately.

Supplies

Any Worsted or Aran Weight Yarn in colours suitable for the:

›    The Main Body 70 meters/ 80 yards

›    Black for top of hat and details 30 meters/ 30 yards

Hooks

›    5 mm/H-8 Hook

›    4mm/ G-6 Hook for anntena

Gauge

13.5 HDCs and 11 rounds = 4 inches/10cm square

Stitches and Abbreviations

Ch          = Chain

HDC         = Half Double Crochet (UK half treble)

SC          = Single Crochet (UK double crochet)

HDC2TOG    = Half Double Crochet 2 Together

Magic Loops (hat and goggles)    Instructions for magic loop at the bottom of this pattern

Size

1-3 years (Newborn, Baby, 4+ and Adult sizes are available for purchase from Kat’s Etsy Shop).

Finished Measurements

16.6 inches / 41 cm round 7 inches /  18 cm tall

To Fit Head Sizes

18 – 20 inches45.7 – 51 cm

***Head sizes vary greatly.  For best results, measure!!***

1-3 Years

Starting with black yarn and 5mm hook.

Round 1:   Using a magic loop*, Ch2 and make 8HDC into the loop.  Join into the 2nd stitch of the Ch2. Pull loop tight to close the bottom of the stitches. (8)

Round 2:   Ch2. *2HDC into each stitch* repeat from * around. Join. (16)

Round 3:   Ch2, *HDC1, 2HDC into the next* repeat  from * around. Join. (24)

Round 4:   Ch2, *HDC2, 2HDC into the next* repeat from * around. Join. (32)

Round 5:   Ch2, *HDC3, 2HDC into next* repeat from * around. Join. (40)

Round 6:   Ch2, *HDC4, 2HDC into next* repeat from * around. Join. (48)

Round 7:   Ch2, *HDC5, 2HDC into next* repeat from * around. Join. (56) Break black yarn and join the red colour.

Round 8:   Ch2, HDC56. Join.

Round 9-19:     Repeat round 8. Break yarn.

Finishing

Edging:

Join the black yarn to the bottom of the hat. Ch1 and SC around the edge to finish off the hat.

Antennae (x2):

Using the black yarn and 4mm/J hook

– Before starting the anntenae, you will need 2 small balls of yarn, wound to roughly 1 inch/2.5cm diameter to act as stuffing.

Round 1: Using a magic loop. Ch2. SC6 into hook. Join. (6)

Round 2: Ch2, 2SC into each stitch. Join. (12)

Round 3: Ch2, *SC1, 2SC into next* repeat from * around. Join. (18)

Round 4: Ch2, SC18, Join.(18)

Round 5: Ch2, SC18, Join. (18)

Round 6: Wind a small ball of yarn, just smaller than the diameter of the ‘cup’ you’ve just made. Place inside as stuffing. Ch2, *SC1, SC2tog* repeat from * around. Join (12)

Round 7: Ch2, *SC2tog* around (6)

Round 8: Ch2, SC6 to form the stalk for the antenna. Continue until stalk measures 1.5 inches/ 3.8 cm. Cut yarn, leaving a long tail for sewing onto hat. Weave in ends.

Small Spots (make 5):

Using black yarn and 4mm/J hook.

Round 1: Using a magic loop, Ch2 and make 8HDC into the loop.  Join into the 2nd stitch of the Ch2. Pull loop tight to close the bottom of the stitches. (8).

Break yarn leaving a long tail to sew them onto the hat.

Large Spots (make 5):

Using black yarn and 4mm/J hook.

Round 1: Using a magic loop, Ch2 and make 8HDC into the loop.  Join into the 2nd stitch of the Ch2. Pull loop tight to close the bottom of the stitches. (8)

Round 2: Ch2. *2HDC into each stitch* repeat from * around. Join. (16).  Break yarn leaving a long tail to sew them onto the hat.

Ladybug hat crochet pattern

Magic Loop:

  • Make a loop with the yarn. Ensure that the tail of the yarn is behind and pointing to the left.
  • Pinch the bottom of the loop. Put your hook through the loop and place yarn over the hook as you would normally to make a stitch. Pull through.
  • Chain 2 more to secure.
  • Continue as normal, making stitches into the bottom loop.
  • When desired number of stitches in complete, join round.
  • Pull tail tightly to close the hole at the bottom of your stitches. Its important that this tail is securely tied when sewing in the ends so that the hole doesn’t open again.

For a variety of other finished crochet designs (including Little Bug Ladybug Hats) and other handmade items, please check out my etsy shop.

   Crochet hat patterns crochet hat patterns

Thank you Kat for sharing this wonderful Ladybug pattern. So cute! I hope you have been inspired today to have a go! And don’t forget, if you need a little help, I have a “How to Teach Yourself to Crochet” post to help you along the way!


What others are reading

  • Free Crochet Patterns for Toys & KidsFree Crochet Patterns for Toys & Kids
  • Free Crochet Unicorn PatternFree Crochet Unicorn Pattern
  • Free Baby Booties Crochet PatternFree Baby Booties Crochet Pattern
  • Free Hedgehog Crochet PatternFree Hedgehog Crochet Pattern
  • Egg Cozy Hat PatternEgg Cozy Hat Pattern
  • Free Cat Crochet PatternFree Cat Crochet Pattern
  • Free Mermaid Crochet PatternFree Mermaid Crochet Pattern
  • Seed Stitch Messy Bun Hat free PatternSeed Stitch Messy Bun Hat free Pattern
Did you like this? Share it:
Tweet
«
»

Filed Under: Crochet, Gifts, How To's, patterns 21 Comments

Comments

  1. Chris at Thinly Spread says

    April 6, 2012 at 5:11 pm

    Aw, that is so cute! I\’m going on a crochet refresher course this month so I am on the hunt for little projects, thanks for sharing this one!

    Reply
  2. Red Ted Art says

    April 6, 2012 at 5:27 pm

    Oooh how perfect! And definitely good to have little projects on the go!

    Reply
  3. The Foreigner says

    April 6, 2012 at 6:37 pm

    This is absolutely adorable. We have a bit of a thing for ladybug\’s in this house. The Duchess has a ginormous head, so even at 10 months, expect we\’d have to get her a much bigger size.

    Reply
    • Red Ted Art says

      April 6, 2012 at 6:55 pm

      Why don’t you check the measurements – they are for 1-3yrs old – to fit a head size 18-20inches?

      Reply
  4. Mummy..Mummy..MUM!! says

    April 6, 2012 at 9:22 pm

    oooh gorgeous! i might have to get my needles out!

    Reply
  5. Mummy..Mummy..MUM!! says

    April 6, 2012 at 9:22 pm

    Sorry hook!

    Reply
  6. Jackie says

    April 11, 2012 at 3:52 pm

    What a cute hat! I just printed this out to give it a try. I think my little ladybug needs one. 🙂

    Reply
  7. Jill says

    April 13, 2012 at 2:08 am

    Love this! We just posted our Kitchen Fun and Crafty link party and would love for you to share this! http://kitchenfunwithmy3sons.blogspot.com/2012/04/kitchen-fun-and-crafty-friday-link_12.html?m=1

    Reply
  8. Red Ted Art says

    April 13, 2012 at 8:03 am

    Thank you and have linked up!

    Reply
  9. nicolette @ momnivore's dilemma says

    April 16, 2012 at 11:12 pm

    Great guest post and project…If I only had a daughter and the ability to crochet. Regardless, I love it. I’m pinning to my “imaginary daughter” board.

    I featured you today at my site from last week’s Creative Juice. I’m also sharing this at facebook…Thanks for linking up last week.

    Reply
  10. Beatrice S ONeill says

    April 21, 2012 at 1:42 am

    I want to make this ladybug hat for my g g grandaughter, am having a bit of a problem. Do you count the ch 1, ch2,after the hdcs a stitch.. are the ch 1s,and ch2s, etc line up or what. Can you help me out with the. lack is hard to work with, so maybe that is part of my problem, so thought I would ask for clarification. thanks in advance for your help, hat is so cute that I really would like to make it

    Reply
  11. Jaime says

    May 28, 2012 at 6:46 pm

    Would you mind posting pictures on how to do the Magic Loop? Seeing it helps me and I absolutely love this hat!! Thanks 🙂

    Reply
  12. mary says

    August 9, 2012 at 5:51 pm

    Hello thank you for the pattern. Could you please tell me what HDC1 means in round 3 of the hat? It’s the 1 after the HDC that I don’t understand Thank you.

    Reply
  13. Julia @ FaveCrafts says

    November 8, 2013 at 4:12 pm

    Hi there,

    What a cute project! I love it so much that I decided to feature it in our roundup of cozy handmade hats! Check it out here: http://www.favecraftsblog.com/diy-winter-hats/

    Have a great day!

    Reply
  14. gloria says

    March 9, 2014 at 3:21 am

    not sure but i am not understanding the hdc2,2hdc in the next does this mean to to a hdc2together or a total of 4 in one stitch??? not understanding why the number is behind hdc and in front of hdc do they mean different things???

    Reply
    • Red Ted Art says

      March 11, 2014 at 10:27 am

      Hello Gloria, I am afraid this is a guest post, I am not sure what the answer is!

      Reply
    • crochet beginner says

      July 22, 2016 at 9:43 pm

      After searching online and trying about 4 different ways this worked for me…hdc2, 2hdc = hdc in the next two stitches and 2hdc in the third stitch to complete the round. The next round is hdc3, 2hdc which would be hdc in the next three stitches and 2hdc in the fourth stitch and so on. I hope this helps others!

      Reply

Trackbacks

  1. Link Love: Cozy Winter Hats says:
    November 7, 2013 at 9:44 pm

    […] Little Bug Ladybug Hat from Red Ted Art […]

    Reply
  2. Top 10 Adorable DIY Crochet Kids Hats - Top Inspired says:
    November 14, 2013 at 11:25 pm

    […] DIY project and photo credit to redtedart.com […]

    Reply
  3. Cute Kids Knit & Crochet Accessory Patterns | Style My Party says:
    November 22, 2014 at 4:04 pm

    […] Free pattern via redtedart.com […]

    Reply
  4. Pinteresting Projects: crochet for babies • LoveCrochet Blog says:
    October 4, 2015 at 12:01 pm

    […] Make a ladybug hat with Kat Goldin on Red Ted Art […]

    Reply

Leave a Reply Cancel reply

Your email address will not be published.

Welcome!

Welcome!

Hello! I am Maggy and I love all things crafty and sharing my craft ideas and how tos.

The aim of this site is to provide easy, do-able and fun crafts for all ages.

Categories

Archives

Crafty Blogs

Copyright © 2019 · Website Design By Jumping Jax Designs

We use cookies to ensure that we give you the best experience on our website. These cookies feedback information to our analytics and advertisers. We track views of the site - which pages are visited, whether you are a regular or returning visitor to help generate a more personalised experience. You can switch cookies off or follow the READ MORE link for more and information on how to.OkRead more