How to… make a cute Keepsake Bunny from Onesies (Guest Post)
 Remember our cute cute onesies Doll? Well, if dolls are not your thing, maybe bunnies are? Especially now that Easter is coming up! I have been working on lots of different ideas of what I can make out my children’s cute little baby onesies, but I have to confess, you just have to go to the experts to get it right, especially when it is your precious baby clothes. So I was very pleased when Ruth from Summerland said she would do a Bunny Pattern for us – Binky Babbit! Yay! Yay! Yay! If you don’t quite “dare” do it yourself hop (ahem) over to Ruth’s and she can make them for you, in fact, she has a whole range of keepsake toys – friendly monsters, bunnies, cats and mice. For those of you who want to give it ago… here is the pattern and instructions! Thank you Ruth.
(If you need to buy some stuffing, Ruth has some on offer here!)
 I wasn’t planning any more animals for 2011, but Maggy put a call out for a bunny pattern and I couldn’t resist. I’m so glad I didn’t, once I made bunny I also made a mouse and a cat using vintage scraps and my duaghter’s old pj’s and then I started on monsters too.
What started as a single pattern has morphed into new patterns, new kits and even a new product line of Keepsake Critters. That’s what I love about blogging and twitter, that one idea or conversation can seed a world of new ideas.
This pattern will give you a three dimensional, shaped rabbit, but isn’t jointed and with the head drawn onto the same piece as the tummy isn’t as fiddly as having separate head and body parts.
It probably isn’t suitable as a first project but if you are already on fairly friendly terms with your machine and want to develop your skills then this is a good project. [Maggy says: I am very much a beginner and you will see below, that I managed!!!]
So here is the wee fella that started the whole thing off…..
Materials
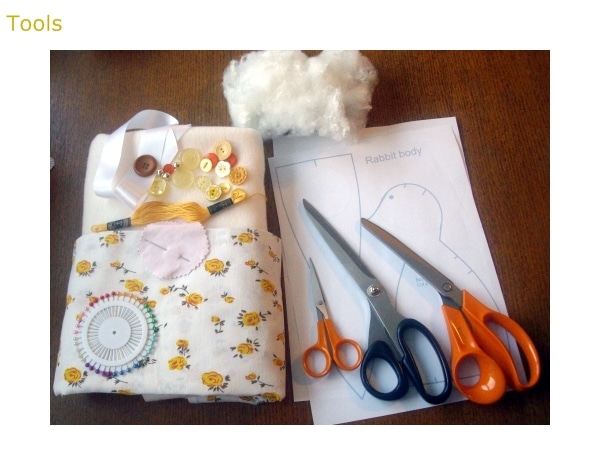
For your rabbit you will need the following:
Download your free Bunny Pattern (unfortunately you will have to click on the link and then click on it again and THEN you will get the pdf…no idea why)!
- Two fabrics, 50 x 50 cm of the main fabric (I used a vintage pillow case) and 50 x 25 cm of the contrast fabric (I used fleece scraps)
- Scissors – sewing and craft
- Pins and needles
- Sewing and embroidery threads
- Stuffing
- Buttons, bells and ribbons to embellish
- Bunny pattern download
Cut out and mark up pattern pieces
Cut out the paper pattern pieces with craft scissors.
With fabric right sides together pin the paper pattern to your fabric.
Cut close around the paper pattern pieces with sewing scissors.
Transfer any markings to the fabric pattern. You can do this with a fabric marking pen or pencil or using tailor tacks.
Sew and stuff four legs
With right sides together, pin together two leg pieces – one each from the main and contrast fabrics. Do this till you have four legs pinned together.
Leaving the straight side open, sew along the long curved edge.
Notch, press and turn to right side out.
Stuff the legs, I find it best to tease out small pieces of stuffing and fill the paw pad with a small ball then fill the length of the legs to avoid lumps.
Sew ears
With right sides together, pin together two ear pieces – one each from the main and contrast fabrics. Do this till you have two ears pinned together.
Leaving the straight side open, sew along the long curved edge.
Notch, press and turn to right side out.
With the contrast side facing you fold the side of one ear to the middle and sew a few basting stitches to hold the shape. Repeat in opposition with the other ear.
This will give you a nice folded shape if you want or you could leave the ears flat.
Sew body section
With right sides together pin the body sections together from nose to base.
Baste, stitch, notch turn and press.
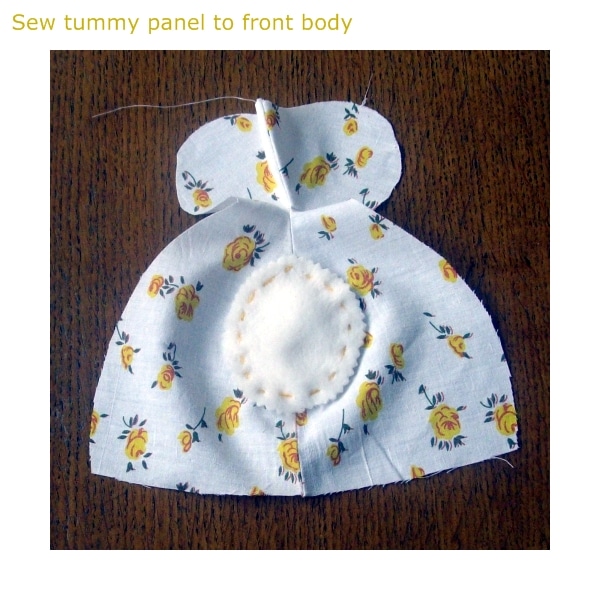
Place the contrast tummy section wrong side to the body’s right side and sew in place with a decorative running stitch with embroidery thread.
Join body to back panel
Using the markings as a guide, pin and baste the ears and arm legs to the body sections.
You are now going to join the back panel to the body, this is a little bit fiddly. I find it helpful to pin the loose ears and arms to the body sections so they don’t get in the way.
Starting at the nose and with right sides together pin one side of the back panel to the corresponding side of the body panel, use the markings to help you get the correct positioning, you may need to tease the curves of the head sections to fit.
Baste and turn to check you are happy with the seam.
Repeat with the other side of the panel.
Sew in place, clip and notch seams, turn and press.
Sewing base to the body section
Base the remaining two legs to the bottom of the body.
Turn the body right side in and pin and baste the base panel to the body.
Stitch, remembering to leave an opening to turn your rabbit through.
Turn the rabbit right side out and press.
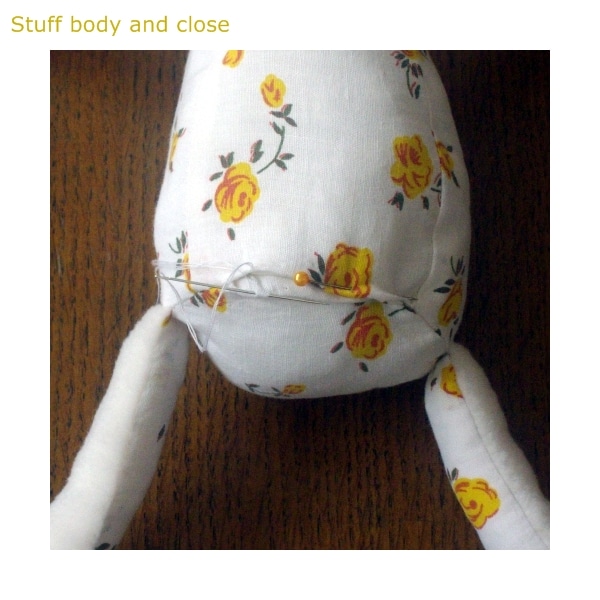
Stuff your bunny.
Taking small pieces of stuffing start to stuff your bunny. You will need to make the head and neck quite firm if you want you bunny to sit up.
Once you are happy with the firmness of your bunny pin the opening together and close with blind stitch or slip stitch.
Give your bunny a tail
Sew a running stitch along the edge of the tail section.
Pull the stitches tight so you get a little pom pom. You can either stuff your tail or leave it empty, whichever you prefer.
Stitch the tail to your bunny’s bottom.
Sew paw details
Using embroidery thread sew paw details.
Push the needle through from back to front, return the needle to the back forming a loop of fabric and push the needle to the front again. I do three looped stitches like this, you can do more or less.
Sew face features
Use a satin stitch to make a nose and a stem stitch to form the mouth lines.
Sew on buttons for eyes passing the needle all the way through the head from one button to the other.
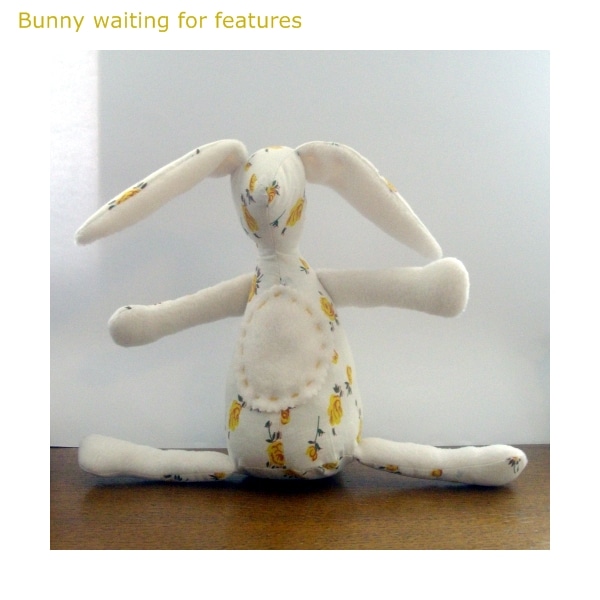
Bunny is finished – you can add ribbon and button collars and bows to give him a bit of dash.
Now… I had a go with one of Pip Squeak’s Onsies (Babygrows) and my did it turn out cute. It is a little harder to sew stretch fabric, but when you stuff itm the stretch fabric lets you remould some of your mistakes! So all in all it worked well for me as a beginner sewer!!! My “favourite” bit, was to cut the label (3-6months, upto 8kg) and sew it to the bottom of the bunny to remind me of how little Pip Squeak once was:
(You can see how badly I sewed it on…)
Oh and I also knitted a quick scarf! I will now go and make another one for Red Ted!

