Red Ted Art - Make crafting with kids easy & fun

Cute & Easy Crafts for Kids

  • Home
  • START HERE
  • Preschool Crafts
  • Easy Crafts for Kids
  • Paper Crafts
  • Free Printables
  • About
  • Join Our Newsletter
  • Cookies, Privacy Policies & Disclosure

How to… make beautiful Ink Stamp Cards & Things (Guest Post)

February 4, 2011

I don’t know about you, but I am a bit of a collector and horder of things. Especially all things crafty.. I actually have a number of wonderful and beautiful stamps – some I picked up in the V&A (wonderful wood carvings), some I have been dragging around with me for years (I have a little Woodstock from Snoopy) and others from as afar as Japan – as holiday momentos. But have I ever used them? Like properly?!?!?! No. And I have no excuses, I even have lots of different coloured ink pads. Well. Excuses no more… Katie from confessions of a design geek has done this wonderful Guest Post for us – yes, you do need stamps to begin with, but if you are like me, you may actually have a number lurking in your drawers. Go on.. get them out and make some wonderfully crafty things!!!

And if you love design, I mean LOVE design, then go and visit confessions of a design geek – or visit her anyway, show your appreciated for writing this post!

picture 15

Materials:

Ink stamp pads, ideally in a few colours.

(These are available from most stationery and craft shops. Mine are either from WHSmith – or came with the ink stamps.)

Ink stamps, ideally some with pictures and some with letters.

(I have a selection from Yellow Owl Workshop, Skull and Cross Buns, Muji and Tiger – or you can make your own by carving erasers, or even potatoes!)
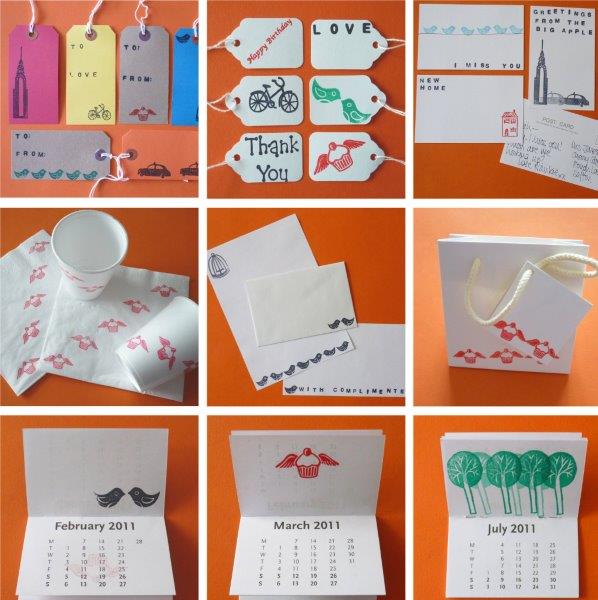
ink stamps

Things to stamp on.

(This is where you can get quite creative, I’ve used everything from blank greetings cards and postcards to luggage tags, napkins and polystyrene party cups.)

Instructions:

1. Decide what you want to make. Let’s start with a simple greetings card.

2. Select your stamps and think about the design you’re going to create with them. (You might want to practice on a piece of paper first.)

3. Ink them up – and get stamping.

4. How about a slightly more complex greetings card, this time using a blank card, and also a luggage tag? Start by sticking the luggage tag string down the inside of the card, using some clear tape.

5. Ink up your stamps in your chosen design – I’m putting my message on the luggage tag and pictures on the card itself.

6. Et voila!

picture 15

7. Then off you go….

8. Don’t worry if the prints aren’t quite perfect – little imperfections are all part of the handmade look.

9. And don’t forget to put your name on the back, so the recipient knows you made it yourself.

ink stamp cards

Links:

  • confessions of a design geek
  • WHSmith
  • Yellow Owl Workshop
  • Skull and Cross Buns
  • Muji
  • Tiger

«
»

Filed Under: Card making, How To's 22 Comments

Comments

  1. Heather Jenkinson says

    February 4, 2011 at 10:18 am

    This post makes me happy – not just the stamping (although I do now have the urge to stamp EVERYTHING in sight), but the collaboration. You make it fun. Love it.

    Reply
  2. Chris says

    February 4, 2011 at 12:33 pm

    Lovely for a rainy day! We have a collection of stampers which haven’t been out for a while, I’m thinking we may make some Valentine’s/Spring cards with them! Thank you! (and thanks for linking Maggy!)

    Reply
  3. Regina @ Chalk In My Pocket says

    February 4, 2011 at 4:35 pm

    This was the kick in the rear I needed to whip out my stamp collection…I might have to steal my daughter’s alphabet stampers…that’s allowed, right?!

    Reply
    • Red Ted Art says

      February 4, 2011 at 4:53 pm

      Absolutely!!!!

      Reply
  4. Amy says

    February 5, 2011 at 1:15 am

    those are so nice.. Thanks for the congrats. What linky system do you use. The one I use is getting ready to have you pay for a year.. I am just looking for something else.. Have a great weekend..

    Reply
  5. mummiafelice says

    February 5, 2011 at 7:25 pm

    LOVE stamping! I must dig out my craft boxes!! Great post!

    Reply
  6. KJ@letsgoflyakite says

    February 6, 2011 at 1:52 pm

    All great ideas. This is an excellent post, a definite keeper. I have so many rubber stamps, but sadly they have not been used in any fabulous way. Thanks to you, I am now armed with a ton of ideas.

    Reply
  7. Lorraine from The Party Times says

    February 6, 2011 at 10:03 pm

    am now going to have to dig out my craft box and find my stamps!!

    Reply
  8. Jo Green says

    February 7, 2011 at 6:04 pm

    Very inspiring! I haven’t really gotten into stamps at all as I was a bit intimidated by stuff i have seen on other blogs, but this post makes me want to try them out!

    Reply
  9. jenvoyce says

    February 7, 2011 at 7:08 pm

    I don’t know why I just buy them for the kids and not me! I’ll have to borrow them….. or …. I saw some lovely ones by Lollipop designs http://www.lollipopdesigns.co.uk/

    Reply
  10. Red Ted Art says

    February 7, 2011 at 7:44 pm

    Ooooh Lollipop look MARVELLOUS! WOW! Thanks for the link!

    Maggy

    Reply
  11. Rebecca at Melba London says

    February 7, 2011 at 8:48 pm

    Ooh, these are BEAUTIFUL, makes me want to go out and buy lots of little labels, and get crafty myself! very inspiring, thank you both :>)

    Rebecca x

    Reply
  12. JDaniel4's Mom says

    February 8, 2011 at 6:36 pm

    This looks so easy. Now I need is her creative genius.

    Reply
  13. Julie says

    February 10, 2011 at 7:08 pm

    I like someone else now want to go home and use my new stamps, but to make cards and other stuff! Thank you so much for sharing! I love this! Oh, and I am a MAJOR HOARDER (in my craft room anyways). I need to clean it out and get more shelving! Thanks for linking to ISCCT!

    Reply
    • Red Ted Art says

      February 11, 2011 at 1:20 pm

      Oh yes, perfect to go back to your craft hoard and use some of your lovely stamps!!

      Reply
  14. jessa says

    February 16, 2011 at 4:11 am

    I have been in *love* with those stamps from the Yellow Owl Workshop for months now.. I might just get them hoping that my stuff turns out as cute as yours!

    Reply
  15. Craig says

    January 29, 2019 at 7:55 am

    Brilliant use of stamps, really creative! Gotta try this when I’m back home

    Reply
    • Red Ted Art says

      January 30, 2019 at 9:04 am

      Enjoy

      Reply

Trackbacks

  1. Tweets that mention Red Ted Art's Blog » Blog Archive » How to… make beautiful Ink Stamp Cards & Things (Guest Post) -- Topsy.com says:
    February 4, 2011 at 7:47 am

    […] This post was mentioned on Twitter by Jenny Nicolson, Maggy Woodley. Maggy Woodley said: How to…. make beautiful ink stamp cards… http://fb.me/z9P0yBd7 […]

    Reply
  2. Something for the Weekend – Forest Adventures! | Thinly Spread says:
    February 4, 2011 at 4:04 pm

    […] 5. Ink Stamp Cards for the older ones – Red Ted Art […]

    Reply
  3. Red Ted Art's Blog » Blog Archive » Kids Get Crafty: (London) City Postcards says:
    June 1, 2011 at 4:59 am

    […] Our Ink Stamp Card Guest Post from a few weeks […]

    Reply
  4. something a little different :: how social media changed my life | confessions of a design geek says:
    July 3, 2011 at 3:24 pm

    […] Festival blog and have guest-blogged for the likes of fabric of my life, The Foodie Bugle and RedTedArt, and have lots more exciting plans in the pipeline. It was only recently that I remembered my […]

    Reply

Leave a Reply Cancel reply

Your email address will not be published. Required fields are marked *

Recipe Rating


Welcome!

Welcome

Hello! I am Maggy and I love all things crafty and sharing my craft ideas and how tos.

The aim of this site is to provide easy, do-able and fun crafts for all ages.

Categories

Archives

Crafty Blogs

Copyright © 2022 · Website Design By Jumping Jax Designs