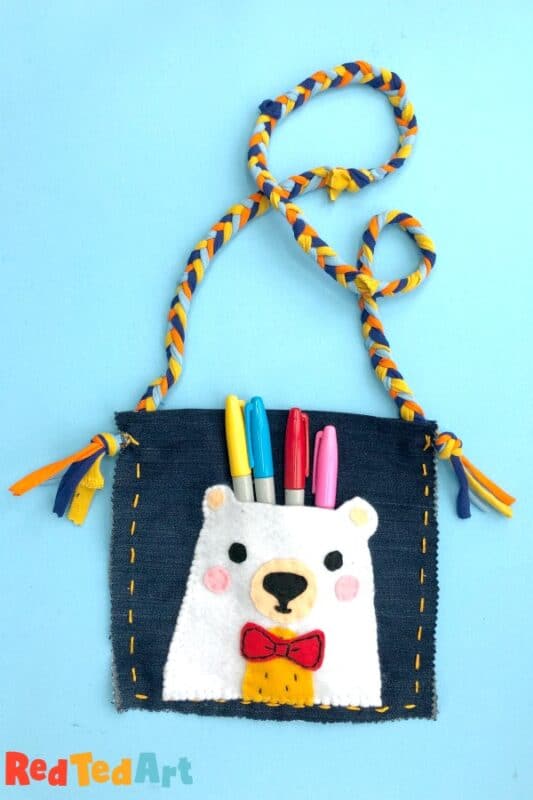
How to sew a Teddy Bear Purse – Ted Sewing for Kids
Aaaah we simply can’t get enough of all these super duper CUTE Ted Crafts! If you love Ted as much as we do, you simply HAVE To have a go.
And if you simply love Teddy Bears… well have a go to! As this Sewing Project for Kids is perfect for all Red Ted Art fans AND Teddy Bear fans. Learn how to sew a Teddy Bear Purse today!
Summer is a great time to spend time with the kids and teach kids to sew. The days a long. There are hours to fill and to put it simply: you (and the kids) have time!! Pip Squeak and I always enjoy a sewing project over the holidays.
Those eagle eyed among you, will have spotted that we made a Teddy Bear Softie a couple of weeks ago. As I was making the Ted Softie, it occurred to me, that an upcycled denim purse, with a felt Ted, would look rather adorable too. So I made one… and decided to share the pattern. Aaaaaah. The perfect accessory for summer.
Teddy Bear Purse – Materials
- Upcycled denim or ANY FABRIC for the purse itself – big enough for two sides of a purse and to fit the Teddy Bear Printable. Here we used 20cm x 20cm
- Felt in the Ted colours: white, orange, red, black and cream
- Sewing threads in white and black
- Embroidery thread in white & orange
- Choice of purse strap – more denim or wool to braid
- Your free Teddy Bear Purse printable
Enter $0 at check out for this free printable Teddy Bear Outline!

How to make a Teddy Bear Purse
You can watch my sew along video on auto play or follow the step by step instructions!

Begin by cutting out all your Ted shapes, as well as your purse basic denim.

You CAN glue on the Ted features, as we did with the Teddy Bear Softie, however, I find purses get “knocked” around a little more than a Teddy Bear toy, so decided that SEWING in this case would best. I used normal sewing threads (rather than embroidery threads) to add a few stitches to the ears, eyes, nose, cheeks and tummy.
Do use pins to help keep your features in place!
After that I used black embroidery thread to add features to the tummy and bow tie.

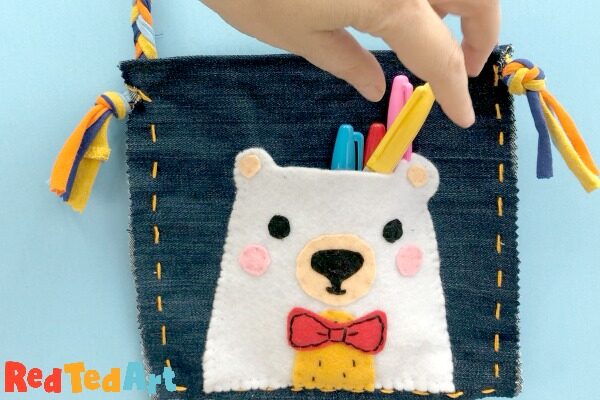
Sew your Teddy Bear to on side of your purse – leave a one centimetre free at the bottom, so you can still sew the purse itself. You can use either white thread (to hide the stitches) or embroidery thread if you want them to show. You can use an over stitch, a blanket stich or a simple running stitch. Your call. You can see all our Hand Stitches in detail here. We used an over stitch.
Note: you can leave “the top” of your Teddy Bear open in order to make a little pocket for pens or notebooks!!

Time to assemble the little bag. Again you have lots of choices. You can have the seam on the inside or the outside. You can use a running stitch or a blanket stitch, you can use pinking shears to create a “less fraying” edge… or you can “embrace the fray” which can look great with denim. But really it is a question of choice. You can also use the sewing machine to do sew this part of your Teddy Bear purse!
If sewing with younger children you may choose to use felt – which doesn’t fray and is softer to sew.
We used pinking shears to cut the left, bottom and right sides. I them sewed a hem to the top of the bag (top left photo). Then we made a four layer t-shirt yarn braid (learn how to make t-shirt yarn and see how to do a four strand braid in the video below).
4 Strand T-shirt Yarn Braid
https://www.youtube.com/watch?v=x9LxFmOZNls
Finally, sew in your t-shirt yarn braid into the top of your back.. and then do a running stitch all around the side and bottom of the upcycled denim bag! Your Teddy Bear purse is finished!! Enjoy!
Watch the Step by Step Teddy Bear Purse how to video here:
(Coming soon: https://www.youtube.com/watch?v=RSGxas-Jgck )

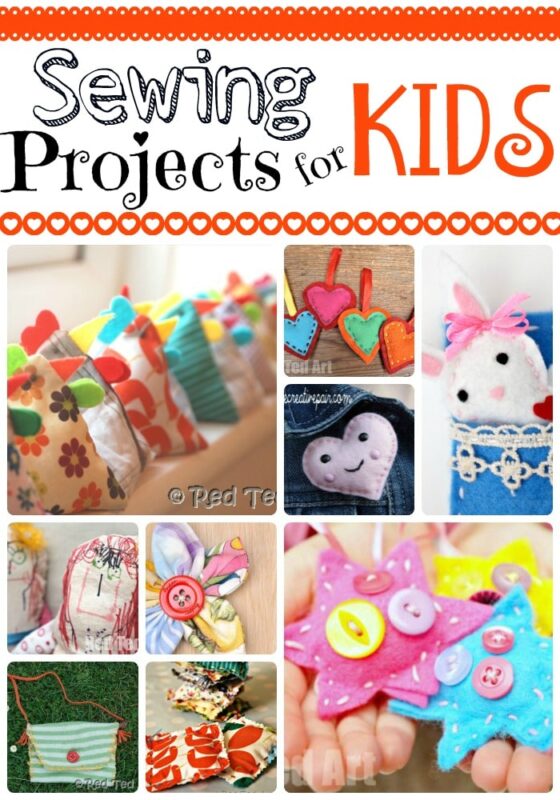
More fantastic Sewing Projects for Kids: