
Free Lily Crochet Pattern from Crochet Flowers by Sierra’s Stitches
As you know, we love love love to crochet here at Red Ted Art HQ, as my daughter grows up, we have moved from preschool crafts, to kids crafts, to crafting with tweens.. and here love of crochet has blossomed. So when we get the opportunity to review and show case some gorgeous crochet books, of course it is a BIG YES from us! In comes Sierra’s Stitches and her brand new Crochet Flowers Book. We are lucky enough to get to share the beautiful Lily Crochet Pattern from it – to give you a taste of the projects and whet your appetite. I do encourage you to check out the full book – it is so lovely!

This blog posts shared with you how to crochet a large Lily Flower, as well as how to crochet a small lily flower and lily bud! This is a sample from the Crochet Bouquet book (see more below), where you can also find instructions for the plant pot, should you wish to make it!
Please note: affiliate links have been added to this post – should you choose to purchase via these, I will earn a small commission that goes towards the upkeep of this site!
Also note: Reprinted with permission from Crochet Flowers by Sierra Miral. Page Street Publishing Co. 2025. Photo credit: Sarah Ainsworth and Sierra Miral (step-by-steps). Do not copy, republish or distribute without your own permission!
About Crochet Flowers Book
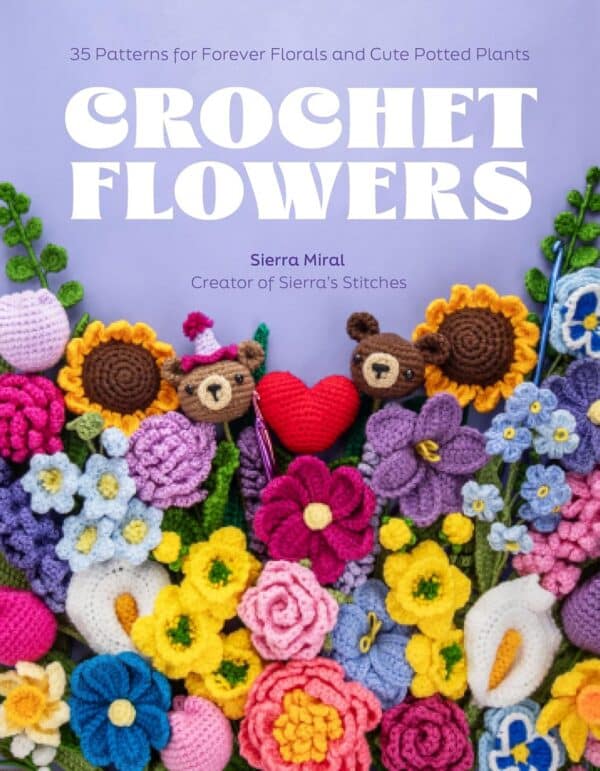

This Lily Crochet Pattern is being shared with permission from the publisher as part of the launch of this gorgeous new “Crochet Flowers” book! The book contains 35 beautiful flowers and pots to crochet – perfect for making standalong gifts (as the mini lily’s in the pot show) or that you can combine into whimsical flower bouquets to gift! 35 patterns.. 100s of possibilities for combining different bouquets and crocheting flowers in all kinds of colors! I do love the adorable little teddy bear’s included in these bouquets too – check out this Instagram Reel to see how perfect the Teddy fits into a bouquet of flowers!
As mentioned this beautiful book was created by Sierra’s Stitches (you can find her on Instagram @sierras.stitches and Etsy). Here accounts are well worth a look, if you want to get a little more of a taste!
Lovely Lily
From the book in Sierra’s voice:
Lilies are cherished for their elegant beauty and symbolic meanings of purity and renewal, making them a beloved choice in floral arrangements and gardens. Did you know that lilies have been cultivated for over 3,000 years, often appearing in ancient art and literature? With more than 100 different species found across the globe, lilies captivate with their diverse forms and vibrant colors. While lilies may look complex, this crochet pattern is designed to be easy to follow, ensuring even beginners can create a stunning flower. Each petal in this pattern is crafted with wire, allowing you to bend and shape them to achieve the perfect look. This added flexibility brings your crochet lily to life, lending a touch of realism and an artistic flair to your creation.
Finished Crochet Lily Measurements
If you’re making the full size lily: Using a US E/4 (3.5-mm) hook and size 4 worsted weight yarn, the lily measures approximately 6.7″ wide x 4.7″ tall (17 x 12 cm).
If you’re making the mini size crochet flower: Using a US E/4 (3.5-mm) hook and size 4 worsted weight yarn, the lily measures approximately 3.1″ wide x 2.3″ tall (8 x 6 cm).
Supplies needed to make a crochet lily
Yarn
- Size 4 worsted weight yarn, 100% acrylic, in your desired lily flower color, green, and yellow or gold
Note: If you use thinner or thicker yarn, your lily will end up being smaller or larger, respectively. If you choose to use a thicker yarn or make a larger lily, you may need to add an extra floral wire stem or wooden skewer to support the weight.
Shown In
- Red Heart Super Saver in the colorways “Tea Leaf” and “White”
- Big Twist Value in the colorway “Pale Yellow”
Hooks
- US E/4 (3.5-mm) hook for both sizes
Notions
- Clear hot glue
- Darning needle
- Fiberfill stuffing (for the mini size)
- Hot Glue Gun
- Scissors
- Stitch Marker
- Floral wire
- 2-mm-thick (14-gauge) floral wire stem or wooden skewer
- 22-gauge flexible floral wire for the flower petals, stamens, and optionally, the bud
Special Techniques
Picot
Crochet Lily Pattern: Full Size

Lily Petals (Make 6 per flower)
Gather your desired flower yarn and 22-gauge flexible floral wire. You will need 12 inches (30 cm) of wire per petal.
Begin with your desired flower color.
- Step 1: CH 20. [20]Step 2: Beginning from the third chain from the hook, work: 2 SC, 2 HDC, 9 DC, 2 HDC, 2 SC. In the last chain, place 3 SC. [20]
- Step 3: You will be working on the other side of the chain. Be sure to work over the yarn tail so you don’t need to weave it in later. SK the stitch we just placed the 3 SC in from step 2. Then, 2 SC, 2 HDC, 9 DC, 2 HDC, 2 SC. SL ST to the beginning of the petal. [17]
- Step 4: CH 1. For this step, you will be crocheting over floral wire. Working along this side of the petal: 2 SC INC, 3 HDC, 2 DC INC, 3 DC, 2 DC INC, 3 HDC, 2 SC, SL ST, SC, and then CH 2, picot. [ 25]
- Step 5: Working down the other side of the petal: 1 SC, SL ST, 2 SC, 3 HDC, 2 DC INC, 3 DC, 2 DC INC, 3 HDC, 2 SC INC, SL ST. Then, FO. Leave a short yarn tail. Wrap the yarn tail around the ends of the wire, and twist the wire to secure the yarn in place. [26]
Repeat steps 1–5 to make 6 petals total.

Lily Stamens (Make 5 per flower)
Gather the yellow or gold and green yarn and 22-gauge flexible floral wire. You will need 8 inches (20 cm) of wire per stamen.
- Step 1: Hold the wire and yellow yarn in the same hand. Wrap the yellow yarn around the center of the wire for about 2 inches (5 cm). Then, fold the wire in half.
- Step 2: Twist the center portion of the wire together to prevent the yellow yarn from unwrapping. Cut off the excess yellow yarn.
- Step 3: Grab the green yarn. Holding the green yarn and wire in the same hand, wrap the entirety of the wire with the yarn. Leave the yellow top portion of the wire exposed. Make sure the green yarn covers the remainder of the wire, so the yellow portion and wire is not visible. Twist the wire ends at the bottom together to prevent the green yarn from unwrapping.
Repeat steps 1–3 four more times to make a total of 5 stamens.

Lily Leaf (Make 1 or 2 per stem)
Gather the same green yarn you used for the stamen s. You will also need 16 inches (40 cm) of wire per leaf.
- Step 1: CH 30. [30]
- Step 2: For the leaf, you will be crocheting around the floral wire. Starting from the third chain from the hook: 3 SC, 3 HDC, 16 DC, 3 HDC, 2 SC. Place 3 SC in the last chain. [30]
- Step 3: Slide your work to the bottom half of the floral wire stem. Bend the wire in half, with the leaf on the right-hand side of the wire. We will now be working on the lefthand side of the leaf. SK the CH that you placed the 3 SC in from step 2. Continuing along the other side of the chain and crocheting over the wire: 2 SC, 3 HDC, 16 DC, 3 HDC, 3 SC. SL ST to the beginning of the leaf, and then FO. Leave a short tail. Twist the ends of the floral wire together to prevent the leaf from sliding off. [27]
Mini Lily Crochet Pattern
Lily Petals (Make 6 per flower)
Gather your desired petal color yarn and 22-gauge flexible floral wire. You will need 8 inches (20 cm) of wire per petal. Begin with your desired flower color.
- Step 1: CH 14. [14]
- Step 2: You will be crocheting around the floral wire for this step. Starting from the third chain from the hook: 2 SC, 1 HDC, 4 DC, 1 HDC, 3 SC, and [SL ST, CH 1, SL ST] in the final chain. [14]
- Step 3: Slide your work to the bottom half of the floral wire stem. Bend the wire in half, with your work on the right-hand side of the wire. Working down the other side of the chain and crocheting over the wire and yarn tail: SK the stitch you placed the [SL ST, CH 1, SL ST], then 3 SC, 1 HDC, 4 DC, 1 HDC, 2 SC. SL ST to the beginning of the petal, and FO. Leave a short tail. Wrap the yarn tail around the ends of the wire, and twist the wire to secure the yarn in place.
Repeat steps 1–3 to create a total of 6 petals per lily.
??Lily Stamens (Make 5 per flower)
The stamen instructions for the mini lily are the same as the full size, except you will need 6 inches (15 cm) of wire per stamen.

Lily Bud
Grab your green yarn.
- Make a MR.
- Round 1: Place 4 SC in a MR. After the fourth stitch, pull the tail of the MR tightly to close the circle fully. [4]
- Round 2: SC around. [4]
- Round 3: (1 SC, INC) x 2. [6]
- Round 4: SC around. [6]
- Round 5: (2 SC, INC) x 2. [8]
- Rounds 6–7: SC around for two rounds. [8]
- Round 8: (2 SC, DEC) x 2. [6]
- Round 9: SC around. [6]
- Round 10: (1 SC, DEC) x 2. Stuff the bud very lightly with fiberfill stuffing. FO, and leave an 8-inch (20-cm) tail. Thread the yarn tail onto a darning needle. Insert the needle through all of the front loops from this round. Pull the yarn tightly to cinch the circle shut. [4]
Lily Leaf (Make 1 or 2 per stem)
Gather the same green yarn you used for the stamen s. You will also need 12 inches (30 cm) of wire per leaf.
- Step 1: CH 22. [22]
- Step 2: For the leaf, you will be crocheting around floral wire. Starting from the third chain from the hook: 2 SC, 3 HDC, 9 DC, 3 HDC, 2 SC, and then place 3 SC in the final chain. [22]
- Step 3: Slide your work to the bottom half of the floral wire stem. Bend the wire in half, with the leaf on the left-hand side of the wire. We will now be working on the righthand side of the wire. SK the CH that you placed the 3 SC in from step 2. Continuing along the other side of the chain: 2 SC, 3 HDC, 9 DC, 3 HDC, 2 SC. [19]


Assembly
- Step 1: Gather your floral wire stem. Place a small amount of hot glue at the end of the stem, and attach one of the stamens. Continue adding a small amount of glue until all 5 stamens are glued to the end of the stem.
- Step 2: Grab your lily petals and green yarn. Hold the floral stem and green yarn in one hand. Place one petal along the end of the stem, and wrap green yarn around it to secure it in place. After wrapping several times, add another petal. Continue wrapping, and add a third petal. The first 3 petals should be in a triangular shape.
- Step 3: Repeat the process of adding petals and wrapping the yarn around the wire from the petals. You can add a small amount of glue while wrapping to make your flower more secure. The last 3 petals should be placed in the gaps from the first 3 petals.
- Step 4: If you did not make a lily bud, proceed to * below.
If you made a lily bud, you will need 6 inches (15 cm) of 2-mm-thick (14-gauge) floral wire. Place a small amount of hot glue onto the wire, and insert it into the center of the MR on the bottom of the bud. Then, place a small amount of hot glue onto the bottom of the bud where it meets the stem. Attach green yarn, and wrap the stem. Place a small dot of hot glue at the bottom of the stem, and secure the yarn. Place the lily bud to the side for now. Add the bud after you have added your petals and wrapped the stem for about 4 inches (10 cm).
* After attaching all 6 petals, continue with the flowerwrapping process.

Credit Line: Reprinted with permission from Crochet Flowers by Sierra Miral. Page Street Publishing Co. 2025. Photo credit: Sarah Ainsworth and Sierra Miral (step-by-steps)

Here you can see how lovely the small lily crochet pattern is part of a the crochet pot plan (the pot is included the the fablous Crochet Bouquet Book!), as well as the large crochet lily, which is perfect to adding to a crochet bouquet of flowers!
Aren’t these stunning? I really do think you will LOVE the whole book too – why not take a peak and grab a copy today?