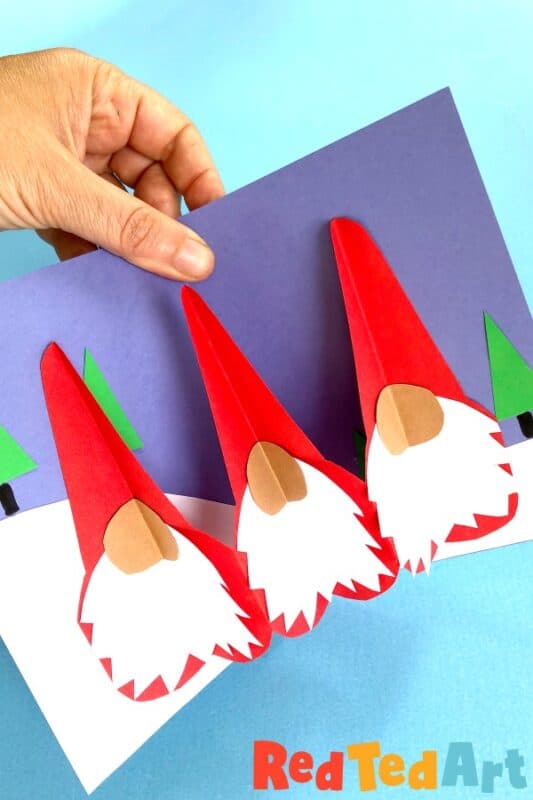
Pop Up Gnome Card DIY for 3d Christmas Fun
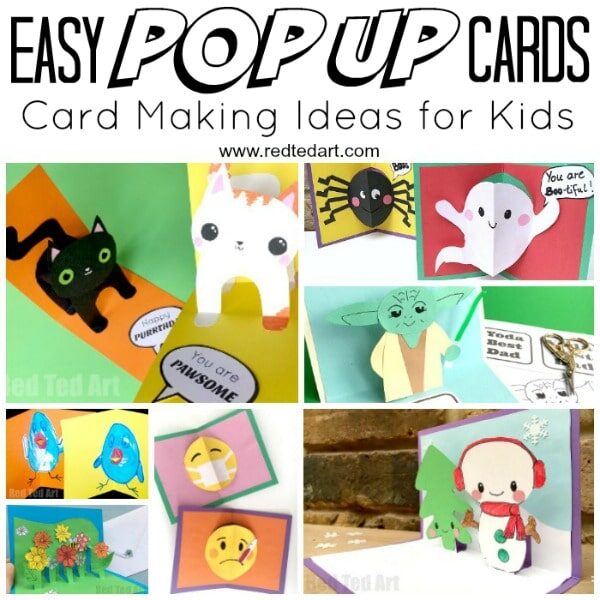
Hooray! It is time for a series of Handmade Cards for Kids.. not just ANY Handmade Cards, but Christmas Cards that Pop Up. We have long been a fans of Easy Pop Up Cards – they are so fun to make and my kids really LOVE them. This is a new series of Pop Up Cards using our fun “paper chain” effect and today we turned this technique into Pop Up Gnome Cards for Christmas (or all year round to be honest!!).
If you are looking for more Pop Up Gnome Card inspiration, we also have this adorable version – again – super easy to customise to suit all seasons and tastes (templates available):

This is our Fall Gnome Card Pop Up version! But of course you can easily take the design and use it as a Christmas Gnome or Valentine’s Gnome pop up too!
Materials needed for Pop Up Gnome Cards:
- A6 card stock (we used purple cards, but you can use any colour and also fold a sheet of A5 in half)
- Gnome coloured paper (we went for red) – it was approximately 20cm wide and the “height of a gnome”… ahem, 8cm told or so?
- Contrasting colours for details – e.g. white paper for a snowy landscape, but it can be green for summer gnomes, green for trees, white for beards and beige for noses…
- Glue stick
- Scissors
- Pencil/ scrap paper for drafting
How to make a Pop Up Gnome Card for Christmas
The video really is the best way to see how easy and fun these gnome cards really are to make. But I have also included some step by step instructions below. If you prefer the video tutorial is also available on my YouTube channel!
How to make a paper chain pop up card – step by step instructions!
Making your pop up gnomes
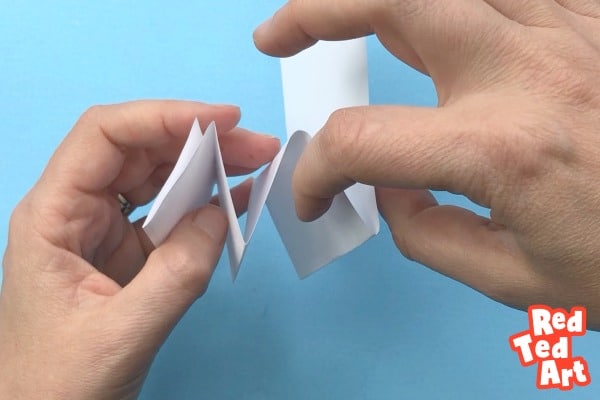
Concertina your RED paper in aproximately 3.5cm folds (photo shows white paper, but we used red). They need to super neat with each edge aligning perfectly. You need a total of 6 folds!

Draw a half a gnome – make sure the “outside” of the gnome is on the side that “flaps open” and also that it goes right to the edge – you will need a straight edge there so the gnomes do not fall apart, a bit like a Paper Doll Chain. The centre of the gnome should be on the closed side.
(Image shows drawing of a heart.. but you just need half a gnome shape!)
Cut out the gnomes. When you open it up you should have 3 gnomes connected together.
Decorating your gnomes and card background
Time to decorate! We cut out some shaggy beards and oval noses for our gnomes. But anything goes. Cut 3 sets out and glue into place.
Give the paper chain another crease. Making sure the “centre” of the hearts “fold in” and not out.
Assembling your pop up gnome card
Decorate the background with a white landscape and triangle trees.
Fold your concertina paper up. Add glue to one side and position on the card. Gently glue down.
Fold the paper again and apply glue to the second outside side. Fold the A6 Card on top for perfect placement.
Your fun gnome card is finished.

Hooray!!! Be sure to come back and check out the REST of our fabulous Pop Up Cards for Christmas. We have a great new series for you coming! In the meantime, you may also like this fabulous DIY Christmas Pop Up:

Or check out our complete collection of fun Pop Up Card Projects for all seasons!