Printable Doll’s House Craft – Mouse Family
The holidays are upon us and we have a fabulous printable for you to keep the kids busy! Lots of wonderful colouring, assembling and above all playing with our Mouse House craft. We love making crafts that you can play with… and this printable doll’s house is just the thing. Super cute and complete with Mouse family!
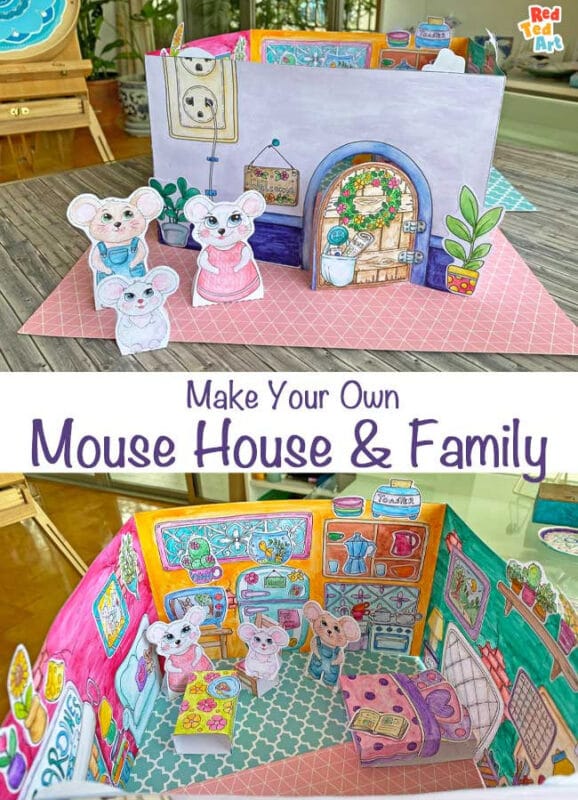
Mouse House Paper Craft
Have a go at our Printable Mouse House and then take advantage of all the fabulous accessories to personalise your house. Or maybe even create some of your own?
For the Mouse House you will need:
- The Mouse House Printable available for for just a few dollars – grab the download here
- Paper (for the House & Furniture templates 180gsm/cardstock is best)
- Sticker Paper or paper for Accessories (120gsm works great)
- Coloring Pens, watercolours for colouring the templates,
- Scissors,
- Glue to stick together the house and add accessories

How to make a Mouse Doll’s House
Main House structure:

- Colour in all 5 main parts of the house: Outside and inside (Entry Hall & Bathroom, Living Room, Kitchen & Bedroom)

- Now, we will glue the ‘Outside’ and ‘Entry Hall & Bathroom’ together. So add glue to the whole of the back of the ‘Outside’ printable and then stick the ‘Entry Hall & Bathroom’ on top. You will have a double sided paper. On one side the outside and if you turn the paper you will see the entry hall and family bathroom.
- Carefully cut with scissors the door open. Make sure not to cut out the whole door but leave about 5cm attached where the hinges are.

- Have the ‘Entry Hall & Bathroom’ printable face you. We will now add the ‘Living Room’ to the right side of the ‘Entry Hall & Bathroom’ part. Add glue to the flap on the Entry Hall & Bathroom’ printable and stick the Living Room facing you on top of the flap aligning both rooms.
- We will proceed by glueing the ‘Kitchen’ to the other side of the ‘Living Room’ and then the ‘Bedroom’ to the ‘Kitchen’.

Adding accessories:
Before we close up the house by glueing ‘Bedroom’ and ‘Entry Hall & Bathroom’ together, we will add accessories.

- Colour in all the accessories that you would like to add to your Mouse Home. You can use all stickers everywhere in the house. I made a suggestion though where some items will fit best. But hey, don’t mind me! This is your Mouse House! You might want to draw a couple of other things that your Mouse Family really really needs! Go for it!
- Then cut out your stickers and either stick your accessories to the house if you have printed on Sticker Paper or add glue first and then stick to where you want things to go.
Finishing off the Paper Doll’s House:
We still need to close up the Mouse House so that it can stand nicely.

- Find the flap that is left. It is on the left hand side of the ‘Entry Hall & Bathroom’ printable. Add glue to the flap and stick it together with the right side of the ‘Bedroom’. Now you can stand up the Mouse House and the walls stand up straight.
Adding printable doll’s house furniture:
You may now want a table, bed and chair?! Here is how to make them.

- Colour in all furniture parts.
- Then cut out chair, bed & bed cover and coffee table along the lines.
- Bed & Coffee Table: Fold all dotted lines and then add glue to the provided flaps and glue bed and coffee table shut. They now look like a box with two sides open.
- Bed Cover: Simply fold both dotted lines and place it over bed.

- Chair: The trickiest of all! You need to glue the front and back of the back rest together. Then add glue to the flap and stick the end of the chair to it as shown in the picture.

Time to PLAY!!!
Check out more of our fabulous Printable Crafts to play with here – including bobble friends, 3d Princess and Pop Up Dinosaurs!: