
Crochet Toy Avocado Pattern
Oh my. Today, I have one of the cutest Free Crochet Patterns ever… yes.. you know you have ALWAYS wanted to crochet a Crochet Toy Avocado Pattern.. right? No? Well.. now you see it, I bet you too!! This little CUTIE is by the Left Handed Crocheter as website packed with the most adorable Crochet Pattern for both left and right handed people, PLUS a great section on the best Left Handed Crocheting tips! I think if you made this out of plush yarn, this would be an amazing Jellycat Amuseables Avocado too, don’t you think?
Free Avocado Crochet Pattern – giving the Jellycat Amuseables Avocado a run for it’s money!
Want to teach yourself to crochet? We have a lovely beginners crochet guide for you to check out!
And today, lucky Red Ted Art readers, I get to share with you this little Toy Avocado!! I want one.. and I want one now. How fun. How adorable! Here we go…
Crochet Toy Avocado Pattern
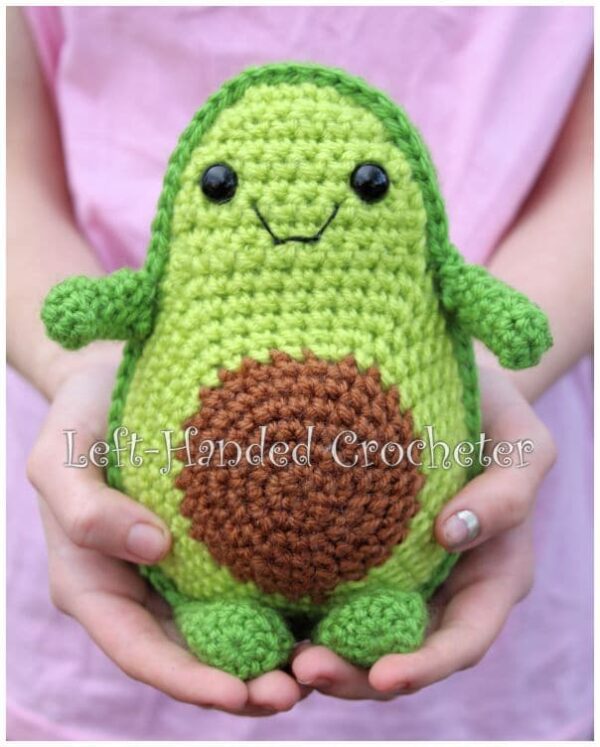
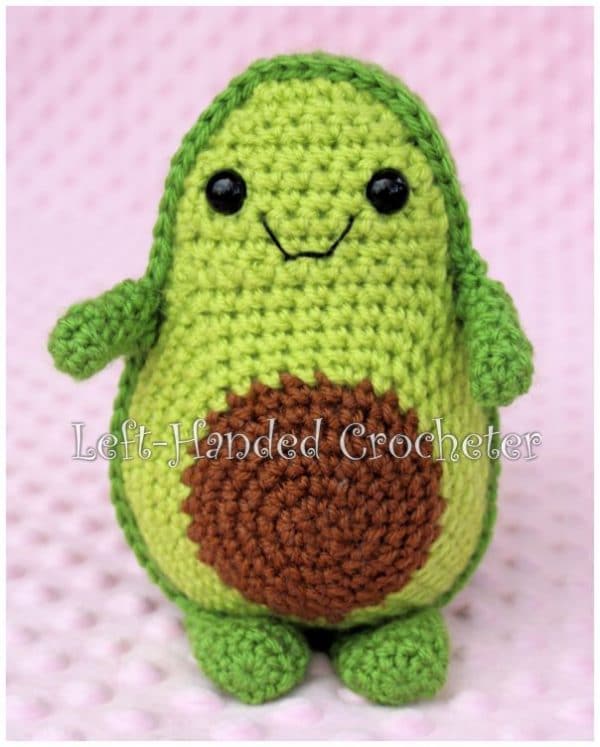
Have you heard? Avocados are a super food. They’re super healthy and super yummy. You won’t want to eat these avocados, though, but they are super cute and super cuddly.
This pattern works up really quickly, and doesn’t take much yarn to make. The finished avocado stands about 7 inches tall. Make a couple for all of the avocado-lovers in your life.
If you want a pattern that you can save on your computer and easily print, this pattern is available in my Ravelry shop for only $3.00. I love printing patterns and saving them in a binder to keep track of the ones I’ve done and the ones I still plan to do. And if you make these from plush yarn as Jellycat Amuseables Avocado you could easily sell these at a crochet fair or market stall!
Crochet Abbreviations used in this pattern:
ch: chain
sc: single crochet
sl st: slip stitch
inc: increase (2 single crochets in one loop)
dec: decrease (pull yarn through loop, pull yarn through second loop, yarn over and pull through all loops)
Kawaii Avocado – Materials needed:
Please note: This materials list contains some affiliate links – should you choose to buy through these links, the site will earn a small comission that goes towards the upkeep of the site!
- Lion Brand Vanna’s Choice yarn in fern, toffee, and radiant lime.
- I (5.25mm) crochet hook
- 12mm safety eyes
- Yarn needle
- Poly-fil
- Black embroidery thread
This crochet avocado pattern is worked “in-the-round”, and stitches are worked through both loops unless otherwise noted.
Front of your Kawaii Avocado
With toffee, ch 3. Sl st to first ch to create circle. (Instead, you can perform the “magic circle” if you’d like.)
Row 1: Ch 1, 5 sc inside of circle. (5 stitches)
Row 2: Inc in each stitch around. (10 stitches)
Row 3: *Inc in first stitch, sc in next stitch, repeat from * around. (15 stitches)
Row 4: *Inc in first stitch, sc in next 2 stitches, repeat from * around. (20 stitches)
Row 5: *Inc in first stitch, sc in next 3 stitches, repeat from * around. (25 stitches)
Rows 6-7: Sc in each stitch around. (25 stitches)
Switch to radiant lime.
Row 8: *Inc in first stitch, sc in next 4 stitches, repeat from * around. (30 stitches)
Row 9: *Inc in first stitch, sc in next 5 stitches, repeat from * around. (35 stitches)
Row 10: *Inc in first stitch, sc in next 6 stitches, repeat from * around. (40 stitches)
Row 11: *Inc in first stitch, sc in next 7 stitches, repeat from * around. (45 stitches)
Row 12: *Inc in first stitch, sc in next 8 stitches, repeat from * around. (50 stitches)
Tie off.

Your piece won’t be round, it should have 5 sides to it like the photo above. With radiant lime, slip stitch into the end of one of those sides.

Row 1: Sc in first 10 stitches, ch 1, turn. (10 stitches)

Rows 2-4: Sc in each stitch across, ch 1, turn. (10 stitches)
Row 5: Dec in first 2 stitches, sc in next 6 stitches, dec in last 2 stitches, ch 1, turn. (8 stitches)
Row 6: Sc in each stitch across, ch 1, turn. (8 stitches)
Row 7: Dec in first 2 stitches, sc in next 4 stitches, dec in last 2 stitches, ch 1, turn. (6 stitches)
Row 8: Sc in each stitch across, ch 1, turn. (6 stitches)

Work 65 sc’s around the whole thing.

Sl st to first stitch. Tie off.

If you’re using safety eyes, you can attach them now and sew a mouth on with embroidery thread. If you’re stitching eyes on, you can wait until you’re finished to sew them on if you’d like.
The Back of your DIY Avocado Softie
With fern, ch 3. Sl st to first ch to create circle. (Instead, you can perform the “magic circle” if you’d like.)
Row 1: Ch 1, 5 sc inside of circle. (5 stitches)
Row 2: Inc in each stitch around. (10 stitches)
Row 3: *Inc in first stitch, sc in next stitch, repeat from * around. (15 stitches)
Row 4: *Inc in first stitch, sc in next 2 stitches, repeat from * around. (20 stitches)
Row 5: *Inc in first stitch, sc in next 3 stitches, repeat from * around. (25 stitches)
Row 6: *Inc in first stitch, sc in next 4 stitches, repeat from * around. (30 stitches)
Row 7: *Inc in first stitch, sc in next 5 stitches, repeat from * around. (35 stitches)
Row 8: *Inc in first stitch, sc in next 6 stitches, repeat from * around. (40 stitches)
Row 9: *Inc in first stitch, sc in next 7 stitches, repeat from * around. (45 stitches)
Row 10: *Inc in first stitch, sc in next 8 stitches, repeat from * around. (50 stitches)
Tie off.
Sl st into one of the flat sides like you did for the front.
Row 1: Sc in first 10 stitches, ch 1, turn. (10 stitches)
Rows 2-4: Sc in each stitch across, ch 1, turn. (10 stitches)
Row 3: Dec in first 2 stitches, sc in next 6 stitches, dec in last 2 stitches, ch 1, turn. (8 stitches)
Row 4: Sc in each stitch across, ch 1, turn. (8 stitches)
Row 5: Dec in first 2 stitches, sc in next 4 stitches, dec in last 2 stitches, ch 1, turn. (6 stitches)
Row 6: Sc in each stitch across, ch 1, turn. (6 stitches)
Work 65 sc’s around the whole thing. Repeat this 3 times to create a “bowl” shape. You can make your avocado wider by working more rows around the back piece, or make it slimmer by working less rows around.
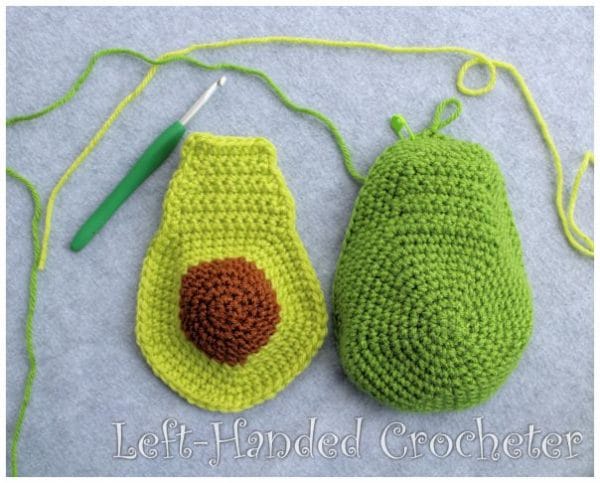
Holding the 2 pieces together, sc around.

Before you close it up, stuff tight with poly-fil.

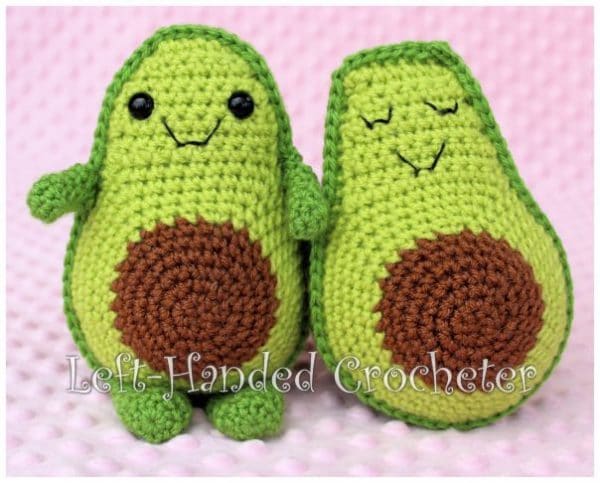
You could leave your avocado like this if you’d like.

Or put a face on it and attach some arms and legs.
The Arms of your Kawaii Avocado
With fern, ch 3. Sl st to first ch to create circle. (Instead, you can perform the “magic circle” if you’d like.)
Row 1: Ch 1, 6 sc inside of circle. (6 stitches)
Rows 2-5: Sc in each stitch around. (6 stitches)
Tie off. Sew onto sides of avocado.
Your Avocado’s Crochet Legs
With fern, ch 3. Sl st to first ch to create circle. (Instead, you can perform the “magic circle” if you’d like.)
Row 1: Ch 1, 10 sc inside of circle. (10 stitches)
Rows 2-6: Sc in each stitch around. (10 stitches)
Tie off. Sew onto bottom of avocado.

I hope you enjoy this pattern! You’re welcome to sell items that you make using my patterns, as long as you don’t post the pattern anywhere else, and link back to my page if you’d like to.
A HUGE thank you to the Left Handed Crocheter for this fantastic and awesomely CUTE Avocado Crochet Patetrn. If you love it as much as I do … why not check out some more fantastic designs – e.g. we love:

Cutest Unicorn Pattern – part of a Crochet Fairytale Series

… or also part of the Fairytale Crochet series.. this wonderful Crochet Dragon Pattern? Just SO CUTE!!!
More Free Crochet Toy Patterns?
Check out this lovely collection of Free CrocheT Toy Patterns, including the fabulous dumpling cat crochet and a fabulous crochet unicorn pattern! Many of the patterns here would work as wonderful Jellycat Amuseables!
