
How to sew a Hedgehog Pin Cushion
The Summer Sew a Softie challenge is back! Teaching kids to sew, is something everyone should have a go at. Whether you are confident at sewing yourself or not. As you know, we aim to make sewing easy for you and have a range of wonderful (and easy) Sewing Projects for Beginners. Pin cushions are a fabulous little project to get stuck into (see what I did there.. hehehe) are just so useful. Too often needles and pins get lost while you’re sewing and so having somewhere to put them always comes in handy. This easy hedgehog pin cushion is so cute and you can put all of those stray needles in one place. It’s also super easy to make especially for young children looking to get into sewing.
Isn’t he adorable? And he is so simple to make. A great way to practice your sewing skills or have a go at different basic hand stitches.
Materials Needed to make this DIY Hedgehog Pin Cushion:
- Felt in 3x colours (brown, black and beige)*
- 1x googley eye & strong PVA glue
- Black thread (if you don’t have black you can always use a different colour)
- A little stuffing (we like to use recycled pillows!)
- Pins
- Scissors (felt scissors + regular scissors)
- Paper & pencil for making a basic template
*we happened to have “hedgehog colours” already. But if you don’t have these “classic” colours, why not make your hedge hog in bright red or blue? Don’t be restricted by traditional colour schemes, but DO work with what you have at home already!
How to sew a Hedgehog Pin Cushion from Felt
Cut out 2x felt ovals

Use your paper to make yourself a simple oval stencils for your hedgehog.
Draw an oval shape in pencil on your brown felt and cut it out.
Cut out another one of the same size.
Mark your felt ovals

Mark in pencil an oval shape inside of both your oval cutouts.
You can use a paper stencil to make sure your circles are the same size.
Cut your hedgehog spikes
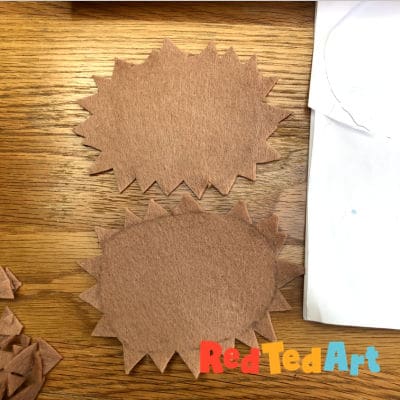
Using felt scissors, cut the felt hedgehog’s spikes around the perimeter of the oval.
Make sure it is within the boundary you drew.
These don’t need to be too neat, they are meant to look a bit wild!
Pin the pieces together

Line up the two felt pieces so that the pencil circles are aligned and pin them to prepare for sewing.
The hedgehog’s spikes don’t need to be aligned as this adds more depth to the craft.
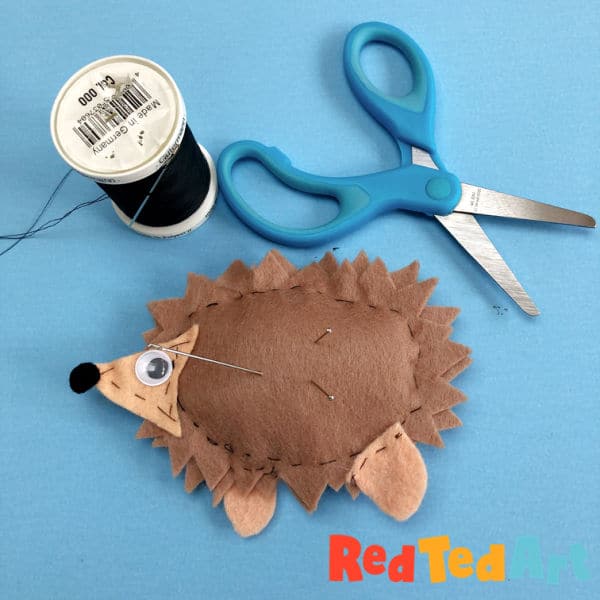
Sew the edges of your felt hedgehog

Sew along the pencil line, making sure to leave a gap to put the stuffing through.
Here we used back stitch here but feel free to use whatever handstitcch you prefer. A running stitch would work well too and is a great stitch for young children to strat off with.
Stuff your DIY pin cushion

Stuff the inside of your pin cushion.
You can use basically anything to stuff this as long as its soft so that the needles will stick in easily.
Make sure to stuff it very full but not too full so that you can’t sew the gap up.
Sew up the remaining part

Sew up the gap that you have put your stuffing in.
Make sure to tie the thread in a knot once you’re done.
Cut out the pieces for the head

Using your beige coloured felt, cut out two triangular shaped pieces with a curved bottom for the head.
Make sure these are the same size.
Use one as a stencil for the other to make sure of this.
Align them

Align them so that they are placed on either side of the hedgehog, using a pin to hold them in place.
Its important that the cutouts are placed so the edge is far enough onto the body of the hedgehog.
Then sew them on using whatever stitch you prefer around the perimeter of the head.
Repeat with the feet

Cutout two semicircle shapes for the feet.
This time sew on onto the edge of one side and one onto the edge of the other side (see below for how it should look).
Again, you can use whatever stitch you prefer.
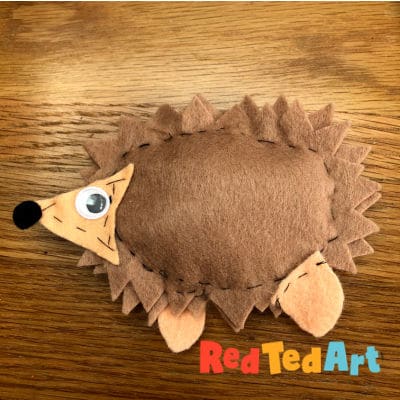
It should look like this

Once you’re done sewing the head and the feet, your hedgehog should look like this.
Add the nose

Cutout a tiny felt circle using your black felt.
Sew it onto the face as a nose.
It doesn’t matter how neat you sewing is here as you’re using black thread on black felt so you won’t see it.
Add your eye
Using PVA glue, stick on a googley eye to your hedgehog.
This is the final touch and it really adds character to your hedgehog pin cushion!
Your hedgehog pin cushion is ready to use!
This hedgehog pin cushion turns out looking so cute and kids love using something that they made themselves. Keep it in your sewing box and stick all of your loose needles on it.
More lovely Sewing Projects for Beginners here:
Or be inspired by these adorable Hedgehog Crafts for Kids:
