Red Ted Art - Make crafting with kids easy & fun

Cute & Easy Crafts for Kids

  • Home
  • START HERE
  • Preschool Crafts
  • Easy Crafts for Kids
  • Paper Crafts
  • Free Printables
  • About
  • Join Our Newsletter
  • Cookies, Privacy Policies & Disclosure

How to… Spin Art Fabric Painting

July 22, 2011

spin art Welcome back to this weeks tutorial: Spin Art Fabric Painting! It is a guest post by the lovely Roopa from Putti Prapancha. I know Roopa through the kids craft network and each week she comes up with more and more fun crafty ideas to do with your kids – from painting with balls on slides (simply brilliant) to teaching young children to sew. Do go and visit her site if you don’t know it! Today she shows us her clever spin art fabric painting idea!

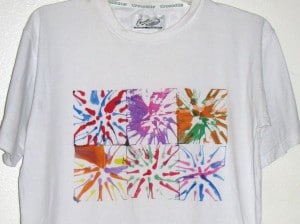
Spin Art T-shirt

This T Shirt was painted by my 3.5yr daughter for her Dad. Isn’t this sweet? If you have made spin art with your child, I am sure you recognise the patterns here. And, If you have a Spin Art Machine or a Salad Spinner, you can make these amazing designer T Shirt for your loved ones in no time. They will make great child made Father’s Day, Birthday, Teachers, Grandpa Gifts or Gifts for any occasion!!

You’ll Need:
• Paints in the color of your choice. I used Acrylic paints, but you can use Fabric Paints and see if you like the results more.
• a T Shirt (I upcycled my husband’s old T Shirt)
• a Salad Spinner or a Spin Art Machine (I have Melissa and Doug Swirl n Spin Art which is just $8)
• cardboard or something else thin and stiff that fits in your t-shirt
• sheets of white paper
• newspaper to cover your work area
• a rolling pin

1. If your T-shirt is new, it’s a good idea to wash it.  Sometimes new shirts have a substance on them called sizing that hinders paint absorption

2. Cut out your cardboard to fit the inside of your shirt.  I used some old pizza boxes for mine. Slip the cardboard inside your shirt. This is to make sure that the paint doesn’t soak through to the other side of the shirt

Spin art t-shirts spin art t-shirt

3. Fold down the bottom of the T Shirt and sleeves, so that only the part that you need the design on is exposed. (makes it easier for little hands to know where to place the paints)

4. Cut the sheets of paper to fit into your Spin Art Machine. Mine takes 4 inch squares, you could cut whatever size you want.

5. Cover your work area with newspaper.

6. Thin your paints by adding a little bit of water, so that they spread easily, but do not make it runny.

spin art

7. Place the cut paper on your spin art machine and put drops of paint over it and give it a spin. Add more colors and spin until you are happy with the design. Picture 4

spin art

8. Then, carefully lift the paper off the machine and place it on the T Shirt where ever you like it with paint side down and press it down firmly.

spin art spin art

9. Place another sheet of clean paper over it and roll it with a rolling pin.  Lift off the paper to see the deign on your T shirt.

spin art spin art tshirt

spin art

10. Repeat the process until you have covered the area of the shirt you wish to paint.  The colors may get smudged or may appear light at places, but thats okay.

spin art tee

11. Voila and it was ready to be worn! If you use fabric paints, you need to set the colors by ironing. My daughter was so proud of the shirt she made for her appa. It looked fantastic and her Dad loved the new look of his old T Shirt !!

spin art spin art spin art flower

spin art t-shirt spin art t-shirt star spin art heart

Extension Ideas:
• You can make these on Tote bags too.
• You can cut the paper in any shape you like. Flower, heart etc
• A heart shaped with red and pink paints will look perfect for Valentines Day.
• Orange and Black colored spin art would be apt for Halloween T Shirts
• Star shaped red and blues for 4th of July!!
• They will make great child made Father’s Day, Birthday, Teachers, Grandpa Gifts or Gifts for any occasion!

Thank you  Roopa for your fabulous Spin Art Fabric Painting technique and ideas! Brilliant! Do hop over to Putti Prapancha and say hello!

«
»

Filed Under: How To's, Kids Craft 23 Comments

Comments

  1. Laina says

    July 23, 2011 at 7:33 am

    Love this! I haven’t done spin art since I was a kid, I had forgotten how much fun it was!

    Reply
  2. Elisabeth says

    July 23, 2011 at 8:53 am

    Splendid! The shirts look beautiful and unique. Well done to you:)

    Reply
  3. Red Ted Art says

    July 23, 2011 at 9:00 am

    Thank you both – yes, I agree Roopa did a fabulous post – love how she was able to transfer “normal” spin art onto fabric. So clever!

    Reply
  4. Paola says

    July 24, 2011 at 12:32 pm

    fantastic!

    Reply
  5. Rachelle | TinkerLab says

    July 25, 2011 at 3:48 am

    Such a clever idea, Roopa! I couldn’t figure out how you did it, and I’m simply amazed. My spin art machine is making the rounds with our play group, but once I get it back….

    Reply
  6. Red Ted Art says

    July 25, 2011 at 7:04 am

    I agree Rachelle – when Roopa sent the post over I was like “ooooh how did she do that?!?” – clever Roopa indeed!

    Reply
  7. Red Ted Art says

    July 25, 2011 at 7:05 am

    PS Peeps: I moved server over the weekend and as part of that lost a number of comments since last Wednesday – so if your comment is missing, I did NOT delete it 🙁

    Reply
  8. Judy says

    July 25, 2011 at 2:48 pm

    What a cool art project…I am going to have to try this with my boys!

    Reply
  9. Liz Burton says

    July 25, 2011 at 8:14 pm

    What a fantastic idea! It looks really effective.

    I’m going to be on the hunt for a salad spinner now – I always wondered what the point of them was, now I know!

    Reply
  10. Red Ted Art says

    July 25, 2011 at 9:28 pm

    You make me laugh!!!!

    Reply
  11. Emma says

    July 26, 2011 at 4:59 am

    I too had forgotten about this ~ my son used to do it in his preschool (he’s 7 now) and we haven’t done it since. Roopa’s look amazing and this has many possibilities. Thanks for sharing!

    Reply
  12. Roopa @putti prapancha says

    July 26, 2011 at 2:28 pm

    Thanks everyone for all your comments and likes !! Glad you all liked it, hope you give it a try too and you will know how easy it is to make:)

    Thanks again Maggy!

    Cheers
    Roopa

    Reply
  13. Esther says

    July 26, 2011 at 4:54 pm

    Beautiful prints! It looks so neat!

    Reply
  14. Julie Bagamary says

    July 27, 2011 at 12:21 pm

    This is GREAT!

    Reply
  15. Bernadette - Mom to 2 Posh Lil Divas says

    July 30, 2011 at 4:11 am

    oh, how fun. love this idea! what a fabulous homemade gift.

    Thanks for linking up to the Sunday Showcase – hope to see you again this week!

    Bernadette

    Reply
  16. Sewplicity says

    July 31, 2011 at 10:06 am

    This is such a cool idea…my kids are going to love it! I’d love if you linked up on my Weekend Craft Hop! http://sewplicity.blogspot.com/2001/07/weekend-craft-hop)30.html

    Reply
  17. Red Ted Art says

    July 31, 2011 at 11:55 am

    Thank you! And done 🙂

    Reply
  18. Rachel @ Lines across my face says

    August 1, 2011 at 2:54 am

    This is so cute and there are so many projects you could do using this same colorful idea. It looks like a lot of fun to make. Thanks for linking up last week at Lines Across My Face. I hope to see you back this week for our 2nd crafty link party.
    http://linesacrossmyface.blogspot.com/2011/07/craft-link-party-2-cure-for-common.html
    🙂 Rachel

    Reply
  19. mummiafelice says

    August 4, 2011 at 8:17 am

    This looks brilliant!!!

    Reply
  20. Red Ted Art says

    August 8, 2011 at 3:26 pm

    Rachel – Thanks for the invite to link! Have now stopped by 😉

    Reply

Trackbacks

  1. Spin Art Fabric Painting · Lesson Plans | CraftGossip.com says:
    August 1, 2011 at 12:41 am

    […] love the blog Putti Prapancha, and she just did a guest post over at Red Ted Art’s Blog, another one of my top favorites for kids’ crafts. Roopa shows you how to create a fabulous […]

    Reply
  2. 101 DIY Gifts for Kids says:
    June 12, 2012 at 12:07 pm

    […] Wearable art is always fun!  Here is a tutorial on how to paint spin art T-shirts. […]

    Reply
  3. Pintura Centrífuga: Arte y Fuerza Centrífuga en Acción - experCiencia says:
    April 9, 2018 at 4:40 am

    […] También puedes realizar el estampado sobre una camiseta con el papel impregnado en pintura textil, como nos enseñan en la página Red Ted Art […]

    Reply

Leave a Reply Cancel reply

Your email address will not be published. Required fields are marked *

Recipe Rating


Welcome!

Welcome

Hello! I am Maggy and I love all things crafty and sharing my craft ideas and how tos.

The aim of this site is to provide easy, do-able and fun crafts for all ages.

Categories

Archives

Crafty Blogs

Copyright © 2022 · Website Design By Jumping Jax Designs