Red Ted Art - Make crafting with kids easy & fun

Cute & Easy Crafts for Kids

  • Home
  • START HERE
  • Preschool Crafts
  • Easy Crafts for Kids
  • Paper Crafts
  • Free Printables
  • About
  • Join Our Newsletter
  • Cookies, Privacy Policies & Disclosure

How to… make Sand Beads

July 29, 2011

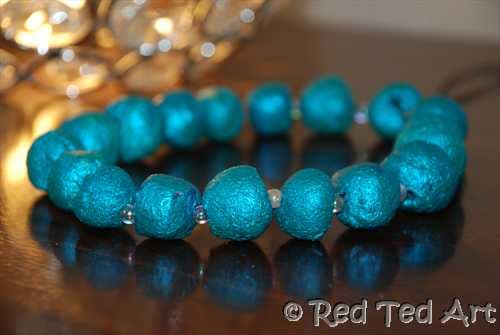
Sand beads Hello Welcome back to this week’s tutorial: How to Make Sand Beads! That is right making beads, from more or less JUST SAND! I first had the idea whilst having a twitter chat about plaster of paris (don’t ask) and I suddenly wondered whether it was “possible”… There seemed to be “very little” out there. So I had a go! And guess what, it works, brilliantly!

My main “weakness” was the painting – I think as with any beads, it is final finish that really gives it that “something”. And I am not too experienced at bead painting – e.g. getting a nice marbled bead or a nicely decorated bead. Neither am I very good at “mixed media” – I genuinely believe these would look fabulous mixed and matched with say some felt beads…

So.. how to make sand beads:

Materials:

Sand (sifted) & white glue & a skewer.

Yep, that is it! And you really don’t need much!

how to make sand beads how to make sand beads

1)ย For about 12 beads, I think I used roughly 6 table spoons of sand & 2-3 table spoons of glue (squirted directly onto the sand). Mix it until it feels like “wet sand” – a bit like that hideous stuff moon sand.. i.e. you can shape it a little by squeezing it gently.

2) Take a small amount -and form into a ball, by cupping one hand & squeezing with the finger tips of the other. You cannot “roll” these like playdough. It is a forming and squeezing process. A bit fiddly at first, but gets easier as you get the hang of it. Try and make them as small as possible (I think mine are approx 1cm in diameter), as they are just too chunky and clumsy looking otherwise (I made 3 attempts!).

3) Use skewer to make the hole. Make sure the skewer is clean. I found I had to wash the skewer and my hands every 4-5 beads.

4) Let dry – it doesn’t take long – a day or so.

5) Paint. I confess, I repainted this about 3 times, trying to work out what look nicest and settled on our metallic paints.. now I would love for some one more bead talented to have a go and come up with a fabulous design or marbling technique!

6) Thread and enjoy! So.. what do you think?

And here is the kid’s Salt Dough Beads inspired version..

And why not visit my good friend Chris over at Thinly Spread for her fabulous “Something for the Weekend” linky?

«
»

Filed Under: How To's, Nature 28 Comments

Comments

  1. Amanda @ Having Fun says

    July 29, 2011 at 8:15 am

    ooh, these look great. I’m going to make them with my 8 & 10 year old girls. I’ll let you know how they go. Is it ok to blog about it with full credit and link backs to you? Amanda x

    Reply
    • Red Ted Art says

      July 29, 2011 at 10:16 am

      Absolutely!!! Hope it goes ok with 8yrs old!! They are little tricky at first, would prob recommend for older children, but having said that would love to hear how it goes! ๐Ÿ™‚

      Reply
      • Kitty says

        May 22, 2013 at 5:28 am

        If you want to get a marbled effect, why not paint a base coat of color and then do the marbling the same way they do it for manicures? i.e. dropping different colors of nail polish onto the surface of some water that is room temperature, dragging a toothpick through it to cause the colors to swirl and marble, and then dipping the bead into the color. Then you could just seal the final product with a clear acrylic and you should get some wonderful marbling effects in a matte or gloss finish ๐Ÿ™‚

        Reply
  2. Merry says

    July 29, 2011 at 12:12 pm

    I like it – very novel indeed ๐Ÿ™‚

    Reply
  3. Esther says

    July 29, 2011 at 12:37 pm

    I love the blue metallic color! The idea of sand beads sounds fun! We have to try the salt dough and the sand beads.

    Reply
  4. Esther says

    July 29, 2011 at 12:40 pm

    and I understand the difficulty of painting. How about adding some food color or paint to the glue? But may be we won’t get the same neat look as painting!

    Reply
  5. Red Ted Art says

    July 29, 2011 at 1:13 pm

    Merry – thank you ๐Ÿ˜‰
    Esther – have fun! Would love to see how yours come out! Colouring the sand beforehand is a great idea!

    Reply
  6. Chris at Thinly Spread says

    July 29, 2011 at 4:23 pm

    Genius! Never tried this…I may have to raid the sand pit! ๐Ÿ˜€

    Reply
  7. miss bliss says

    July 30, 2011 at 7:35 am

    I love how the metallic paint turned out! great texture and color…

    Reply
  8. Erika says

    August 2, 2011 at 5:29 am

    How well do these hold up? Are they pretty sturdy? Or do they start falling apart since they are just sand?

    Thanks! Very cute idea!

    Reply
  9. kerry says

    August 2, 2011 at 10:22 am

    Loved them, you could try to spray paint them, very small spray guns and mini compressors can be brought from bunnings at a reasonable price, would be able to get the swirly effect using gun.

    Reply
  10. clairelouise says

    August 3, 2011 at 11:36 pm

    Wow I love these and the blue is my fav colour, they look great.x

    Reply
  11. Red Ted Art says

    August 7, 2011 at 2:30 pm

    Have been away a few days – love the spray paint idea – a technique I am yet to explore!

    And Erika – they are VERY TOUGH – in fact, SURPRISINGLY tough.. didn’t expect them to be so solid, but they are. If you are using acrylic paints you add an extra layer of sturdiness! So yes, I would highly recommend!

    Reply
  12. Melanie says

    August 8, 2011 at 2:26 pm

    How cute! Thanks so much for sharing!

    I’d love to have you visit our first linky party this Thursday! It’s a party specifically for kids and teenagers craft and other ideas, so your idea will be absolutely perfect! Hope you’ll stop by!

    bearrabbitbear.blogspot.com

    Reply
  13. Red Ted Art says

    August 8, 2011 at 7:28 pm

    Ooh sounds like a great linky topic (esp for the teens!) will stop by on Thursday! Thanks!

    Reply
  14. Johnnie says

    August 11, 2011 at 10:55 am

    This is so cool! Stopping by to invite you to link up to Thrifty Thursdays. Blessings!

    Johnnie

    Reply
  15. creativejewishmom/sara says

    August 11, 2011 at 2:01 pm

    lovely!did you see my version with sharpie pens from last summer? I also did a crafting feature with sand beads for a big American magazine, which I can’t wait to share soon,using paint pens to decorate the beads. thanks so much for sharing on Craft Schooling Sunday!

    Reply
  16. Red Ted Art says

    August 11, 2011 at 2:17 pm

    Well I never! Great minds really do think alike!! I am not sure I saw your stones last year, but will go and have a look ASAP ๐Ÿ˜‰ and how funny re the Sand Beads! Can’t wait to see your finished items too!

    Reply
  17. Amanda @gidders1 says

    August 11, 2011 at 5:25 pm

    Great idea, I love it!!

    Reply
  18. Missy says

    August 14, 2011 at 6:11 pm

    That is too cool. I bet the texture is fantastic!!!

    Reply
  19. working london mummy says

    August 18, 2011 at 7:35 pm

    wow these look fabulous- and the colour looks lovely!

    Reply
    • Red Ted Art says

      August 18, 2011 at 7:50 pm

      Aaah thank you ๐Ÿ™‚

      Reply
  20. mummiafelice says

    August 22, 2011 at 2:27 pm

    Fantastic! They are a beautiful colour too ๐Ÿ™‚

    Reply
  21. Carly @ BokBok Jewelry says

    July 17, 2014 at 3:00 am

    I found you through Pinterest – What a great idea! This is definitely on my to-try list. ๐Ÿ™‚

    Reply

Trackbacks

  1. End-of-Summer Crafts at Best Blog for Kids Who Hate to Read says:
    August 19, 2011 at 9:04 am

    […] https://www.redtedart.com/2011/07/29/how-to-make-sand-beads/ […]

    Reply
  2. Braccialetti di sabbia « PianetaGiovaniCreativity says:
    June 4, 2012 at 10:10 am

    […] il materiale, cosรฌ come spiegato nelย tutorial, formate le palline, coloratele e infilatele nel filo scelto. Le perle di sabbia potranno essere […]

    Reply
  3. come-guadagnare-online.it | Perle di sabbia e colla!Creative Riciclate Colorate! says:
    August 14, 2013 at 5:39 am

    […] Ve ne ho giร  presentato qualcuna fatta di carta (la trovate qua) ma oggi voglio presentarvi le PERLE DI SABBIA FAI DA TE che ho scoperto sul ย Blog Red Ted Art. […]

    Reply
  4. The Best Sand Crafts and Activities says:
    April 13, 2015 at 10:57 pm

    […] You’ll be amazed by how beautiful the finished bracelets look! Find all the details via Red Ted Art here. […]

    Reply

Leave a Reply Cancel reply

Your email address will not be published. Required fields are marked *

Recipe Rating


Welcome!

Welcome

Hello! I am Maggy and I love all things crafty and sharing my craft ideas and how tos.

The aim of this site is to provide easy, do-able and fun crafts for all ages.

Categories

Archives

Crafty Blogs

Copyright © 2022 ยท Website Design By Jumping Jax Designs