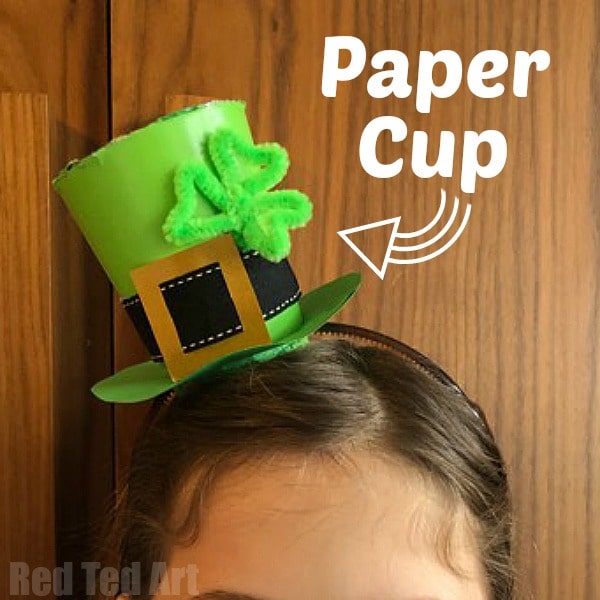
St Patrick’s Day Hat DIY
So.. as our St Patrick’s Day Craft series continues, I wanted to do a little “introduction” video to the our lovely crafts on both Facebook and YouTube.. and I felt that I needed to “look the part” in order to do so. I thought the most appropriate St Patrick’s Day Costume accesory would be a Leprechaun hat diy!!! At first, I was going to “just make it” and not bother sharing the how to with everyone.. but then thought better of it!! So, I filmed my forage into the St Patrick’s Day Hat DIY – kind of making it up as I went along, but most certainly got there in the end. In a funny sort of way, I think this actually now my favourite of all of the St Patrick’s Day ideas shared over the last week or so – eventhough it isn’t perfect. Well I never!!

You won’t need a leprechaun hat template, for this Leprechaun DIY… because will be using a PAPER CUP to make our mini leprechaun hat. I happened to have one green paper cup which was just perfect.. you can of course use a white one and paint it, or use Toilet Paper Rolls (or similar) instead! So please do not fret if you don’t happened to have a green paper cup.. I love this mini leprechaun hat. Now if you want to make a BIG Leprechaun Hat DIY – I have another great Cat in a Hat and Mad Hatter’s Hat Craft you can check out – the same principle applies to a larger Paper Leprechaun Hat too! I rather adore the mini hat DIY though!
These mini hat DIYs, would look amazing as mini top hat DIYs – just use different colours and embellishments!
St Patrick’s Day Hat DIY – Materials
Please note, the following contains some affiliate links – I may earn a small
- a paper cup (preferably green, but white is fine, you can paint it) – you can get some here US/ UK
- green paper (mine isn’t an exact match to the paper cup, but I don’t think you notice)
- black ribbon (ribbon is better for fitting around a taylored paper cup – as the cup curves the ribbon can mold to the shape, however, black paper should work too – or black paint!) – I recycled our black ribbon from one of those fancy paper carrier bags
- gold paper or yellow paper
- green pipecleaner for the shamrock (though you could make a paper shamrock too)
- an alice band – you can get some here US/ UK
- hot glue gun (though strong White Glue fine too)
How to make a mini top hat from a Paper Cup
Ok.. so please do watch the video for the mini top hat how to. As mentioned, I DID make this up as I go along – and I think especially the “top” of the top hat could do with some improvements 😉 but it works and it looks fine I think! Teehee. Step By Step Leprechaun Hat DIY instructions below!
How to make a St Patrick’s Day Hat DIY – Step by step instructions.
Fitting the cup to your alice band
- Begin by making the holes that you will need to secure your top hat to your Alice Band – make two small holes (on opposite sides to each other) at the very bottom of your paper cup. So the tapered end of the cup will be the bottom of your hat – giving it that fun and quirky top hat shape.
- Make sure these holes are big enough to feed your Alice Band through.
- Remove the band again, you will insert it again later.
Ceiling Off the top of your top hat
- Cut the rim off the top of your paper cup. Of course you can leave it – but it is a matter of preference and style. I preferred it without!
- Now use the paper cup to make your own “top hat stencil”. Place the cup on your green paper – trace a circle. Then cut. I tried adding “teeth” to my circle first and gluing it inisde the cup that way first.. but I found that just didn’t work for me.. it may work for you?
- You can either tape or hot glue gun the circle to the top of your paper cup – to seal it off. I hot glue gunned it. Yes, it is a little messy and you can see the glue. but it works. This is the only party of my mini top hat DIY, that I think you may be able to improve on with some experimenting.
Making the brim of your Leprechaun Hat DIY
- I used a small bowl that was about 4 cm wider than the BASE of my paper cup, to trace a big circle. I cut two of these, to make the paper “stiffer”. If you are using card, onc circle is enough.
- Glue the circles of paper together.
- Use the bottom of your cup to trace another circle – cut out the circle JUST WITHIN this circle. Then snip some teeth into the sides.
- Carefully pop over the bottom of your paper cup, until you can see the holes made for your Alice Band.
- Pop the alice band through the holes and they will keep the brim of your hat in palce. You don’t have to glue it!
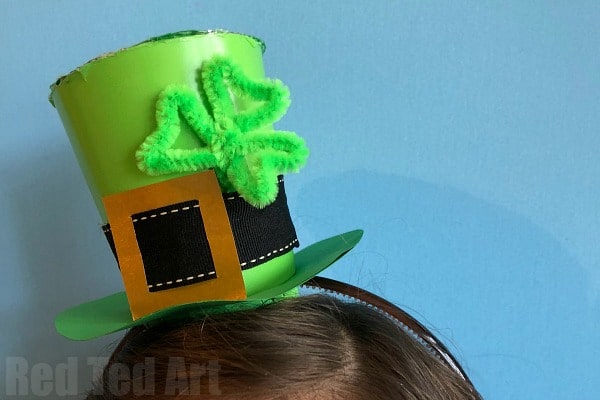
Final Decorations of your St Patrick’s Day Hat DIY
- Now you can have fun decorating your mini leprecaun hat.
- I cut a gold square with some vertical lines and weaved the black ribbon through those lines, to make a buckle.
- Hot glue this on.
- Finally make a pipecleaner shamrock (three hearts and a stem) and pop it into your ribbon and glue in place.
Your mini St Patrick’s Day Hat DIY is finished!! Isn’t it adorable? So cute!!!!
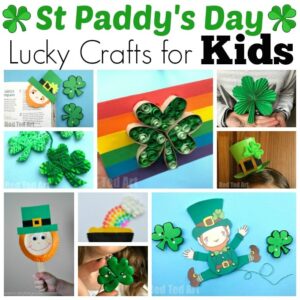
Do take a peak at the rest of the St Patrick’s Day Craft series here: