Cereal Box to Foldable Doll’s House DIY (perfect take along house)
Today, I have a craft that I think you guys will LOVE – a Cereal Box Pop Up Dolls… yes… a dolls house made from cereal boxes, that you can collapse, fold away and take along with you… be it on holiday, to the park or the coffee shop!
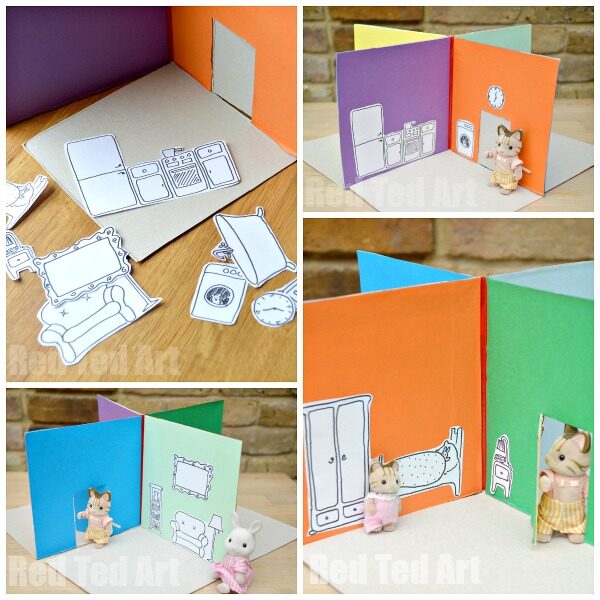
I think this dolls house is super cute – colourful and yet simple.. the best bit? I created some dolls house furniture printables for you – to make things even easier for you to make.
And check out my reader’s TRAIN SET VERSION here created by one of my lovely Red Ted Art readers. So cute!
Quick demo video of our take along doll’s house
You can see the little video of how this doll’s house looks like or can be played with (or YouTube here):
Isn’t it cute the way you can fold it all down and up again?
Pop Up Dolls House – Materials:
- two cereal boxes
- duct tape (duct tape is best, as it is very strong and durable)
- coloured paper (or you can use acrylic paints instead)
- scissors & ruler
- a glue stick (better than white glue, as it doesn’t make paper wrinkle)
- white paper/ printer/ pens

Click to Download your Furniture Printable (enter $0 at check out)

Pop Up Dolls House – How To:
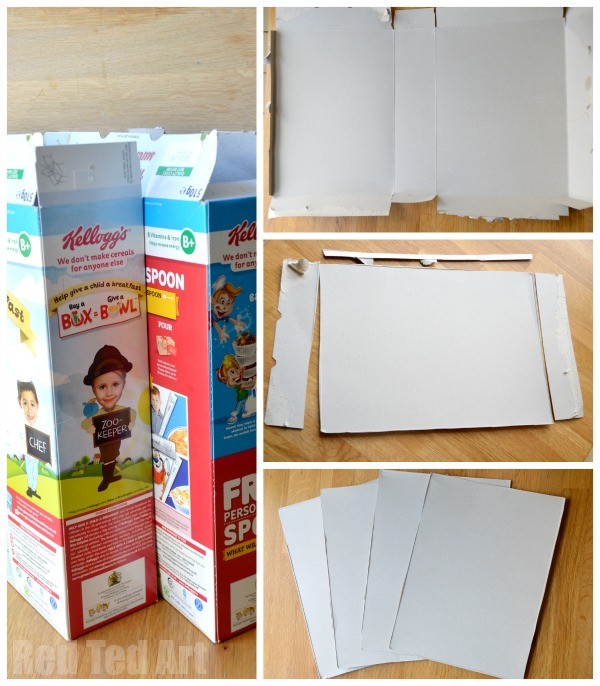
1) You will need two large cereal boxes.
2) Unfold your cereal boxes.
3) Cut out the main panels.
4). This should leave you with four panels.
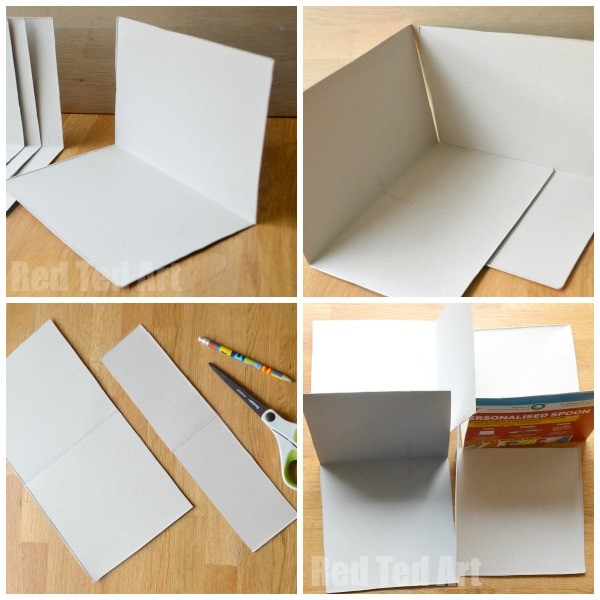
5) Fold your panels in half.
6) Now you want each half “panel” to be a perfect square”. You could get a ruler out and measure everything out, but I was lazy and I used one of the other panels to measure a square and draw a line…… measuring is better, but I am a messy crafter!!! (top right hand corner).
7) Once you have your lines, cut off the excess sides. This should leave you with a piece made up of two squares.
8) Repeat with the other 3 pieces. They now all fit together as per the bottom right hand corner. Arranging them can be a little muddling… but if you follow the next steps, it all falls into place…..

9) Place one panel cereal side up and one cereal side down. As per the top left picture. Tape the top HALF of your two pieces together. As mentioned before, use duct tape, as this is nice and strong and will allow for lots of folding and unfolding without tearing. Other tape works too, but just add more layers.
10) Now taped, you can flip the right hand side over…. and lay the next 3rd panel, face down next two the first two. Tape this in place again.. flip over (as per top right hand picture).. and add the forth panel. Tape in place. Now flip the 4th panel over and unfold the first panel. Connect the 1st and 4th panel.
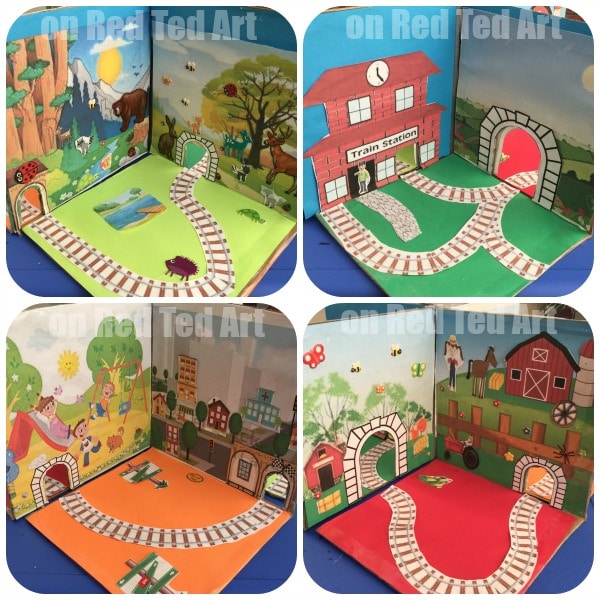
11) When you unfold it all you can will get a 3d room layout (bottom left).
12) When you fold it all up again, you get one neat little package (bottom right or watch the video below).
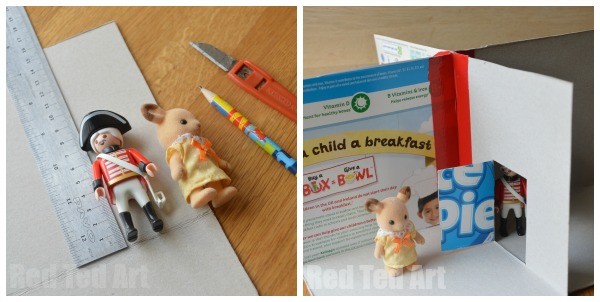
13) Now it is time to cut some doors into your house. We went for two doors only – on opposite sides. This leaves more space for “adding furniture later”. But you can 4 doors if you wish. Unfold your house but lay flat. Measure the door size, based on the toys you will play with. Cut the door into the TOP HALF of one panel using a stanly knife.
14) Repeat on opposite side.

Time to decorate!!! We decide to leave the floors plain… and to decorate the falls only.
15) Being a lazy crafter (as per usual), I didn’t measure out exact shapes…. It was much easier to simply apply glue stick glue to one square panel. Then press the coloured paper down onto it.
16) I flipped it over… and using scissors, cut around the edges of the square.
17) If necessary cut out a door and stick that down too.
18) One panel finished. All neat and tidy, with no precise measuring needed!
19) Repeat for all the sides… and cut out doors where necessary!
20) Now you can start adding some furniture (enter $0 at check out)! You can either design your own.. or use the templates I have provided above…. you can leave them black and white or colour them in.. your call! I have left plenty of space to let you add more furniture items… So.. print/ draw and cut out.
21) Using a glue stick, stick your dolls house furniture into place.
22) You are finished with your cereal box doll house and ready to play!!!!!!!!!
And once you are done, pack your dolls house up, pop it in your back.. and off you go.
Cereal Box Take Along Train Set:
More fun crafts using cereal boxes here: