DIY Birthday Cake Box (with Free Template)
Oooh I do love a cute paper craft! Today we have a fantastic craft for you that you can use in so many difference ways – a fab little DIY Birthday Cake Box with a free template! It is from the amazing Crafty Happy book (more below) and perfect for some self care/ self affirmation, but would also make quirky paper decor and/ or a lovely little DIY Birthday Cake Gift Box. SO CUTE!
Please note: this project has been reproduced with permission from the publisher and is not allowed to be republished in any way, without their consent. It is for personal use only.
Also note: affiliate links have been added to this post – should you choose to purchase via these, I will earn a small commission that goes towards the upkeep of this site!
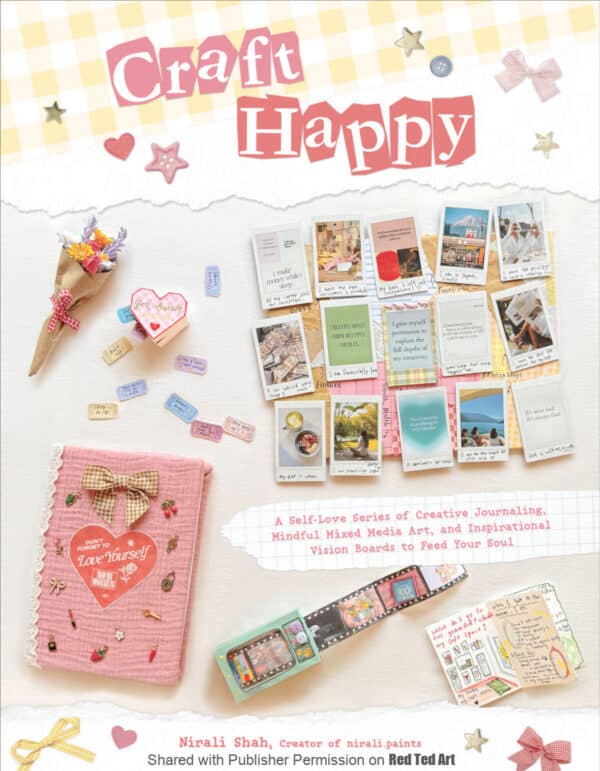
Craft Happy the Book
As mentioned this adorable craft is from the Craft Happy book by Nirali Shah:
You will find Nirali on social media as Nirali Paints a gorgeous instagram account where craftiness and paper art meets water coloring and painting! And the best bit, though her projects look amazing and oh so professional, Nirali has a knack of guiding you through the making process step by step.. in such a way that everyone can join and have fun.
Now she brings her talents together in one book – Craft Happy! A book bursting with positivity, self care and self love. Though I think this book is for anyone, I think it would be particularly fun for teenagers, students or even mum to have a go at. 30 min of just taking time for yourself to make something really cute and creative, whilst also adding messages of love or affirmations. Just wonderful.
The book is also packed with templates, so you can make a broad set of paper crafts easily. Today, I get to share this wonderful little DIY Cake Box with you – time for a Slice of Compliments!
Get yourself a copy of Craft Happy on Amazon or all good bookstores today!
Reprinted with permission from Craft Happy by Nirali Shah. Page Street Publishing Co. 2025. Photo credit: Nirali Shah.
Slice of Compliments – DIY Cake Box with Template
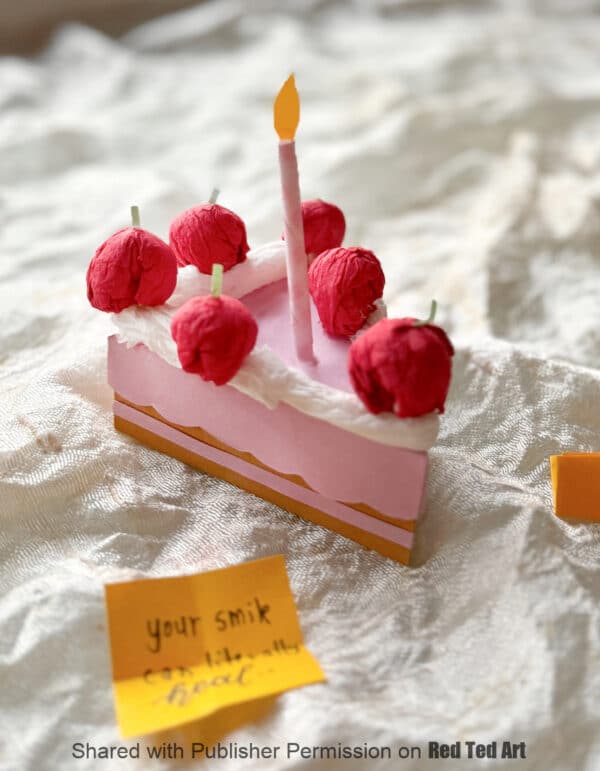
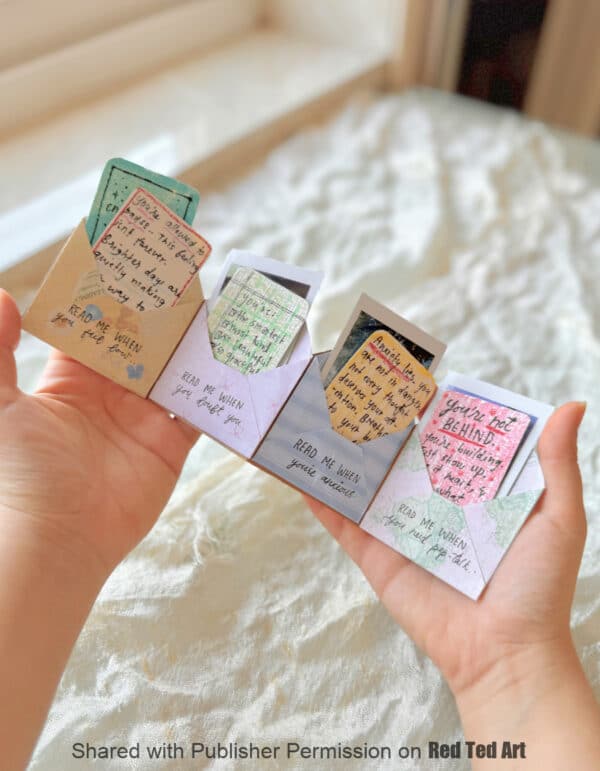
Just imagine . . . You are standing at your dressing table, about to face the day, when your eyes catch a glimpse of an adorable slice of cake. Not just any cake, but one that holds little compliments reminding you of your worth, because you deserve joy, celebration, and a daily dose of self-love. In this tutorial, we are creating a yummy cake slice box that not only adds a pretty touch to your space but also holds words of encouragement. It’s more like your personal slice of happiness, there to lift you up whenever you need it!
Materials
- Cake slice template (see the big red button below “Click for Your Printable”)
- Regular sheet paper (for printing the template)
- Cardstock paper in assorted colors of your choice
- Scissors
- Pencil
- Craft glue or glue stick
- Thin double-sided tape
- Paint or markers
- Paintbrush
- Decorative elements (ribbon, tiny stickers, etc.)
- Red and white tissue paper
- Small pieces of paper (for writing compliments)
- A trinket dish (for display)
I have added the basic cake box template in THREE SIZES to suit different needs and projects!

How to make a DIY Birthday Cake Box
1. Prepare Your Template
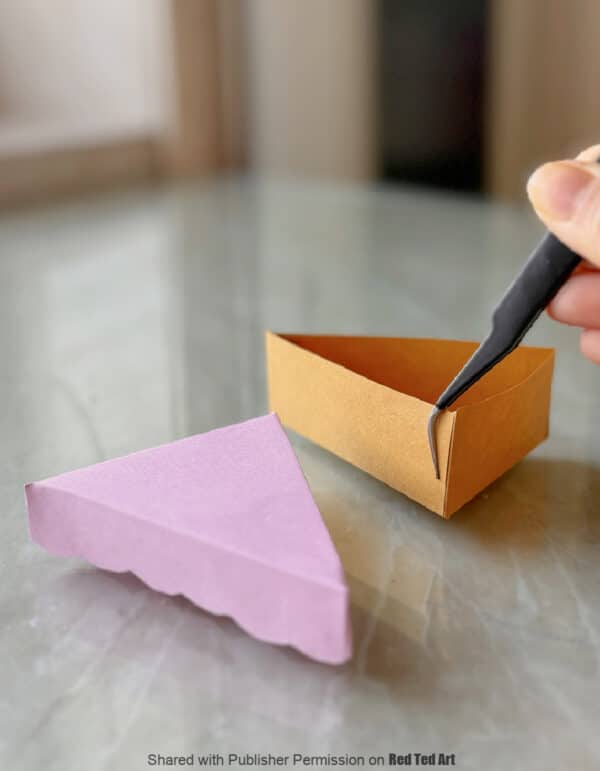
Print out the cake slice template. Use a pair of scissors to carefully cut it out, then trace it onto your chosen cardstock. The template consists of two parts: the base and the lid. Choose a cardstock color based on the type of cake slice you want.
You can try picking two different colors, one for the lid and one for the base. Perhaps a warm brown and red for chocolate cake, pastel pink and soft cream for strawberry, or soft cream and brown for vanilla.
Carefully cut along the solid lines for both the base and the lid, and fold along the dotted lines to form the shapes.
Make sure the folds are crisp for a clean and structured look.
2. Assemble the Cake Slice Base and Lid
Apply glue to the side tabs of the base template and assemble it into a sturdy triangular box.
Repeat the process for the lid, ensuring it fits snugly over the base without being too tight. Make sure both parts are secure so they can hold your compliments inside without collapsing.

3. Decorate Your Cake Slice
Here’s where the cuteness comes in! Get your paint, markers, paintbrush, and other decorative elements ready to add details to the cake slice to give it personality.
Roll a colored paper of your choice to create a small cylinder and stick a small flame-shaped cutout of yellow colored paper on top of it to resemble a candle.
You can draw frosting drips, add tiny paper cutouts for a “sprinkled” look, or even use shimmery paint for a glossy finish.
4. Create a Cherry Topper with Icing
Take white tissue paper, twirl it with some craft glue, and stick it on the boundaries of the cake slice to make the icing.
Take a piece of red tissue paper and gently crumple it into a small ball.
For a realistic touch, roll a small piece of white tissue paper, paint it green, and attach it to the cherry as a stem. Secure the cherry and stem to the top of your cake slice with a dab of glue or thin double-sided tape for that final, irresistible touch.
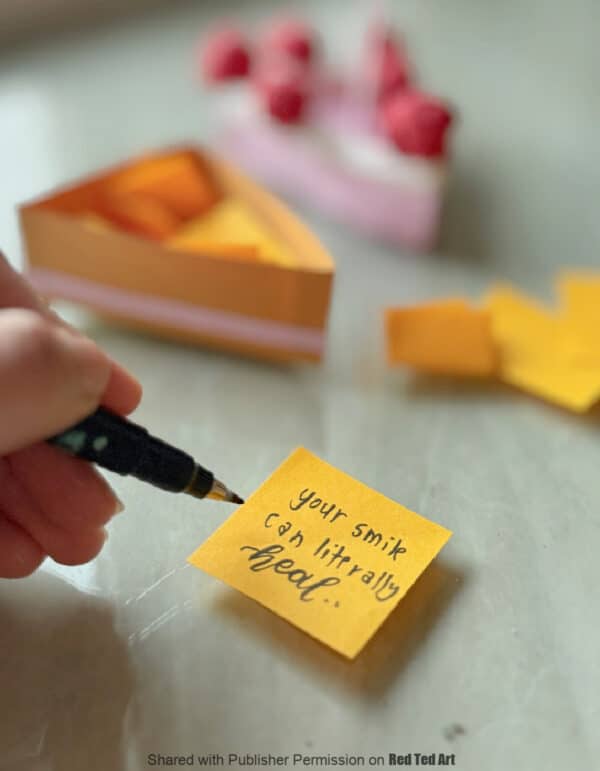
5. Write Your Compliments
Cut small strips of paper and write gentle, uplifting compliments that bring a smile to your face and fold them into paper slips. These could be reflections that celebrate your unique traits and the way you brighten up the space around you.
Consider writing notes like,
- “Your smile lights up the room,”
- “You have a way of making everyone around you feel special,”
- “You have beautiful hair!” or
- “The warmth you bring is unmatched.”
Focus on compliments that remind you of your natural glow, charm, and the little things that add to your uniqueness. Roll or fold each compliment and place them inside the cake slice.
Once done, place your cake slice on a trinket dish and find a spot to display this sweet little treat to remind you how awesome you are!
Project Reflections
Just as we savor a sweet treat, take a moment each day to “unwrap” little joys and remind yourself that you are worthy of kindness, love, and confidence.
Your trinket dish, adorned with this sweet reminder, is a testament that happiness is a state of mind, and we are responsible for maintaining it.
So, take a deep breath, smile, and know that you’re going to finish this chapter with a heart full of encouragement and a daily reminder of your own magic. Now go on and make your world a celebration of you!
Love this template and craft? Want more wonderful Craft Happy inspiration.. well:
Get yourself a copy of Craft Happy on Amazon or all good bookstores today!
Reprinted with permission from Craft Happy by Nirali Shah. Page Street Publishing Co. 2025. Photo credit: Nirali Shah.
Loved this project? Here are some more fantastic Page Street Publishing Books that you may like to try out (ahem, two of these are of course Red Ted Art books!!!):
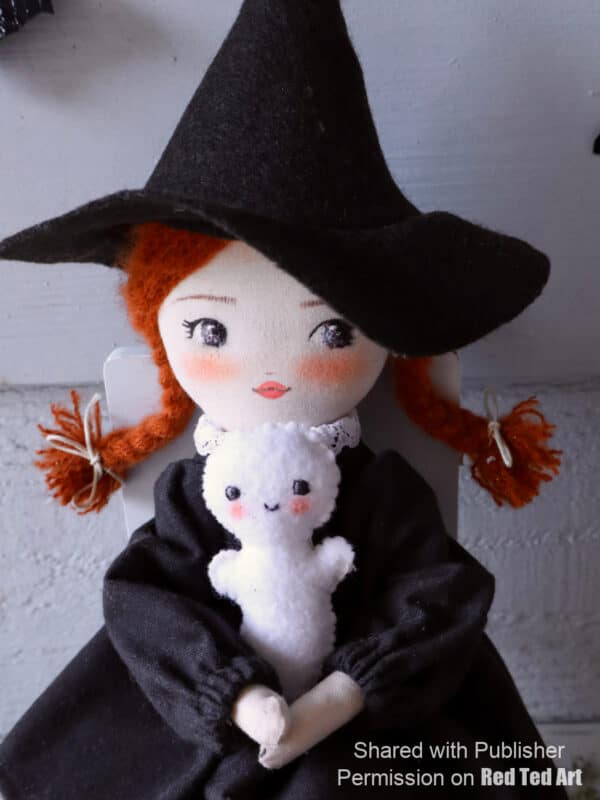
- Have a go at this little Ghost Felt Plushie from Handmade Heirloom Dolls
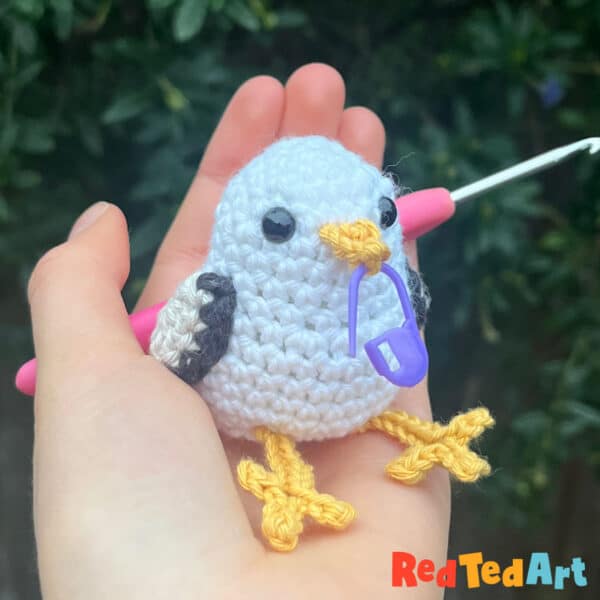
- Try out our very own Seagull Crochet Pattern from The Big Book of Beginner Amigurumi
- Or how about another great paper craft with these cute Paper Baskets from our own Easy Paper Projects?