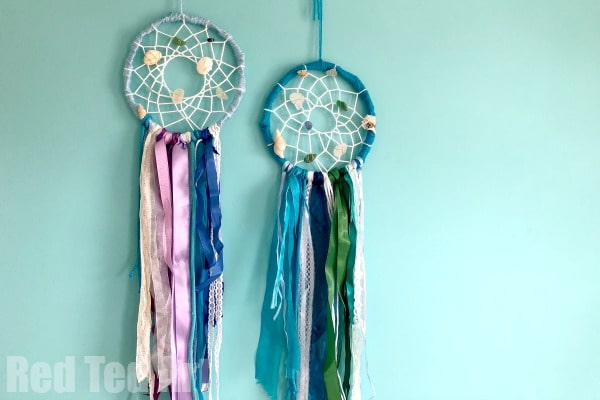
DIY Mermaid Dreamcatcher
Oh our DIY Mermaid Craft series continues. I do hope you haven’t tired of it yet, because we certainly haven’t.. I think it kind of comes with the territory of having an 8yrs old girl crafting with me at home (do check out her AMAZING Mermaid Rag Dolls, that we made as a mummy and daughter project a couple of weeks ago!! Love). And today is no different.. a fantastic and easy DIY Mermaid Dreamcatcher. This makes a great “together project”, we used some “bits and pieces” from around the home, made our own Willow Hoops (though you can use, cut out cardboard rings, or embroidery hoops too) but ABOVE ALL.. we used some nature beach finds – sea glass and shells from our holidays by the sea. Making this not only a lovely seaside craft, but a great way to incorporate our holiday memories into this summer decoration too! We love that it incorporates our precious beach finds and it makes the perfect DIY seashell dreamcatcher for kids! It does make a super fun and fancy dream catcher for your summer decor!!
Today we show you how to make that classic “Dreamcatcher weave” – it is easier than you think. However if working with a bigger group of younger kids, why not check out my friend’s DIY Unicorn Dreamcatcher over on HelloWonderful? This uses an even easier technique and would look just as fantastic for this Mermaid Dreamcatcher version!
DIY Mermaid Dreamcatcher – Materials
- A hoop of any type – we used a DIY Willow Wreath, but an embroider hoop (e.g. US/ UK is perfect too), or even cardboard (two layers of cereal packets would be perfect!)
- Wool or yarn (we used white and blue)
- Old ribbons and lace – anything you can get your hands on.. if you don’t have much, use more of the wool used above… “tear” strips from blue/ green and purple fabrics.. see what you can recycle
For decorating your Mermaid Dreamcatcher
- Craft wire
- Shells and sea glass that you find on holiday (sea glass is a great find, a technically speaking you are cleaning up the beach from man made items!! Hooray)
- You could even use some cut outs from our DIY Mermaid Latern? And have some actual mermaids feature? Totally up to you!
How to make a DIY Mermaid Dreamcatcher
Learn how to make a dreamcatcher with thise DIY Dreamcatcher YouTube video.. or check out the step by step how to instructions below!
Preparing the mermaid dreamcatcher hoop
- Begin by making your hoop. As mentioned this hoop can be made from willow, can be shop bought or recycled from cereal packets (I would use two layers of cardboard for this and cut out a ring about 1.5cm thick)
- If you have a willow hoop, you can actually leave it plain too – for that rustic look. I think that would be lovely. Otherwise wrap your hoop in yarn. We used two pieces of yarn at once to speed up the wrapping it can take a while!
Your dream catcher weave
As mentioned above.. though I think this technique is fairly easy to learn.. if you are working in a big group and teaching how to make a dream catcher for kids, then maybe you would want to check out the DIY Unicorn Dreamcatcher over at HelloWonderful! They use as super easy “criss crossing” technique, that even young children can manage!
- The dreamcatcher weave is very similar to a blanket stitch. Tie your yarn to the hoop.
- Bring into the centre. Then under the hoop… and then OVER the hoop and back through the loop you have created.
- Repeat until you have gone round the hoop once.
- When you have been round the hoop once, loop the yarn through the first loop you made… then the second and third.
- Go all around the hoop once.
- When back at the beginning… give the yarn a little tug. You will see some triangles appear. This time loop the yarn through these triangles. Keep weaving through these triangles until you have gone round 3-5 times (it is a question of preference). A little tug at the yearn, will help “open up” the triangles and make it easier to find.
- When at the end.. pull as tight as you can (without breaking your yarn) a nice circle should form in the centre. Knot and tie off!
Time for your ribbon tassles of the mermaid dreamcatcher!
We used whites, blues, greens and purples for that “under the sea” mermaid colour!
- Fold your ribbons in half.
- Folder under the hoop – with the loop at the top.
- Push the long pieces through the loop and tighten!
- Done! Repeat with as many ribbons and lace and wool items as you wish
- At the end you can trim them to your liking!
Finally. Adding sea glass and shells to the centre of your mermaid dream catcher
Adding your sea glass and shells is actually suprisingly easy, but you do need some craft wire (it may well work with a little thread too!).
- It is really very straight forward – wrap the wire around your seaglass or shell. Leave a 2-3cm piece of wire free at either end.
- Place the wrapped sea glass onto your dream catcher net. And twist the wires one the back of the net to secure. If use thread, just tie it on.
- Yes it really is that easy!!!! Repeat 4-5 times.
- You can also add mermaid silhouettes – we have some great ones to print as part of our DIY Mermaid Latern
Check out the rest of our DIY Mermaid Crafts
As well as some of our Sea Glass DIY Ideas


