
Free Bunny Doll Pattern
We love Bunny Crafts, especially this time of year.. we also love sewing projects for kids. Today’s Free Bunny Doll Pattern can be a “together project” or one for older kids to have a go at!
Sooo…. some of you may know, that this is a BIG YEAR for me.. a BIG YEAR in which I hit a BIG NUMBER. No, I am not talking about pageviews on the blog, or growing subscriptions on my YouTube channel (but whilst I have your attention, to pop over and subscribe 😉 ) I am talking about hitting the big FOUR-O. Yes, I am turning 40!!!! To celebrate, some friends and I are heading to sunny Barcelona for a long weekend of pampering and relaxing and going out. Though I am very much looking forward to it, the KIDS ARE NOT. In particularly Pip Squeak who tends to miss me terribly, even when I am just going out for dinner. So, I promised her to make her a little Bunny Doll whilst I am away and thought I would share the free bunny doll pattern with you!
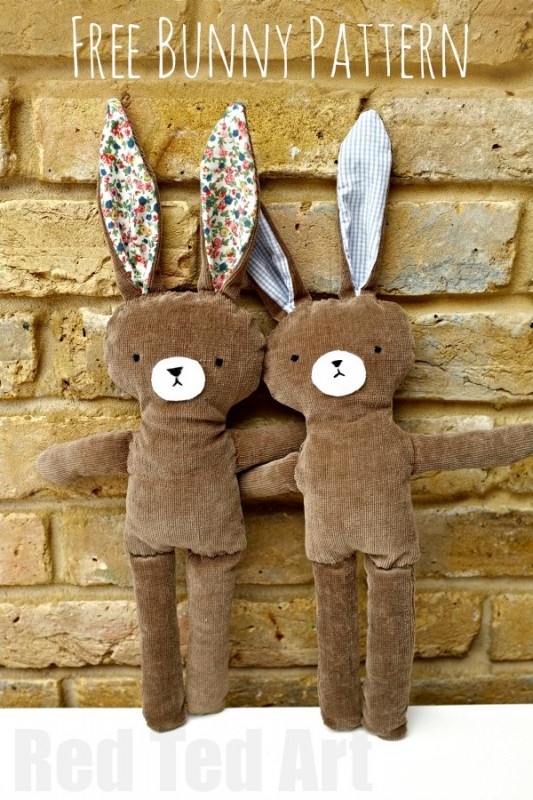
Bunnies, Bunny Crafts and bunny softies are VERY important in our house, with both the kids’ comforters being bunnies. I decided to make their bunny toy, from an old pair of corduroy trousers of mine, combine with a little bit of flower fabric from the trouser lining and The Englishman’s old shirt. This way, I thought the it wouldn’t such be a special bunny toy, but a special bunny toy that would remind them “of me”. A great way to upcycle and old pair of trousers. I will also spray it with a little of my perfume whilst I am away and hopefully, that will give “Pip Squeak”, a little bit of Mummy to cuddle and make the separation easier! And whilst I have your attention, do check out our super duper cute Chick Crafts too!
First post in June 2015 and updated for your convenience
I adapted one of the classic “Rag Doll” patterns (see our Black Apple Doll and our Doll in a Box) and turned it into a Bunny Pattern. When I showed our finished bunnies on instagram, the response was so positive, that I thought I would share the FREE pattern with you today!
These cheeky Bunnies later had a go at wearing the Doll in a Box clothes – see them dress up as Ballerina Bunny and Outdoor Bunny on Instagram!
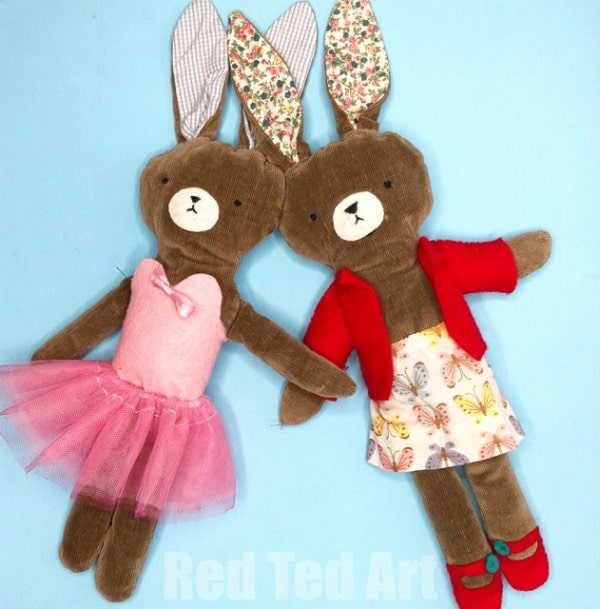
If your bunny’s decide to do the same.. I would add 2mm to the Doll in a Box cloth patterns!
Free BUNNY DOLL pattern – MATERIAS:
- Fabric for the main body – I found one trouser leg was plenty!
- A little bit of patterned fabric for the ears
- A small piece of felt
- Black embroidery thread
- Toy Stuffing
- Sewing machine & needle & thread
- Lavendar or Mummy’s Perfume (optional)
Enter $0 at check out to get your free printable pattern!

BUNNY RAG DOLL – HOW TO:

1) Cut out your pieces of fabric
BODY – The “body” of the doll is only “half the patter”, you will have to fold your fabric in half and cut the shape against the fold of the fabric. You will need two of these.
LEGS – You will need 4 the same
ARMS – You will need 2 the same, then flip the outline over and cut another 2 arms out – this so you have a front and the back of an arm, as they are slightly shaped.
EARS – you will need 2 in the body fabric and 2 in the patterned fabric.
2) Placing the right sides of your fabric together, sew around your arms and legs, leaving an opening at the end. Turn right side round and stuff a little.
3) Place your right sides of fabric for the ears together, sew all the way round. If need be add a little snip a the top of the ears, to help turn the ears “right side again”. Once you have your ears done, fold the bottom ends of the ears in to meet in the middle and sew across to give it that pinched shape.
4) Now… you COULD as with the Black Apple Doll, pin all your arms, legs and ears in place between your two body parts. BUT, I always find this a) very fiddly b) very hard to get everything in exactly the right place and c) tricky to get the sewing machine to run over it properly. SO. I now did a mixture of hand and machine sewing. I sewed together the bottom of the body, right up to “under the arm pit” and then again from the neck up towards 1/3 of way around the head and repeated on the other side.
5) I then turned the body the right way round and pinned the ears, the arms and the legs in place. Folding the body fabric in, as I went along. I now hand sewed it finished, adding stuffing before sewing on the last parts around the legs. Personally, I found this MUCH easier than running the sewing machine around the hole thing and inadvertently sewing the ears in the wrong direction or place!
6) Cut out an oval piece of felt. Using embroidery thread, sew on a triangular nose and mouth part. Then sew this onto your rabbit and add some embroidery thread eyes.
FINISHED!
More from Red Ted Art – 20+ Bunny Crafts and 20+ Chick Crafts

