
Free Fisherman’s Rib Hat Knitting Pattern
As you know, here on Red Ted Art, I always encourage you to learn and try something knew. So today we have a lovely free Knitting Pattern for you – the Free Fisherman’s Rib Hat Knitting Pattern, perfect for Advance Beginners. This is a sample project from the Knit in One Knitting book by the lovely Marie Greene from Olive Knits.

Please note: this project has been reproduce with permission from the publisher and is not allowed to be republished in any way, without their constent. It is for personal use only.
Also note: affiliate links have been added to these post – should you choose to purchase via these, I will earn a small commission that goes towards the upkeep of this site!
Beanies are great projects – as they are so fun to make and also great to gift! They are practical and look great. So why not give this gorgeous Fisherman’s Rib Beanie pattern a go today! If you enjoy the pattern.. then check out the book too:
The Knit in One Book
Knit in One by Marie Greene. Some of you will know Marie from Olive Knits or Knit Camp and now you can enjoy her amazing projects in a compact book. This book contains 30 one skein patterns. I LOVE the concept of one skein patterns – as it is a great way to work through your yarn stash and make some lovely things. You will find all sorts of fabulous projects from beanies (as shared here) to socks cowls and mittens. They are all perfect for the Fall season, and also make fantastic gifts for friends and family during the holiday season. Why not treat yourself to this wonderful book today!?
Fisherman’s Rib Beanie

Some patterns look harder than they are, but this one is the opposite. Not to say that it’s difficult (it’s not), but it’s a little more involved than it might appear. The fabric looks like a simple rib, but it’s a fisherman’s rib, which is a little more robust. To get those dramatic ridges, every stitch is worked in the row below. This creates loftier ribbed layers that are softer and warmer than a traditional rib pattern. The raised ridges practically float along the surface of the beanie and result in a squishy, cozy classic that you’ll wear for decades.
Skill
Advanced beginner
Construction
This classic beanie is knit bottom-up from the brim to the crown and features a squishy fisherman’s rib texture. The project calls for a stretchy cast-on method with a larger needle to match the elasticity of the special rib pattern. The hat is knit long enough for a folded brim to match the classic style.
Sizes
Baby (Child, Adult Small, Adult Large)
Yarn
Sport Weight | Brooklyn Tweed Imbue Sport | 100% Merino Wool | 380 yards (347 meters) in 100 grams (Note: This yarn is sold in 50-gram skeins, so you will need two 50-gram skeins to equal one full-size 100 gram skein) | Color: Crepe
Needles
- Cast-On: US 5 (3.75 mm) 16 in (40 cm) circular needle
- Main: US 4 (3.5 mm) 16 in (40 cm) circular needle*
- Crown: US 4 (3.5 mm) DPNs*
*Or size needed to achieve gauge
Notions
- Stitch markers
- Darning needle to weave in ends
- Blocking mat and pins (for finishing)
Gauge
16 sts and 24 rnds in 4 in (10 cm) in fisherman’s rib pattern on smaller needle, blocked
Abbreviations
- bet between
- BOR beginning of row/rnd
- CO cast on
- dec decrease
- DPNs double point needles
- k knit
- k2tog knit 2 sts together (dec 1)
- p purl
- pm place marker
- rep repeat
- rnd/s round/rounds
- RS right side
- sl1-k2tog-psso slip 1 st purlwise, k the next 2 sts together, pass the slipped st over the k2tog (2 sts dec)
- sl1 slip 1 st purlwise with working yarn held to back
- st/s stitch/stitches
- x x is a placeholder for sizes not represented in this line of instruction
Special Stitches
- k1b knit into the stitch one below the next st on your left needle, then work as usual
- p1b purl into the stitch one below the next st on your left needle, then work as usual
Finished Measurements
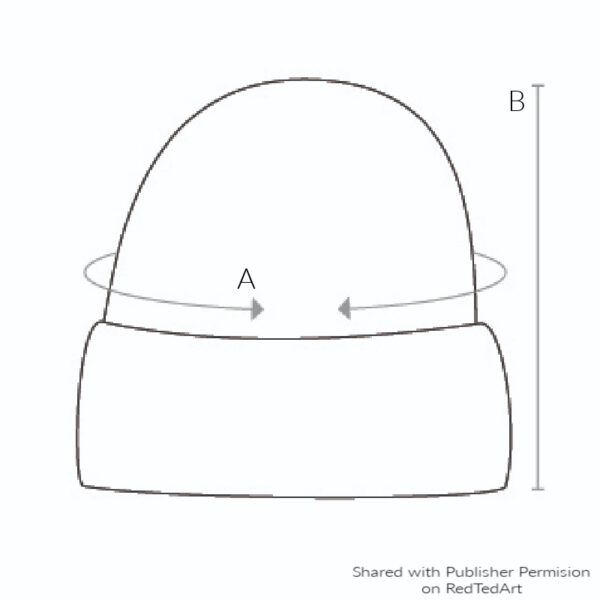
A. Circumference: 14 (16, 18, 20) in/ 35 (40, 45, 50) cm
B. Brim to Crown: 7 (9, 9.5, 10) in/ 17.75 (22.75, 24.25, 25.5) cm with brim folded, blocked
Fisherman’s Rib Beanie Pattern
With US 5 (3.75 mm) 16 in (40 cm) circular needle, CO 56 (64, 72, 80) sts using the Estonian cast-on method .* Do not join the rnd yet. Please note that this is a stretchy cast-on method for ribbing that begins your work immediately on the RS. Adjust accordingly if you use a different cast-on.
*See a tutorial for this cast-on method here: oliveknits.com/caston
Set-Up Row (RS): Transition to US 4 (3.5 mm) 16 in (40 cm) circular needle—or size to achieve gauge—and continue, [k1, p1] rep bet brackets to end of row, pm to denote BOR and join to work in the rnd. (Be sure to check that your sts aren’t twisted before you proceed.)
Begin Fisherman’s Rib Pattern
Rnd 1: [K1b, p1] rep bet brackets to end of rnd.
Rnd 2: [K1, p1b] rep bet brackets to end of rnd.
Rep Rnds 1–2 until your work measures 7 (9, 9.5, 10) in/ 17.75 (22.75, 24.25, 25.5) cm from cast-on edge and you have just completed a Rnd 2 of the pattern.
Decreases
Transition to DPNs when necessary to complete the crown decreases.
Rnd 1 (dec): K1b, [Work 5 sts in established rib pattern, sl1-k2tog-psso] rep bet brackets to last 7 sts, work 5 sts in established rib pattern, sl1 (knitwise with yarn held in back), then k the last st of the rnd together with the first st of the next rnd, then pass the slipped st over. Replace the BOR marker so that it sits to the left of the new st [42 (48, 54, 60) sts].
Rnd 2: [P1b, k1] rep bet brackets to end of rnd.
Rnd 3: [P1, k1b] rep bet brackets to end of rnd.
Rnd 4: [P1b, k1] rep bet brackets to end of rnd.
Rnd 5 (dec): P1, sl1-k2tog-psso, [p1, k1b, p1, sl1-k2tog-psso] rep bet brackets to last 2 sts, p1, k1b [28 (32, 36, 40) sts].
Rnd 6: [P1b, k1] rep bet brackets to end of rnd.
Rnd 7: [P1, k1b] rep bet brackets to end of rnd.
Rnd 8: [P1b, k1] rep bet brackets to end of rnd.
Follow instructions for your size below.
Sizes 1 & 4 Only Rnd 9 (dec): [P1, sl1-k2tog-psso, p1, k1b] rep bet brackets to last 4 sts, p1, k1b, p1, k1b [20 (x, x, 28) sts].
Size 2 Only Rnd 9 (dec): [P1, sl1-k2tog-psso, p1, k1b] rep bet brackets to last 2 sts, p1, k1b [x (22, x, x) sts].
Size 3 Only Rnd 9 (dec): [P1, sl1-k2tog-psso, p1, k1b] rep bet brackets to end of rnd [x (x, 24, x) sts].
All Sizes Continue
Rnd 10: [P1b, k1] rep bet brackets to end of rnd.
Rnd 11: [P1, k1b] rep bet brackets to end of rnd.
Rnd 12: [P1b, k1] rep bet brackets to end of rnd.
Follow instructions for your size below.
Size 1 Only Rnd 13 (dec): [P1, k1b, p1, sl1-k2tog-psso] rep bet brackets to last 2 sts, p1, k1b [14 sts].
Sizes 2 & 4 Only Rnd 13 (dec): [P1, k1b, p1, sl1-k2tog-psso] rep bet brackets to last 4 sts, (p1, k1b) twice [x (16, x, 20) sts].
Size 3 Only Rnd 13 (dec): [P1, k1b, p1, sl1-k2tog-psso] rep bet brackets to end [16 sts].
All Sizes Continue
Rnd 14: [P1b, k1] rep bet brackets to end.
Rnd 15 (dec): [K2tog] rep bet brackets to end [7 (8, 8 10) sts].

Finishing
Cut yarn and draw the tail through your remaining sts. Pull tightly to close the top of your beanie. Weave in your ends, closing any gaps at the cast-on edge, and wet block, flat. Soak in lukewarm water with a splash of fiber wash for about 20 minutes to gently cleanse and relax the fiber. Gently press out excess water and lay flat to dry. Fisherman’s rib will stretch beyond belief if you pull too much on it while it’s wet, so just pat it into shape on your blocking mats and let it dry without pins. Turn as needed for even drying.
Enjoyed this project? Why not treat yourself to the Knit in One book! With many more projects to explore and enjoying making!
Credit: Reprinted with permission from Knit in One by Marie Greene. Page Street Publishing Co. 2025. Photo credit: Annie Loaiza.
You can explore more knitting patterns on Red Ted Art here.