
How to Make a Papier Mache Erupting Volcano for the Science Fair
Today we are sharing our very own Papier Mache Erupting Volcano, it was a relatively “quick project” that we made in a “last minute” hurry to celebrate my son’s “Hawaiian Day” at school. My son has been learning all about the Hawaiian Volcanoes – in particularly Mauna Loa and was very excited to recreate a volcanic eruption.

Our papier mache volcano is perfect for the classic “Science Fair” project, if you are looking for a science project to make with the kids. So long as you have enough “drying time” for the papier mache, this is a quick and fun science fair project to make. We added a coat of varnish to our volcano, to allow us to keep erupting it! Check out more fantastic Chemistry Experiments for kids over on my friend’s site Science Sparks!
Need another 3d Volcano Model Idea?
Don’t have time for paper mache and need a 3d Volcano Model Idea in a hurry? Fear not, we have a fantastic printable for you here (please note: best printed with on a Tabloid/ A3 Printer):

Learn about Mauna Loa
My kids made this whilst learning about Mauna Loa at school. Here are the basic facts about Mauna Loa from an excerpt from Wikipedia:
Mauna Loa is one of five volcanoes that form the Island of Hawaii in the U.S. state of Hawai?i in the Pacific Ocean. The largest subaerial volcano in both mass and volume, Mauna Loa has historically been considered the largest volcano on Earth [Red Ted’s favourite fact!]. It is an active shield volcano with relatively shallow slopes, with a volume estimated at approximately 18,000 cubic miles (75,000 km3), although its peak is about 120 feet (37 m) lower than that of its neighbor,Mauna Kea. Lava eruptions from Mauna Loa are silica-poor and very fluid, and they tend to be non-explosive.
Find out more about Mauna Loa via Wikipedia. Then add this Homemade Volcano DIY to your volcano lesson plan!
This is a great volcano experiment for kids of all ages, as you only need a few household items to make this DIY volcano!
Supplies needed to make a Papier Mache Volcano
Check out our basic how to make papier mache post too!
- an empty plastic bottle/ empty soda bottle (small is good)
- newspaper
- masking tape
- a box lid or similar “to contain” the volcano – some people like to use an old baking pan
- plain flour & water (for the DIY papier mache paste, more info below)
- paints (we used acrylics, as they are a plastic and marginally waterproof)
- waterproof varnish (optional, but great for being able to reuse the volcano science project)
To make the volcano erupt you will need these ingredients:
To create the chemical reaction that is the erupting volcano, you need to main compounds, plus a little liquid
- Baking Soda (Bicarbonate of Soda in the UK)
- Basic white vinegar (any vinegar will do, but this tends to be the cheapest)
- A little (warm) water – the warm water acts as an accelerant. As part of your experiment you can compare the reaction with cold water.
- Food coloring (optional) for the “magma” color
People also like to add dish soap for extra bubbles effect, but it isn’t strictly speaking necessary! Hopefully these ingredients are easily accessible from your kitchen cupboard!
DIY Papier Mache Paste How To:
You can of couese use watered down white glue or school glue. But we like to use homemade papier mache paste – as it is eco friendly and super cheap to make.
Hop over to see our DIY Papier Mache Paste Detail post if you wish!
- Mix one part flour to two parts water in an old container. (we used half a cup of flour and a cup of water)
- Pop into microwave and cook at full heat.
- Performances of microwaves vary – so this can be anything from 30sec to 2-3 min – depending on microwave and the amount of mixture you are making. So keep checking and stirring!
- The mixture will be hot, so you may have to let it cool down a little. It will keep in the fridge with a cover for 1-2 days.
(some people like to add a small cup of salt to preserve the paper mache paste and avoid mold forming BEFORE you use it, but it isn’t strictly speaking necessary – once dry your paper mache creations will last for years, unless you get them wet and don’t dry them out fully).
How to Make your Papier Mache Erupting Volcano:
Some people like to make their erupting volcaon from salt dough.. but you would end up making quite tiny volcano that way (or need A LOT of salt and flour to make a volcano as big as the one shown here), we like this simple papier mache method, as it made using materials from the trash! Apart from a homemade papier mache recipe and a little acrylic paint, it is free to make!
The process shown here is the best simple volcano to make at home!
Make the Basic Volcano Shape

1) First we cut down our cardboard box, to create a base for our volcano to go in and to capture the fluids from the erupting volcano and will make less of a mess! You may want to cover all the holes you can see (especially in the corners) with additional tape.
2) Place your empty plastic bottle inside the centre of your cardboard box (remove the lid).
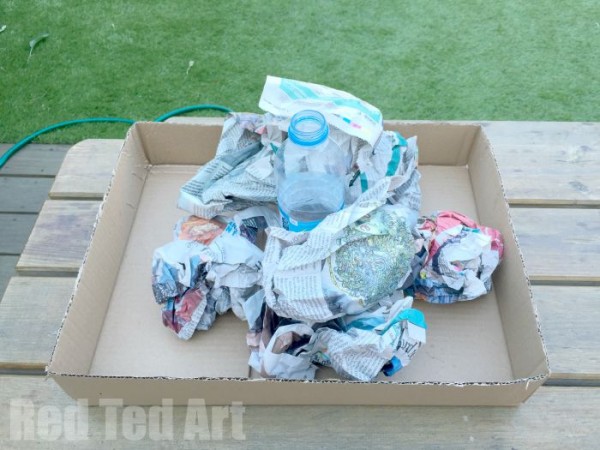
3) Scrunch up some newspaper and place it all around the empty bottle. This is you can shape your volcano and make the steep sides.
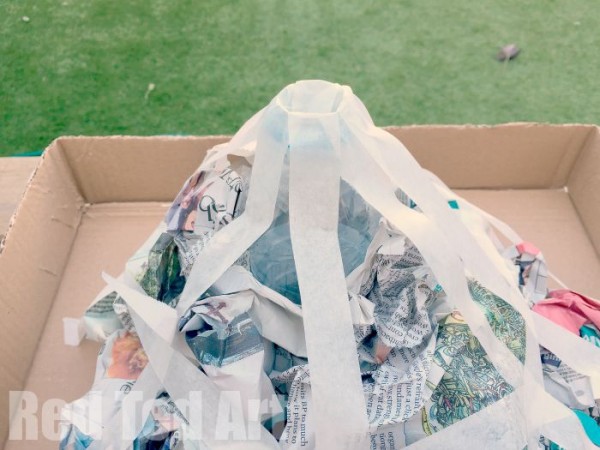
4) Using your masking tape, make a “frame” – running from the top of the bottle down to the cardboard platform and trapping the scrunched up newspaper underneath. This will help shape the steep sides for when you start layering it with newspaper strips.
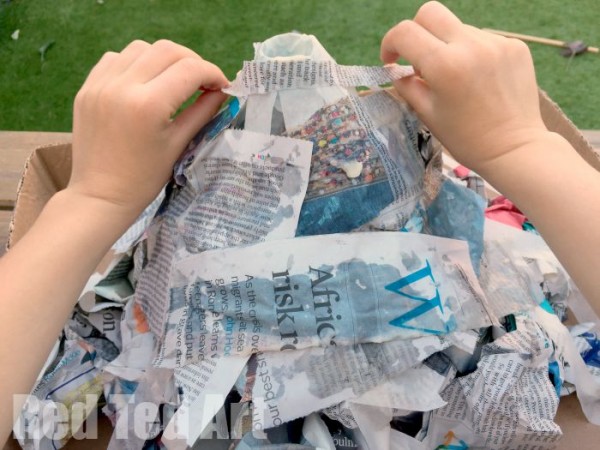
5) Tear your remaining newspaper into stripes and smaller pieces (12 x 4cm ish is good). And start applying your papier machie layers all around the volcano – using the masking tape as a frame. Your volcano shape will start to emerge. The top of the empty soda bottle needs to stay clear, as this is the volcano’s crater .
6) Check for any gaps and holes and make sure the newspaper is nice and flush against the side of the volcano.
7) Let dry fully.
(IF NEED BE ADD A SECOND LAYER ON ANOTHER DAY and let dry again)
Paint Your Volcano to represent earth and magna
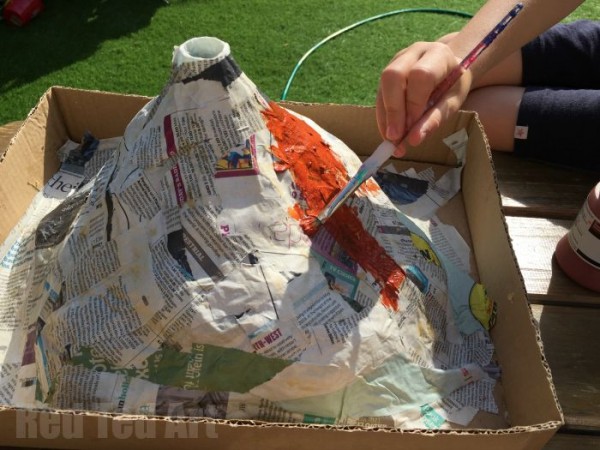
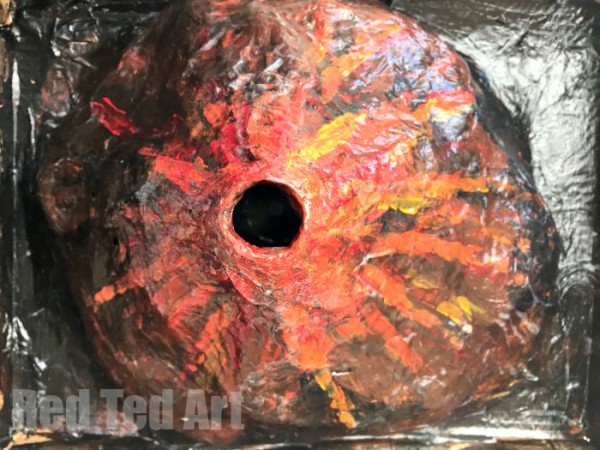
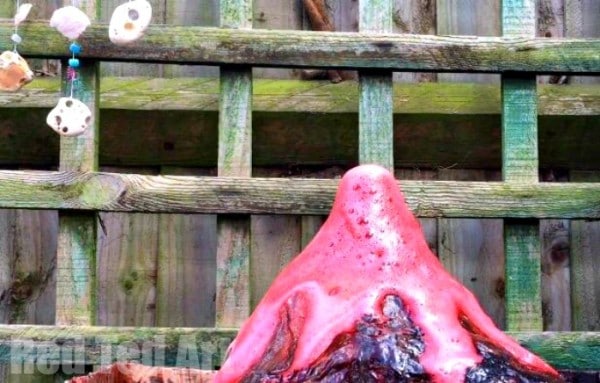
8) Now get creative and paint – we used a dark brown base (mixing brown and black) for our volcano and then at the end added some red and yellow lava streaks/ molten rock around the top of the volcano crater. The kids had a blast painting this!
9) Let dry fully.
10) Finally… add a coat of waterproof varnish (any craft decoupage varnish that has a waterproof finish will do). This won’t make the volcano totally waterproof, but will certainly help in preserving it.
Now let the fun begin… here is the science part to an erupting volcano experiment!
Volcano Experiment
Let’s make the Baking Soda Volcano Erupt (Bicarbonate of Soda in the UK):
I LOVE this article about the Science of Erupting Volcanoes – and how the “order of things” affect the final eruptions! I am keen to try out the mentos and diet coke at some point soon!
Watch the DIY Volcano VIDEO
To erupt our volcano we you will need to:
- Create a paper funnel and added 2-3 tea spoons of bicarbonate of soda to our plastic bottle. You can at this stage also had a few drops of detergent, but it really isn’t needed!
- Pour in half a glass of warm water mixed a few drops of red food coloring
- Pour in approximately a class full of (inexpensive) vinegar.
And stand back…. (watch the video above!!)
Hope you have fun with your DIY Papier Mache Volcano!
More great Papier Mache Projects here:
