
How To… Make a Peg Christmas Wreath

 Welcome to How To… Make a Peg Christmas Wreath – a perfect wreath to help display all those wonderful Christmas cards you will be receiving… The lovely Kelly Innes from Domestic Goddesque is visiting again. If you don’t know Kelly, itis about time you did.. she does EVERYTHING, from crafting, to baking (check out her pumpkin cake) to craftiness with children.. a definite all rounder for any mum! And we have yet another Guest Post coming from her soon! Over to Kelly!
Golly, can you believe that it’s time to start thinking about Christmas decorations?
Today I made a fabulous Christmas Wreath that could also be used as a card-holder, and I want to share it with you. You will need:
- A polystyrene wreath
- A packet of wooden pegs (I used about 30)
- Some strips of fabric (enough to cover your wreath)
- A glue gun
- Spray paint
- Tinsel
Spray paint all your pegs, letting them dry before turning and coating the opposite side. I used a zingy festive red that I had left over from another project.

Using the glue gun to secure them, wrap your fabric strips around the wreath until it is entirely covered. I used strips from an old shirt that no longer fits my daughter but you could ribbon too.

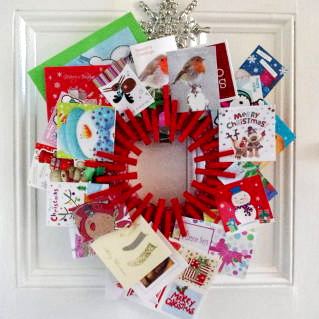
Now your wreath is fully covered, arrange your pegs on top. Take a while to play around with a design that you like. As you can see, I went with a staggered starburst effect. I didn’t put the pegs too close together, but you could always secure them so that the sides are touching, though you would obviously need more pegs. Bear in mind too that, if you plan on using this wreath to display your Seasonal bevy of cards, that you will need to make sure the pegs are facing the right way!
Once you are happy with the design, stick the pegs in place with the glue gun.

Add a burst of glitter by sticking tinsel around the edge, then hang, stand back and smile.
Easy as 1, 2, 3…..4, 5!

The wreath fully loaded:

Soo… fancy making a Peg Christmas Wreath yourself? Go on… and don’t forget to visit Kelly at Domestic Goddesque!
Looking for other lovely decor ideas? I love these Christmas Jars!