Red Ted Art - Make crafting with kids easy & fun

Cute & Easy Crafts for Kids

  • Home
  • START HERE
  • Preschool Crafts
  • Easy Crafts for Kids
  • Paper Crafts
  • Free Printables
  • About
  • Join Our Newsletter
  • Cookies, Privacy Policies & Disclosure

How to… Make Fabric “Paper” Chains (Guest Post)

April 8, 2011


Remember the wonderful and beautiful Helen from Ickle Babe from a few month’s back? She came up with this great way of “recycling” your child’s favourite t-shirt that they have either outgrown or that has stained or been damaged. It was fabulous and you must go and take a look. Helen really is a very crafty lady and always comes up with something original… so I asked if she fancied another Guest Post and fancy she did… even more importantly she came up with a fabulously fun idea! Fabric Paper Chains. Not only do they look wonderful, but they are a FABULOUS way to use up those fabric scraps you have lying around.. go Helen! ย And if you like what you see, DO go and visit her shop and blog! They are gorgeous! Oh AND it is “No Sew”! Hooray! You could of course sew these if you fancy it…

Oh… and make these in red, blue and white and you have a FABULOUS Royal or 4th July Craft! Hooray all round!!

I’ve always loved bunting, itโ€™s just so bright and happy. There is something very joyous andย fun about it isnโ€™t there?ย  But dare I say it,ย  *whispers quietly* just lately, I think it has become a bitย  *done*. Everybody has their own unique way of making it and all the high street shops seem to be selling it this year. So I had this thought, what if you could have something just as whimsical and fun, using cute fabrics…just different?


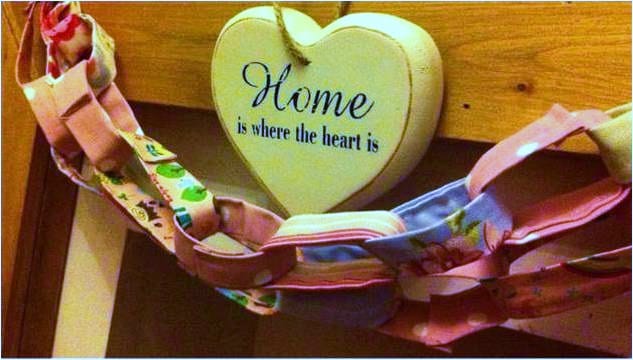
And I came up with this, itโ€™s a fabric *paper* chain. Really easy to make (easier than bunting I think) and it has a lovely homespun rustic feel. I used fabric scraps from quilting projects for this, but you could use anything. I think it would be really special if you used your children’s out grown favourite dresses or shirts as it would then be something of a family heir loom. And being as its all loops together, itโ€™s kind of symbolic ofย  family too…but I am an old romantic!

Whatever scraps or shiny new fabric you use I think it would look great.ย  Hung over a fireplace, adorning a favouriteย  kitchen dresser or a surrounding a child’s bed. Just, shabby chic perfect! And no sewing machine necessary. Gotta love that!

You will need

  • Sharp scissors
  • A selection of different pattered materials, all cut into oblongs about 6 inch by 3 inch

(this does not have to be exact, it just depends how big you want the loops in your chain to be )

  • A sheet of BondaWeb (like big sheets of wonderweb, John Lewis or Ebay always has it )

So , start with one piece of fabric and iron down a thin hem (strip)ย  on each side like this…


Then place a piece of cut bondaweb in the centre, as long as the fabric and wide enough to just overlap each folded side. Iron down, peel back the paper and then sandwich the two sides together,


and iron down, You should now have a neat strip of fabric like this….


Now you just have to put a little square of bondaweb on one end to act like a the glue to make the loop. and iron that down in the same way as before.

Once you have made one loop you just repeat the process, always remembering to attachย  one loop to the next, until you have your desired length. I made one long piece and doubled it over for a chunky effect. Easy and fun!

 

«
»

Filed Under: How To's, No Sew 22 Comments

Comments

  1. Bev says

    April 8, 2011 at 6:52 am

    ooh this is a fab idea! Great way to use some of the fabric scraps I have too! I think I also have some trusty “bondage web” somewhere! ๐Ÿ˜‰ hehe

    Reply
  2. icklebabe_com says

    April 8, 2011 at 8:24 am

    Hehe Bev! glad you like the chains, I think I am gonna get some union Jack material and make some royal weeding ones…. think I have some *bondage web* left over too ;D X
    Ps. thanku again Maggie for letting me on here, again. I LOVE your site! X

    Reply
  3. Red Ted Art says

    April 8, 2011 at 12:16 pm

    Oh oh oh and girls: I had another idea: use Bias Binding and staplers and then wee ones can help too! (well careful with the staples.. but you know what I mean!)

    Reply
  4. Amy says

    April 8, 2011 at 2:43 pm

    Those are amazing.. Thanks again!

    Reply
  5. karen Jones says

    April 8, 2011 at 3:25 pm

    Oh ! I am totally loving this idea, it’s something I could even attempt, and a no sewing option for me, will pop off and find some vintage material to make some for my home.

    Helen, you are far toooooo clever and talented and well done on the guest post on Mrs Red Teds prestigious blog : )

    Reply
  6. The Mad House says

    April 8, 2011 at 3:45 pm

    I love this idea. It is great to make them with fabric, then you can use them ourside to decorate too

    Reply
  7. Chris at Thinly Spread says

    April 8, 2011 at 4:53 pm

    What a lovely idea! It makes a pleasant change from bunting and I’ve got some gorgeous Spring fabric in my stash which would look fab like this! Thank you!

    Reply
  8. Red Ted Art says

    April 8, 2011 at 5:06 pm

    Karen & Helen – you two stop being so silly.. My blog is just the same as everyone elses!! Don’t make me blush!

    Reply
  9. Kanesha says

    April 8, 2011 at 6:37 pm

    So cute. Maybe I’ll do this instead of a baby blanket. ๐Ÿ™‚
    -Kanesha

    Reply
  10. Kizzy says

    April 9, 2011 at 7:07 pm

    I will definitely have a go at these. I love bunting and have thought about buying it recently but will give it a try before I buy some. Thanks for this.

    Reply
  11. Red Ted Art says

    April 10, 2011 at 4:51 pm

    PS someone twitter suggested doing some with poppers, then you can reconnect them in different ways/ make them longer and shorter. Thought it was a great idea!

    Reply
  12. Icklebabe says

    April 10, 2011 at 8:32 pm

    Oh yes, poppers would be perfect for kids too ๐Ÿ™‚ brilliant idea! X

    Reply
  13. Messy Missy says

    April 12, 2011 at 1:25 am

    What a sweet idea. There are some favorite t-shirts that both I and my Munchkin have not wanted to let go of….but this tutorial just might save the day. Thanks so much for linking up to my Marvelous Mess party!! ๐Ÿ™‚

    Reply
  14. Mari says

    April 12, 2011 at 10:14 am

    Two of my favourite blogs in one swoop! Can’t be bad when I’m in a mad rush like today can it?
    I adore this idea and as I’m doing my girls bedroom up at the moment it has given me some excellent inspiration, I Just Need Time, but you all know that anyway.
    Gorgeous

    Reply
  15. cathy@nurturestore says

    April 12, 2011 at 5:17 pm

    Nice to do this with clothes your kids have outgrown, as a kind of keepsake.

    Reply
  16. Robin says

    April 14, 2011 at 1:34 am

    Thank you for linking up to Ucycled Awesome at http://www.thetshirtdiaries.com.

    Reply
  17. Rachel says

    April 14, 2011 at 3:04 am

    Those are pretty ๐Ÿ™‚ A great idea for all of my fabric scraps!

    Thanks so much for sharing this at For the Kids Friday Link Party! I will be posting the next party tomorrow night. I hope to have you stop by and join us for another week sharing great ideas for our kids!!

    Thanks for stopping by!
    :)rachel at http://SunScholars.blogspot.com

    Reply
  18. Liz Burton says

    April 14, 2011 at 3:17 pm

    Oh my oh my – I like this idea a lot!

    Thanks for sharing. x

    Reply
  19. mummiafelice says

    April 14, 2011 at 6:06 pm

    So gorgeous! Thanks for linking up ๐Ÿ™‚

    Reply
  20. fabric uk says

    March 2, 2018 at 10:36 pm

    We are giving away some free fabric swatches, these are swatches that have built up over the years in our fabric sample room, we are having a clear out they are ideal for small patchwork projects and can be used for making cloth chains

    Reply
  21. Medikal Forma says

    March 8, 2018 at 9:27 pm

    Very nice ideas, thanks.

    Reply

Trackbacks

  1. Something for the Weekend – What Have I Done? | Thinly Spread says:
    April 8, 2011 at 4:40 pm

    […] 4. Fabric ‘Paper Chains’ – Red Ted Art […]

    Reply

Leave a Reply Cancel reply

Your email address will not be published. Required fields are marked *

Recipe Rating


Welcome!

Welcome

Hello! I am Maggy and I love all things crafty and sharing my craft ideas and how tos.

The aim of this site is to provide easy, do-able and fun crafts for all ages.

Categories

Archives

Crafty Blogs

Copyright © 2022 ยท Website Design By Jumping Jax Designs