Red Ted Art - Make crafting with kids easy & fun

Cute & Easy Crafts for Kids

  • Home
  • START HERE
  • Preschool Crafts
  • Easy Crafts for Kids
  • Paper Crafts
  • Free Printables
  • About
  • Join Our Newsletter
  • Cookies, Privacy Policies & Disclosure

How to.. make Paper Photo Frames

June 4, 2010

Paper Frames

Paper craft is back (I told you I still had some up my sleeve! Scroll down for links to other paper craft ideas).

Today I would like to show you how to make super simple photo frames – one frame, 3 different mini variations. They stand up by themselves, or add a magnet and make a fridge frame (a lovely and tidy way to decorate your fridge!!). Your kids can decorate them too -colour or stick stickers or glitter on! I hope that you like them.

This was another one take wonder, so I apologise for a) background garden noise and b) that video ends abruptly!

How to make a paper photo frame (quick and easy)


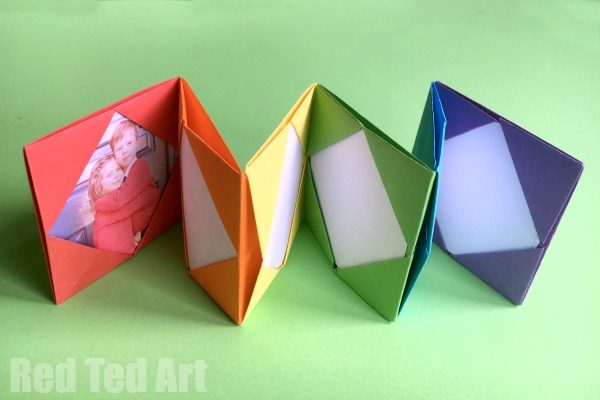
Once you have mastered the basic Origami Photo Frame.. why not have a go at these:

We do love these cute mini concertina photo albums! Adorable!

«
»

Filed Under: How To's, Paper Crafts, vlogs 27 Comments

Comments

  1. TheMadHouse says

    June 4, 2010 at 8:42 am

    Love this idea, really cool

    Reply
    • Red Ted Art says

      June 4, 2010 at 8:45 am

      ๐Ÿ˜‰ thank you! x

      Reply
  2. dotsie says

    June 4, 2010 at 9:31 am

    You explained it well…thanks, cute idea!

    Reply
    • Red Ted Art says

      June 4, 2010 at 9:38 am

      ๐Ÿ˜‰ i think they would look lovely as lots of fridge magnets!! x

      Reply
  3. Miri says

    June 4, 2010 at 11:50 am

    Cute!

    Reply
  4. Sherry says

    June 4, 2010 at 2:11 pm

    Those are too cute !:D

    Have a great weekend!
    Sherry

    Reply
    • Red Ted Art says

      June 4, 2010 at 2:22 pm

      aaaah! Glad you like! Have a lovely weekend too! x

      Reply
  5. Diane says

    June 4, 2010 at 2:52 pm

    Great tutorial. Found you via friday fun finds. Hope you can visit me sometimes over at Pittypat Paperie.

    Reply
  6. threeundertwo says

    June 5, 2010 at 12:27 am

    Great! Thanks so much for linking up to Finished for Friday.

    Reply
  7. Jessica Hills says

    June 5, 2010 at 6:40 am

    That is so cool! Thanks for sharing!

    Reply
  8. Stephanie Lynn says

    June 7, 2010 at 3:06 pm

    What an adorable gift idea! Great tutorial. Super cute! Thanks so much for joining the Sunday Showcase Party! I greatly appreciate it! I’ll be featuring these in a post today. Stop by and grab a featured button if you like. Hope you have a wonderful week! ~ Stephanie Lynn

    Reply
    • Red Ted Art says

      June 7, 2010 at 3:31 pm

      Oh how wonderful! Thank you for featuring!! Coming to get featured button now ๐Ÿ™‚ x

      Reply
  9. Kaysi @ Keeping It SImple says

    June 7, 2010 at 7:57 pm

    Awesome!! What a great idea!

    Reply
  10. Meg says

    June 9, 2010 at 12:26 am

    Very cool. Great tutorial!

    I would love for you to check out my blog for a fun giveaway! alittleknickknack.blogspot.com
    Have a great night!

    Reply
  11. Cheri Peoples says

    June 9, 2010 at 2:16 am

    Thanks so much for posting to Its So Very Creative. This is a great and thrifty project.

    Cheri

    Reply
  12. lizbeth says

    June 9, 2010 at 7:08 am

    what a neat idea! Your video was super easy to understand and your accent was a pleasant surprise!

    Reply
    • Red Ted Art says

      June 9, 2010 at 7:11 am

      ๐Ÿ™‚ glad you “liked” and yes… visiting from “this side of the pond”!! x

      Reply
  13. Cheri Peoples says

    June 10, 2010 at 10:04 pm

    I came by last week to look at your project but was just looking through all of them. I don’t see the us of any of our sponsor’s products on your project? You are more than welcome to enter another project that has used at least one of the products. You do need to have your entries in by this evening.

    Cheri

    Reply
  14. shopannies says

    June 10, 2010 at 11:56 pm

    love this I believe I will try it many years ago I made frames using fabric

    Reply
    • Red Ted Art says

      June 11, 2010 at 2:15 pm

      Oooh, great idea! Will try it with fabric too!! Thank for top tip!

      Reply
  15. Homemade Mamas says

    June 14, 2010 at 11:26 am

    Thanks for the inspiration! We made them and they came out great! Check out our version: http://www.homemademamas.net/2010/06/fathers-day-photo-frames.html

    Thanks again!

    Reply
    • Red Ted Art says

      June 14, 2010 at 1:02 pm

      So chuffed to see frames! They look fab. Great choice of pretty paper! x

      Reply
  16. Rebekah says

    June 14, 2010 at 8:40 pm

    Thanks for sharing @ Anything Related!
    {Rebekah}

    Reply
  17. Jude says

    June 16, 2010 at 8:36 am

    Lovely simple idea which I’ve not come across before. I did a project on my blog for some Fridge Frames too:
    http://www.artful-adventures.co.uk/2009/11/18/create-your-own-fridge-frames/

    Reply
  18. Jenn says

    June 18, 2010 at 11:37 am

    Thanks for linking up to Tot Tuesdays! What a neat and thrifty idea. I hope youโ€™ll join me again next week for another fantastic party! Have a great week!

    Reply
  19. Jemima says

    July 2, 2014 at 7:07 am

    Hello. I am new at this sort of thing but love the frame! I am wondering though what size photo would these hold?

    Reply
    • Red Ted Art says

      July 2, 2014 at 10:24 am

      Totally depends on the size of paper you use! But our photos are prob around 10cm x 10cm?

      Reply

Leave a Reply Cancel reply

Your email address will not be published. Required fields are marked *

Recipe Rating


Welcome!

Welcome

Hello! I am Maggy and I love all things crafty and sharing my craft ideas and how tos.

The aim of this site is to provide easy, do-able and fun crafts for all ages.

Categories

Archives

Crafty Blogs

Copyright © 2022 ยท Website Design By Jumping Jax Designs