
Kids Craft: Travel Play Set (Guest Post)
Today, I have a real treat for you – an amazing travel play set, that the wonderful daughter of Sun Scholars’ came up with all by myself. I think it is absolutely amazing and if my child made this all of her own back, I would be SO chuffed! It really is totally adorable and a great travel toy that you can make for or with your kids. Read on… and be inspired!

My name is Rachel. I share over at my blog, Sun Scholars.
Red Ted Art is one of my favorite blogs. Maggy always shares amazing ideas for crafting with kids. It is a fabulous resource, and I am thrilled to be a guest. The project I am sharing today isn’t mine, but my 9 year old daughter’s, Charlotte.
Red Ted Art is one of my favorite blogs. Maggy always shares amazing ideas for crafting with kids. It is a fabulous resource, and I am thrilled to be a guest. The project I am sharing today isn’t mine, but my 9 year old daughter’s, Charlotte.
She is just tickled pink to have her idea featured here! Thank you so much, Maggy, for having us!

DIY Travel Play Set

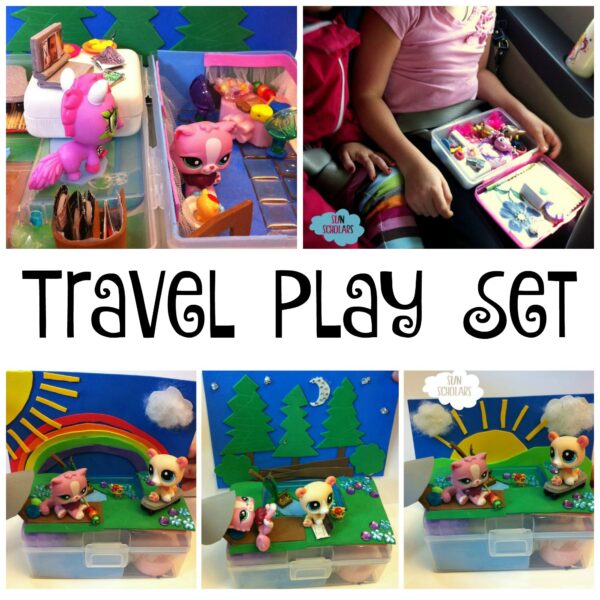
Transform a simple plastic box into a fun, travel play set!
Inside the closed box you can hold your play figurines, accessories, and more. Take it along with you on long trips in the car, to play with while waiting at the doctor’s office or at a restaurant, and more. A doll-house for when you are on the go!
My daughter loves to play with Littlest Pet Shop figurines, so that is what we used here. However, any small figurines or dolls could be used.

Supplies Needed
- Plastic Box, close able (Pencil case)
- Craft Foam
- Various Craft Supplies
- Craft Glue or Hot Glue
- Double-Sided Tape (optional)
- Miniature Furniture (optional)
- Miniature Figurines
Directions
Craft foam works perfect for this project. We had a nice stack of rainbow colored craft foam that was sticky on one side. Craft paper or non-sticky craft foam would also work. I would recommend using double-sided tape if you are using either of these.

Add a Floor!
We cut a piece of foam to fit the bottom of our box. We had to cut a couple of notches in our rectangle to get a nice fit. Once we were happy with the cut, we pulled the backing off of the adhesive and stuck our floor into place.

Add the Walls!
We cut strips of craft foam to fit each of the four walls. Since the plastic box was clear, we thought it would be fun to cut windows in the walls that you could actually see through like real windows.
I did this by folding the foam and cutting out a small rectangle. Don’t forget to leave room for a door!
I did this by folding the foam and cutting out a small rectangle. Don’t forget to leave room for a door!

Dress the Windows!
We used some spare netting for curtains, though any kind of fabric would work. We cut a small strip of craft foam to match the length of each window. The sticky foam allowed us to stick the fabric curtains into position, but you could also glue them. We used beads to hold these curtains in place (which we glued to the wall so they would not fall off). Glue your finished curtains along the top of each window.

Add a Door!
Our box had a strip of plastic that ran down the corners, which was perfect for attaching our door. We cut two matching pieces of craft foam. Add a door knob and a window in the door if you like. We then attached the door to the corner strip of plastic.
The flexibility of the foam allows you to open and close the door.
The flexibility of the foam allows you to open and close the door.


Decorate Your Home!
Use various supplies to decorate, furnish, and accessorize your home.
Create wood flooring by using popsicle sticks, make pictures to “hang” on the walls from magazines, cards or stickers, create your own furniture with small recyclable items, and so on.
Add miniature furniture and accessories that you might already have. Remember that part of the fun is setting up your home, so don’t glue everything into place!

Create Your Own Accessories!
My daughter’s favorite place on the web is My Froggy Stuff. The crafty mom behind this blog shares some amazing tutorials on YouTube teaching you how to make all sorts of neat things for your dolls. My daughter has created some of the things above for her travel play set inspired by these ideas.

Create a Backdrop!
My daughter thought her play set would be even more fun with a backdrop to set the mood for her play. The craft foam sheets were perfect for this. She cut the pieces she needed and stuck them into place. She added some polyester stuffing to the top of the clouds to add a little dimension.
Here are the finished scenes…

As you can see, my daughter creates “outside of the box” too!
haha…
haha…
On top of her travel play set she wanted to have an outdoor scene, so she created a park.

All Packed Up!
All of your goodies tuck nicely inside, ready for you to take along!

Tate was eager to take her travel play set to school to use at indoor recess. It fit nicely in her bag.

This was Charlotte’s original creation…
She made it to take on our long car trips. She and her sister would sit side-by-side and play together.
Ahhh… How could you not love that!

Happy Crafting!
& Charlotte