Red Ted Art - Make crafting with kids easy & fun

Cute & Easy Crafts for Kids

  • Home
  • START HERE
  • Preschool Crafts
  • Easy Kids Crafts
  • Paper Crafts
  • Free Printables
  • About
  • Join Our Newsletter
  • Cookies, Privacy Policies & Disclosure

Kids Crafts: Traditional Walnut Babies

December 3, 2011

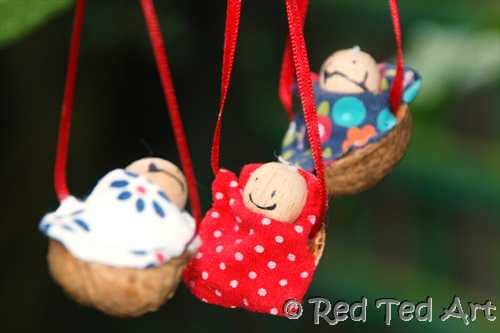
walnut cradle craft Hello! Today we share out little Walnut Babies (aka Walnuss Wiegenkinder or Walnussbaby), yet another classic German/ Austrian childhood craft. We love Walnut DIYs. This is also very special edition of “Kids Get Crafty”, as it is part of the Kids Craft Group “Advent Calendar Activities”. A number of blogger friends have got together to create an activity a day for you to have fun during the advent period. Today I am sharing our little Walnut Babies – so dig in to those seasonal nuts and get crafty!

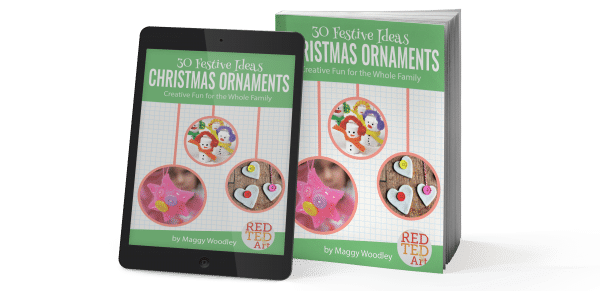
These ornaments feature in our new Christmas Ornament Book. 30 of our favourite ornaments brought together in one place. Sorted by age. Each craft is shared on one page – making the perfect worksheet print outs. Lovely to have them all in one place too!
christmas-ornaments-3d-images-1a

Only $7.99

Get yours today and keep it forever!

Walnut Babies

Note: Red Ted is almost 4yrs old and I found that he “loved the process”, but did need help. I think replacing our fabric with felt would have made it easier for him.

Materials: Walnut, wooden bead, pipecleaner, glue, ribbon, fabric pieces (or felt)

If you don’t have a wooden bead to hand (which wouldn’t surprise me!!) you can adapt this craft by making the head as per the angel craft from an old pair of stockings. Just tie the pipe cleaner “into the head” as you make it.

1. First you need to split the walnut carefully and try and get two intact pieces. The best way of doing this, is to get a kitchen knife or a screw driver and insert it into any weak spot you can find on the nut. Then on a chopping board, give it repeat taps until it hopefully comes apart. Mine all came apart easily, but needless to say: take care… and if in doubt move onto the next walnut!

walnut crafts

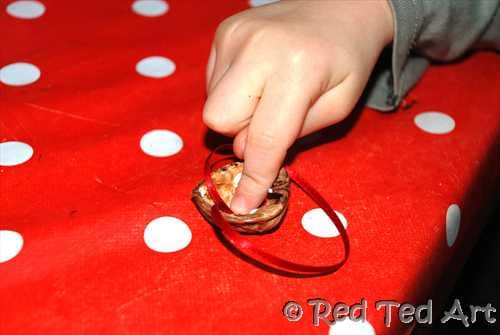
2. Cut a ribbon and glue into the walnut

walnut baby craft

3. Glue the bead onto the pipecleaner. Wrap the pipe cleaner round your finger. This will give the baby a “body” and prop the bead up (i.e. this is the clever bit I got from Zeit Online).

walnut christmas crafts

4. Cut out a pillow and glue it down – it doesn’t really matter which end. In some ways “felt is better” for small hands, as it doesn’t fray. I used fabric from one of Pip Squeak’s babygrowns and had to “tuck it in” for Red Ted…

walnut crafts

5. Glue in the baby and the glue on the blanked (again, felt is easier for small hands, as I had to “tuck” part of the fabric in for Red Ted)

walnut craft walnut babies

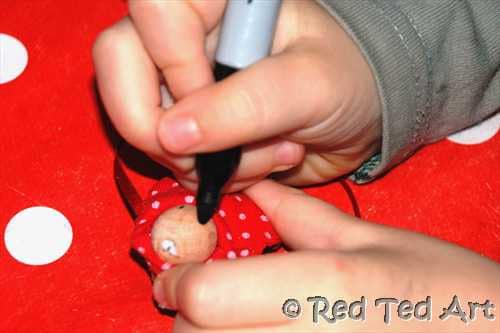
6. Draw on eyes and mouth. Now out felt tip did run a little, so you may want to paint these on or varnish your bead first. Red Ted did an AMAZINg “1st face” – just perfect… and went a little vampire like on the 2nd two. But look at his little face, he was SO excited to be doing it. And at bedtime, when his father asked what we did that day, that was all he would talk about!

walnut cradle craft walnut crafts

Hang in your tree and admire.

Like walnut crafts? How about some:

walnuss maus walnut boat

Walnut Mouse Racing or some Walnut Boats?

Don’t forget! Lots more Walnut Crafts here:

walnut-diy

«
»

Filed Under: Christmas, Kids Craft, Nature 49 Comments

Comments

  1. Brooke@let kids create says

    December 3, 2011 at 5:48 am

    Very cute, I need to track down some walnuts. Or go buy some at the store.

    Reply
  2. Cerys @Rainy Day Mum says

    December 3, 2011 at 8:12 am

    Very cute – think I may have to go and have a go at this myself.

    Reply
  3. Red Ted Art says

    December 3, 2011 at 9:04 am

    Brooke & Cerys – do do – walnuts are such a wonderful traditional crafting “material”

    Reply
  4. cathy @ nurturestore says

    December 3, 2011 at 9:43 am

    Lovely Maggy! How sweet to have a little family if them hanging from the Christmas tree.

    Reply
  5. Red Ted Art says

    December 3, 2011 at 9:55 am

    Thanks Cathy! Our main “problem”, is that Pip Squeak as taken a shine to them and carries them around with her…. no going on the tree (for now!)….

    Reply
  6. mermaid says

    December 3, 2011 at 10:01 am

    Very cute!
    I love them!

    Reply
  7. Angelique Felix says

    December 3, 2011 at 12:32 pm

    so beautiful! Love them Maggy <3

    Reply
  8. Jen says

    December 3, 2011 at 12:47 pm

    Love them. Very sweet.

    Reply
  9. jackie@happyhooligans says

    December 3, 2011 at 1:05 pm

    These are SO adorable!! I think I need to find me some walnuts!

    Reply
  10. Art For Little Hands (@art4littlehands) says

    December 3, 2011 at 1:14 pm

    Those are so cute. I think he did a lot of the work. This would be perfect for my daughter who is 7. Off to share this wonderful idea.

    Reply
  11. Red Ted Art says

    December 3, 2011 at 1:44 pm

    Thank you 🙂

    And Art For Little Hands – yes, he helped every step of the way and a 7yrs old should be able to manage perfectly!!

    Reply
  12. Aleacia says

    December 3, 2011 at 1:52 pm

    These are the sweetest little babies I’ve ever seen! This would be the perfect ornament for baby’s 1st Christmas!

    Reply
  13. Esther says

    December 3, 2011 at 7:37 pm

    Adorable! love them! now we have to buy whole walnuts!

    Reply
  14. Mummy..Mummy..MUM!! says

    December 3, 2011 at 8:18 pm

    Oh they are soo cute! I love them 🙂

    Reply
  15. Mama Pea Pod says

    December 3, 2011 at 9:44 pm

    So cute! My mum still has the walnut babies on her tree each year that she bought at our primary school fair (all mum-made crafts) when I was not much older than Red Ted!

    You are such a crafty mum!

    Reply
  16. Joyce @Dinosaurs And Octopuses says

    December 3, 2011 at 10:08 pm

    Those are very sweet! He did a great job!

    Reply
  17. Fran says

    December 4, 2011 at 12:22 am

    These are adorable! I can see the girls wanting to make lots of these 😀

    Reply
  18. Ali says

    December 4, 2011 at 7:31 am

    Oh I wish I had some walnuts. I want to make some myself… and I am sure my daughter would too.

    Reply
  19. Red Ted Art says

    December 4, 2011 at 8:18 am

    Aaah thank you all for your super lovely comments! Walnut babies really are lovely! Since we started “walnut crafting” again, I always buy a big bag when they are in the shops! And keep them all year 🙂

    Reply
  20. Jessi says

    December 5, 2011 at 3:02 am

    Very, very sweet! Do you have any ideas what could be used in place of the shell for those with nut allergies?

    Reply
  21. Red Ted Art says

    December 5, 2011 at 10:01 am

    Ah no, poor you/ child. I was going to do a peanut craft soon and thought about allergies on that one.. but “forgot” the general nut allergy children 🙁 sorry!!

    Do you have “kinder joy” (like a kinder egg) – this type: http://www.angeliquefelix.com/blog/fairy-golden-christmasballs-gouden-fee-kerstballen

    Or any toy that comes in a ball that you can split in half? You could maybe use part of an egg carton (the dip) or half of a chestnut shell (the spikey outer bit). Or you could cut the “bottom” off a small bottle (like a travel shampoo bottle).

    Reply
  22. Amanda - Small Home Big Start says

    December 5, 2011 at 3:59 pm

    So cute! They remind me of all the decorations that my grandmother used to maker using walnut shells!

    Reply
  23. Red Ted Art says

    December 5, 2011 at 7:00 pm

    Aaaah just perfect memories – your grandmother crafting 🙂

    Reply
  24. Zoe says

    December 5, 2011 at 8:05 pm

    We did a walnut craft this weekend too – walnut suitcases! http://www.playingbythebook.net/2011/12/05/what-happens-when-you-give-but-dont-know-how-it-is-received/

    Reply
    • Red Ted Art says

      December 5, 2011 at 9:30 pm

      Ooooh how cute!

      Reply
  25. Candace @ NaturallyEducational says

    December 6, 2011 at 2:22 am

    So lovely! Thank you for posting these!

    Reply
  26. Michelle Breum says

    December 6, 2011 at 6:38 pm

    These are soooo cute. We bought mixed nuts in the shell yesterday. I’m not the craftiest mom, but I will be making these as soon as I get the supplies from the craft store. I like that there will be no glitter. That has been the craft item of choice for my eight year old daughter lately.

    I’m so looking forward to making these and hanging them on the tree. Thanks for the idea! I’m sharing this post on twitter and adding it to pinterest, so I make sure I do it this busy holiday season!

    Reply
  27. Red Ted Art says

    December 6, 2011 at 7:02 pm

    HOORAY! Thank you 🙂 And I rather like things that do NOT involve glitter as well….

    Reply
  28. Bernadette - Mom to 2 Posh Lil Divas says

    December 6, 2011 at 8:51 pm

    This is adorable. I have never had much luck splitting walnut shells but those babies sure are cute!

    Reply
  29. Bri says

    December 6, 2011 at 10:17 pm

    oooh my girls would love these! How cute!

    Reply
  30. Julia says

    December 7, 2011 at 2:28 am

    I’ve never seen these before, but I love them! We’re expecting a baby in January, and my kids will surely enjoy making these!

    Reply
  31. Red Ted Art says

    December 7, 2011 at 8:03 am

    Bern – I confess to having had problems cracking the latest batch of walnuts!!! How odd.. the first batch ALL opened! The 2nd batch I get about half! Good luck!

    Bri & Julia – have fun and Julia good luck with the new baby! Hope it all goes smoothly and easily!

    Reply
  32. Slummy single mummy says

    December 7, 2011 at 12:34 pm

    Now I am the least ‘crafty’ mum ever, but these are just lovely. I bet the cry less than regular babies too 🙂

    Reply
  33. Colleen @Fth @pinterestmama says

    December 7, 2011 at 1:51 pm

    Love your walnut babies!
    So darling!
    Saw your linky at the Sunday Showcase, so wanted to pop by to say hello.
    Hope that you will come by my blog, Sunrise Learning Lab, and see what we are up to this week.
    Colleen:)

    Reply
    • Red Ted Art says

      December 7, 2011 at 3:14 pm

      Done!

      Reply
  34. Ellie says

    December 8, 2011 at 3:45 pm

    These are gorgeous! Thanks for sharing.

    Ellie

    Reply
  35. Sarah says

    December 11, 2011 at 9:12 am

    How cute!!!! Is there a knack to cracking walnuts without shattering the shells??do share 😉 xxx

    Reply
    • Red Ted Art says

      December 11, 2011 at 3:03 pm

      Yes! Instruction on post, but basically with a knife inserted at the back of the “weak spot” of the nut and then gently tapping it. The older the nut the easier…

      Reply
  36. Carolyn Wilhelm says

    December 12, 2011 at 2:21 am

    Love this! I know first graders would love it for sure, too. Carolyn

    Reply
  37. Kerry Treasure says

    November 20, 2012 at 1:12 pm

    Shame! Unfortunately I’ve just discovered that one of my little crafters (I had planned to do them with my sons and their friends this week)is allergic to walnuts and cannot even handle the shells! I’m now on the hunt for something to replace the shells that is just as beguiling. Ideas would be VERY welcomed…

    Reply
    • Red Ted Art says

      November 20, 2012 at 2:00 pm

      Oh no, that really IS a shame! I can only think of “lid tops”, but I am not sure if they would have the right dimensions. OR…. could you make some air drying clay beds ahead of time for them?

      Reply

Trackbacks

  1. Walnut Babies | Day 3 Creative Christmas Countdown says:
    December 3, 2011 at 1:02 pm

    […] Tutorial: Make Walnut Baby Ornaments […]

    Reply
  2. Red Ted Art's Blog » Blog Archive » Kids Crafts: Walnut Crafts & Link Up Party says:
    December 7, 2011 at 4:59 am

    […] But we are very busy here in Red Ted HQ and we had an “extra craft” on Saturday (i.e. Walnut Babies) and ANOTHER extra craft on Monday (The Christmas Cards). And I am afraid we are busy having Advent […]

    Reply
  3. McGaugh Academy: Polar Express Unit and Other Christmas Crafts « birdinyourhand says:
    December 7, 2011 at 5:52 am

    […] also made a walnut baby ornament and hung him on our kitchen tree. We found directions here. Fortunately, I had a wooden bead in my bead box. The ribbon and fabric were scraps on hand. I did […]

    Reply
  4. Children’s activities nut shells! « Teachers Quiver Full says:
    July 7, 2012 at 8:28 am

    […] was looking at Red Ted’s Art blog  https://www.redtedart.com/2011/12/03/kids-crafts-traditional-walnut-babies/ and I found these wonderful walnut babies so I made some of my own, as you […]

    Reply
  5. Red Ted Art's Blog » Blog Archive 15 Homemade Christmas Tree Ornaments » Red Ted Art's Blog says:
    September 16, 2012 at 3:03 pm

    […] Walnut Babies […]

    Reply
  6. 2011 Creative Christmas Countdown - A Mom With A Lesson Plan says:
    November 15, 2012 at 7:31 pm

    […] Create ~ 24 days of Holiday Books 2. Dilly-Dali Art ~ Home made Christmas Cards 3. Red Ted Art ~ Walnut Babies 4. Teach Preschool ~ Thank You Cards 5. Angelique Felix ~ Christmas Songs 6. Rainy Day Mum ~ […]

    Reply
  7. 5 Homemade Christmas Ornaments for Children to Make - Festive Friday! - thinlyspread.co.uk says:
    November 15, 2013 at 12:00 pm

    […] crafting with walnuts. Walnuts have a very “traditional” feel to me and we love making little Walnut Babies for the tree or racing mice. Being super thrifty, I actually cracked open these nuts first and then […]

    Reply
  8. Sunday Surf: Jan 15-21 | Old New Legacy says:
    January 6, 2014 at 3:49 am

    […] Kids Crafts: Traditional Walnut Babies {Red Ted’s Art’s Blog via No Time for Flash Cards} What a cute craft.  I’d like to make these one day! […]

    Reply

Leave a Reply Cancel reply

Your email address will not be published.

Recipe Rating


Welcome!

Welcome

Hello! I am Maggy and I love all things crafty and sharing my craft ideas and how tos.

The aim of this site is to provide easy, do-able and fun crafts for all ages.

Categories

Archives

Crafty Blogs

Copyright © 2021 · Website Design By Jumping Jax Designs

We use cookies to ensure that we give you the best experience on our website. These cookies feedback information to our analytics and advertisers. We track views of the site - which pages are visited, whether you are a regular or returning visitor to help generate a more personalised experience. You can switch cookies off or follow the READ MORE link for more and information on how to.OkRead more