Red Ted Art - Make crafting with kids easy & fun

Cute & Easy Crafts for Kids

  • Home
  • START HERE
  • Preschool Crafts
  • Easy Crafts for Kids
  • Paper Crafts
  • Free Printables
  • About
  • Join Our Newsletter
  • Cookies, Privacy Policies & Disclosure

Perler Bead Cookie Cutter Ornaments

November 12, 2014

Due to popular demand.. this is a translation of the wonderful Wooz.dk instructions. We have had a go and they are great. It is VERY important that you follow the instructions, else your Perler Beads/ Hama Beads will stick to your cookie cutter and ruin it! I do love some DIY Christmas Ornaments!

Cookie Cutter Perler Bead Ornaments

These ornaments feature in our newย Christmas Ornament Book. 30 of our favourite ornaments brought together in one place. Sorted by age. Each craft is shared on one page – making the perfect worksheet print outs. Lovely to have them all in one place too!
christmas-ornaments-3d-images-1a

Only $7.99

Get yours today and keep it forever!

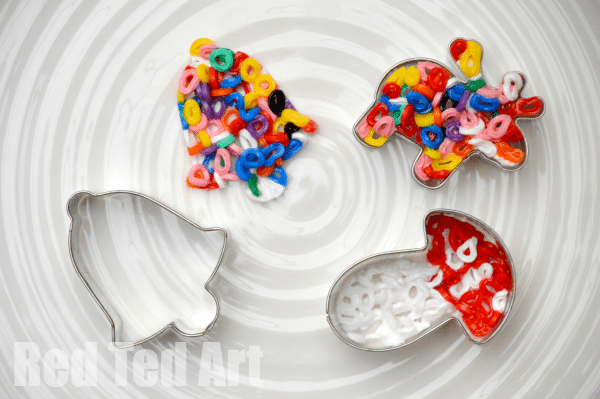
For your Perler Bead Ornaments, you will need:

  • Cookie cutters
  • Vegetable oil (VERY important)
  • Baking paper
  • Perler beads (also known as Hama Beads or Melty Beads)
  • And oven

Looking for Cute ย Cookie Cutters click here:

US Readers ย (affiliate links)

UK Readers (affiliate links)

Perler Bead Ornaments How To:

1.Pre heat the overn to 200C

2.ย Get a baking tray with baking paper ready and brush with oil.

3. Now brush the cookie cutter with oil too – it is very important that the inside is covered.

4. The oil is so important as it will stop the perler beads from sticking to your cookie cutter shape. Make sure the oil goes “up the sides” of your cutter, as when the perler beads melt, they have a tendency to “stand up” a little and you don’t want them to stick to the cutter higher up.

5. Now put one layer of beads in the cookie cutter. It is possible to do patterns (see our mushroom ornament above), but to be honest the rainbow coloured ones look best and are fun for kids to make.

6. Place in oven and wait for beads to melt. It will only take a few minutes. Once finished, remove from the oven. I “poked down” a few of the upright standing perler beads with a knife, to give it more of an even surface.

7. Then let it cool enough, for the beads to stick together and placed them into a bowl of lukewarm water. Wait to fully remove until the beads have started to stiffen!

8. Finally, wash in warm soapy water t remove the “grease” from your ornament.

Looking for Cute ย Cookie Cutters click here:

US Readers ย (affiliate links)

UK Readers (affiliate links)

Check out 25 more wonderful Cookie Cutter Craft Ideas:

25 Fun Cookie Cutter Crafts & Ideas

Want more Christmas Ornament Ideas?

homemade ornaments

«
»

Filed Under: Christmas 15 Comments

Comments

  1. Kelly says

    November 13, 2014 at 8:41 pm

    Would cooking spray work as a replacement to vegetable oil?

    Reply
    • Red Ted Art says

      November 14, 2014 at 10:07 am

      I confess, I don’t know! Have no experience with cooking spray!

      Reply
  2. adrienne says

    November 14, 2014 at 2:45 am

    i was wanting to print Perler Bead ornaments out so i dont have to have a screen in the kitchen, is there a way to do this?

    Reply
    • Red Ted Art says

      November 18, 2014 at 9:20 am

      Does “print via webpage”, not work?

      Reply
  3. Melissa says

    November 17, 2014 at 4:16 pm

    How do you hang them?

    Reply
    • Red Ted Art says

      November 17, 2014 at 6:04 pm

      Just thread a piece of ribbon through one of the holes!

      Reply
  4. Yolanda says

    November 18, 2014 at 12:12 pm

    You could always push something into them when melting to keep a hole open if concerned an existing one won’t hold the weight of the ornament…

    Reply
  5. Stacey says

    November 26, 2014 at 7:27 am

    Are the cookie cutter s metal or plastic?

    Reply
    • Red Ted Art says

      November 26, 2014 at 8:32 am

      Mine are metal!

      Reply
  6. Colleen says

    September 23, 2015 at 5:30 am

    Can you use metal cookie cutters that have been painted? Or does it have to be the shiny metal unpainted ones?

    Reply
    • Red Ted Art says

      September 23, 2015 at 8:31 am

      I have to confess, I don’t know. I think they should be ok, but haven’t tried!

      Reply
  7. jill says

    November 13, 2016 at 12:55 am

    Really strange, but mine never did melt. They all just felt apart and were a big waste of time and money.
    I wonder if it depends on the brand of perler beads.

    Reply
    • Red Ted Art says

      November 15, 2016 at 2:48 pm

      Oh that IS strange?! I wonder why????

      Reply

Trackbacks

  1. Christmas Gifts Kids Can Make says:
    November 20, 2015 at 2:50 pm

    […] love the idea of using cookie cutters to create ornaments for their friends out of the Perler Beads. ย That totally eliminates the issue of beads falling off and gives kids a […]

    Reply
  2. How to make an easy Christmas ornament with toddlers - Twitchetts says:
    November 26, 2018 at 5:45 pm

    […] had found crafts using the cookie cutters to shape the Perler beads, and I loved the look of putting paper behind a cookie cutter…I just combined the […]

    Reply

Leave a Reply Cancel reply

Your email address will not be published. Required fields are marked *

Recipe Rating


Welcome!

Welcome

Hello! I am Maggy and I love all things crafty and sharing my craft ideas and how tos.

The aim of this site is to provide easy, do-able and fun crafts for all ages.

Categories

Archives

Crafty Blogs

Copyright © 2022 ยท Website Design By Jumping Jax Designs