Kids Get Crafty – Christmas Baubles
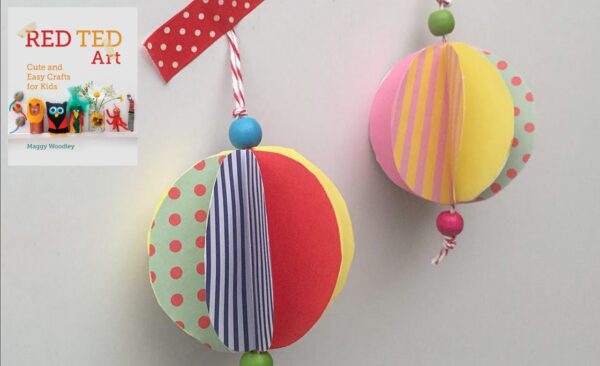
Red Ted and I got all Christmas crafty again this week. Well, we are in the middle of advent and I find that Christmas is a really special time of year to craft together. I love our little craft today, as it is another great way to “use kid’s art” and make something with it. We made these paper Christmas baubles. Red Ted not only enjoyed painting, he also enjoyed the sticking. Of course I had to help him.. but read on for how we fared.
The Book
The Wise Men’s Christmas (Bauble Books)
This a little book that will be going into Red Ted’s Christmas stocking - it is a story AND a bauble in one! I know, it is a little cheesy, but that is what stockings are for! This little book tells the story from the point of view of the 3 wise men. There are 3 others in the series (Joseph’s, Mary’s and the Shepard’s). It is not a well known fact that I am actually half Spanish and in Spain, traditionally, the gifts are brought on the 6th January by the 3 Wise Men (think about it, it makes sense!). For this reason, I thought it would be nice to have a little book that focusses on the 3 Wise Men. It’s very sweet.
The Craft
The craft, I believe is really easy and quite effective.
Materials: Paper, paint, ribbon, scissors, glue
1) Do some painting or drawing. I findthe stiffer the paper the better these work
2) Cut out 8-10 circle. You need to cut these as perfectly as possible for the finished effect to be at its best. We used a small cup to trace the circles
3) Fold circles in half. Make a good crease.
4) Stick the left side one to the right side of the other. I found that if I held them for Red Ted he could do all the sticking. When you get to the last one, add the ribbon. Then glue the first circle to the last
5) Even them all out a bit, if necessary add a tiny bit more glue and done!
These make lovely gifts for family too. Add a little note in the corner saying which child made it, what year and what age…
The tree was made on the same principle – but with thicker card and only 5 sides.
Happy Paper Bauble Crafting!!
Related Posts
Category: christmas, decor, Kids Craft, Paintings, Sticking


Another great craft idea. Just where do you get them all from!
I’ll try this with Kidder for our tree
Becca xx
It looks like you had a lot of fun with this craft and cute result too!
Good thinking to paint first and THEN cut! I tried this with stars, but cut out the stars first. My kids would only color one side of the stars, and would NOT under any circumstances let me turn them into 3D ornaments!
Thanks for the sweet comments on my blog Maggy! I’m so happy you stopped by because know I found another awesome link up and blog to follow. I can’t wait to see all the great crafty ideas.
Jill
I love that you have crafty boys. I have one of my own and these look like projects that would thrill him for hours. Thanks for sharing!
I love the idea of these very different and there are so many colourful possiblities. Thank you for linking up
Adele
http://www.monkeyingaround1.blogspot.com
x x x
Thanks for coming by my blog and the invite to link up!!
These ornaments turned out great! I like the idea of painting and then cutting!!
Thanks for the invite! I love your baubles, and we’ll be doing that candy cane mouse idea that’s linked up.
Polly – yes, I love the candy mice too – they are just too cute!
Mary-Anne oh I like the idea of stars!
Adele – yes, def great that you have so many “colour choices” with this craft!
KJ – so pleased to see you!
Meldoy – definitely nice to have crafty boys!!! So much fun!
Thank you all for your lovely comments!
Maggy
Maggy,
thanks for inviting me to link up here and thank you for your comment. I will continue visiting your blog =)
Anel – so great that you popped over! Look forward to reading more of your blog too!
Cute baubles! Looks like a fun time too.
I love your ornaments. The 3-D effect is really fun! The book looks great. JDaniel got a few of these during the book swap and loves them.
Thanks for hosting the link-up! I love the photos of Red Ted putting together his 3-D ornaments – what adorable expressions!
Maggy,
so simple…and really easy to make! I love this… will get my boys on the case this weekend, they’ll love it!
Another cracking idea from @redtedart eh?
Ali
x
Ali – I can’t take credit – crafts from my childhood revisited!!!
Thanks for linking your craft to my link up! Very easy for kids!
Maybe some of your readers would like to link up too!
Nice! Thank you for the tutorial, I always wondered how these were made. Sounds like a very good book. Thank you for sharing.
I have plans to make similar circle ornaments and use them to help my daughter remember the verses to a couple of carols.
What a fun craft. I have done this one using recycled Christmas cards. Thanks for sharing!
Thanks so much for stopping by Mom Endeavors and inviting me to link up!
Thanks for the comment and direction over to your blog party. I’m excited to read through the links here!!
This was such a great idea. I will have to try it.
I’m here from Show n Tell, and I must say I really enjoyed viewing all the kids’ crafts!!! Darling.
My Show n Tell Link – A Jim Shore Find
Do stop by and say ‘hi’ if you can find time. Have a great week ahead.
Fabulous and have hopped over your way too!
hi maggy for some reasonthe wrong pic came up on my last post I have added. I can not believe the amount of enteries you have had added this week well done! We are very quiet this week with only 3 :0(
Adele x x x
Let me know if you want to relink up and get me to delete the “wrong” one. And thank, yes, there are some lovely crafts this week – it must be the season to be crafty!!!!
Love that it’s something fun for the kids to do! Thanks for sharing & linking up! He looks like he had a good time! Glue is always fun for kids.
Thank You & Have a Blessed Christmas!
Love them too. So simple and cute. I made couple using mu daughter`s photograph last year.
I love finding uses for kids’ random paintings. These look fun, and I especially love that they would fit the “style” of our tree. I also really like the idea of the books told by different viewpoints.
Mermaid – oh photos is a great way of making these. Lovely idea!
Jenny – tanks for stopping by! And if you do get to make some, do send us a pic!!! Love seeing everyones craftiness!
Mermaid – oh photos is a great way of making these. Lovely idea!
Jenny – thanks for stopping by! And if you do get to make some, do send us a pic!!! Love seeing everyones craftiness!
He did such a nice job on his ornaments!
Thanks for the invitation to your party! Great stuff going on here. I am now following your blog & am eager to see awesome things happen next.
Thanks sooo much for the invite! I linked up! All of these are sooo cute.. I may have to “borrow” some to do with my kids!
Hi, thanks for stopping by my blog and the invitation to join the link up…such cute stuff here!
These look like fun! I love the paint first cut later idea it seems like it would be so much easier for the kids. Come link up to my Sew Crafty party…
http://wildflowersandwhimsy.blogspot.com/2010/12/startin-early-for-orphaned-no-more.html
I’ve happened upon this site before, but had forgotten about it. Thanks for reminding me! Love all your fun kid’s crafts! Maybe after the holidays I’ll join in on the linky fun!
Very cute! I had been planning on making paper balls like these–first I was going to make them out of orange paper for pumpkins or red paper for pumpkins and then I wanted to make them for Christmas ornaments but I never get around to cutting the circles!
Hi Maggy,
Just to let you know that I have linked to this post at my new blog, here:
http://craftulate.blogspot.com/2013/01/baubles-made-from-childs-artwork.html
I’ve also used one of your crafty badges – thanks!
Georgina @ Craftulate
I love the photo idea. Iw would make great presents for grandparents
These are brilliant! I’m pinning this for later in the year (and I *really* need to order a copy of your book!)
Ooooh yes, Ness, PLEASE do!!