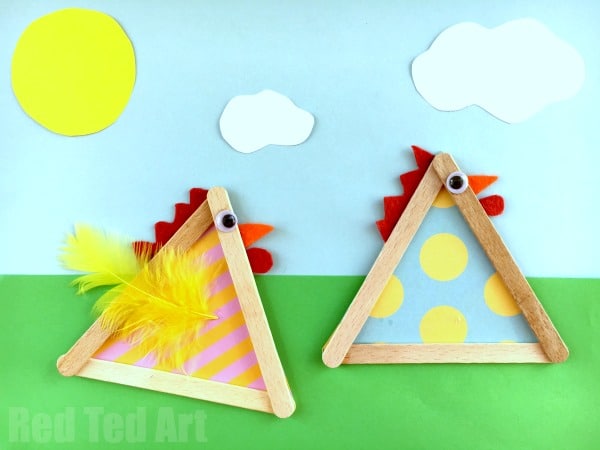
Craft Stick Chicks for Easter and Spring
Now we do love a recycled craft… I know most people buy their craft sticks.. but we love to upcycle the kids lolly sticks/ popscicle sticks and make a lovely lolly stick craft out of them. The kids get to eat their ice lollies, I pop their lolly sticks in the dishwasher.. and hey presto, we have a great set of craft sticks to craft with! Woohoo! I was inspired by these darling Craft Stick Fairies that I saw earlier in the year and thought the shape would make nice “chooks too” (as per our Pyramid Juggling Chooks). And here they are.. aren’t these Craft Stick Chicks just too cute?! They are super quick and easy to make. A great 5 minute craft for kids and grown ups alike! We have LOTS more Chick Crafts for Easter that you can browse, do take a look!
Popsicle Chicks – Materials:
To be honest.. this is one of those “why not have a look and see what you have around the house” type crafts. Use up some odds and ends and just see what you have. I will list what we used, but will add alternative craft material suggestions to make your own Craft Stick Sticks!
- Craft Sticks or like in our case Lolly Sticks – 3 per chick. You can use coloured craft sticks too if you wish!
- Patterned card/ paper of fabric. We used some patterned “light card stock”, but I think using fabric would be adorable too.
- Pieces of felt for the wattle, beak and comb – again, if you don’t have any felt to hand, then some craft foam could do or some plain card
- Goggly eyes
- A feather (optional)
- Good PVA glue
Craft Stick Chicks – How To:
As mentioned, these craft stick chicks really are SUPER easy to make, and a great 5 minute craft to do with the kids this Easter (or if you make lots, you can take your time over them too..). It really is a simple “assemble and glue” project and though I have shared my steps.. you can make these Craft Chicks in whatever order you wish!
First get all your materials ready – as mentioned you will need 3 craft sticks per chick as we well as little felt, googly eyes and some pretty paper!
Next we cut out the “extras” – a red comb and wattle and a beak for our lolly stick chick.
Then we assembled to check that we liked the size and position of our chick features.
Next I glued down the first lolly stick (see in background of top left image). Glue it as close to your edge as possible, to save on paper.
Then I glued the wattle to the back of the second craft stick. Added some more glue and place that into position.
Take your third craft stick, glue your google eye, beak and wattle into position. Add extra glue to the back and again place in postion.
Note: your second and third Popsicle sticks will not lie “flat” on your piece of card or fabric. But there should be enough surface area that your craft stick craft will be secure!!
Then roughly cut out your craft stick chich.. and finally trim off the edges! And done!!!!
(UPDATE: some of you have asked regarding my cute little craft scissors – you fancy a pair, you can get them here US/ UK (aff links)).
We have LOADS more Chick DIYs for you to browse here:


