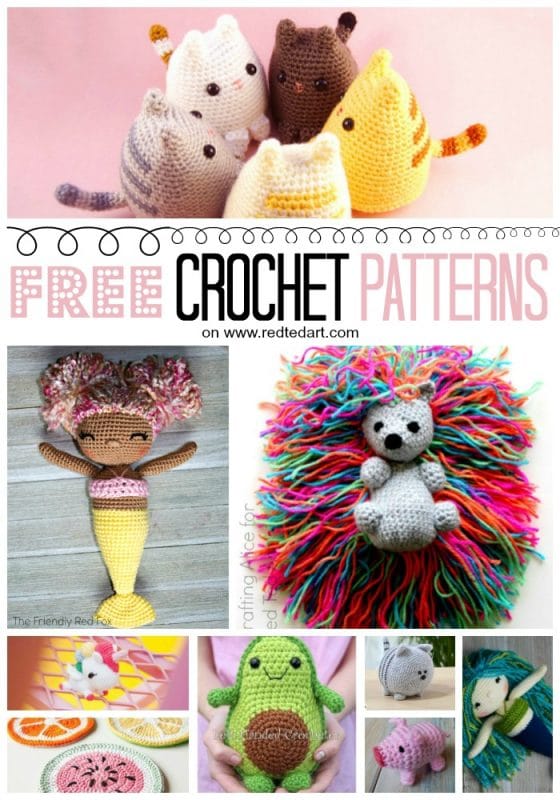
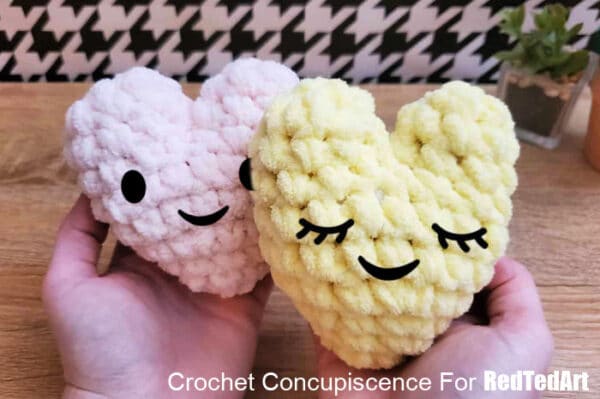
Easy Crochet Heart Tutorial – How to Make Kawaii Hearts
Looking for a cute and easy Crochet Heart Pattern? Well check out this fantastic crochet heart tutorial! This is a guest post by Crochet Concupiscence! A fantastic crochet resource website, you will love to check out and follow. So.. let’s take a look at this adorable Crochet Heart Tutorial. I think these little plushie hearts would make a great Jellycat Amuseables Red Heart replacement? Don’t you think? SO CUTE!

This is a fantastic Crochet Heart Tutorial for beginners – as we will literally step you through the heart making process – step-by-step tutorial – with photos all the way! So if you are new to crochet and want to give this heart pattern a go DO IT! Note: you don’t have to use chenille yarn (some people find it heart to work with at first!), use any yarn you like – just make sure you use the corresponding hook size. Your final heart will be smaller, but just as cute! Especially if you choose to add some safety eyes and a lovely little Kawaii smile! Don’t shop Jellycat Amuseables Red Heart but make one instead!
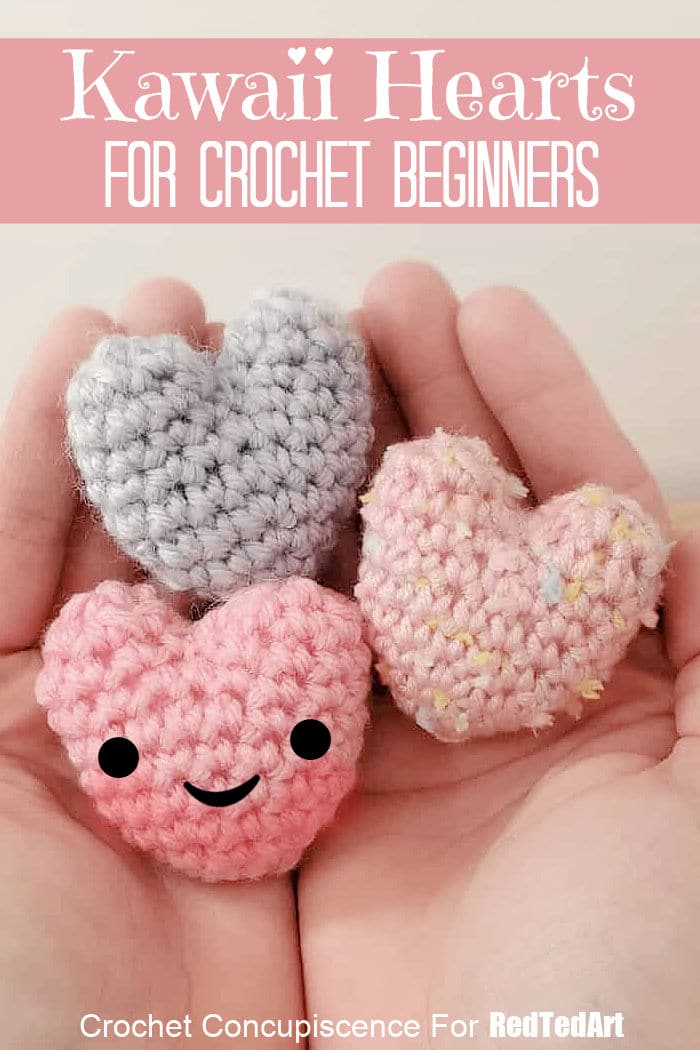
These hearts make a wonderful Valentine’s Day gift, birthday gift, or made in small, they would make great little heart pocket friends for a First Day of School.
I hope you will enjoy these detailed instructions, with lots of great photos for this wonderful free crochet heart pattern.
Learn more about Crochet Concupiscence
As mentioned this a kind guest post by Crochet Concupiscence! I why not give their website a good browse? They have whimsical wedding dress crochet and lots of fantastic crochet books to recommend!
Supplies needed for an amigurumi heart
- Super chunky chenille yarn – we used Bernat’s Baby Blanket in Baby Pink
- 10 mm hook (or use the hook size recommended by the yarn you have)
- Stuffing (we like to recycle old pillows!)
- Tapestry yarn needle for sewing in the bits of yarn end
- Scissors
- Optional – Stitch Marker
- Optional – black yarn and safety eyes or black felt & glue if adding a cute Kawaii Face to your hearts!
Crochet Abbreviations & Notes
This pattern is written in standard US terminology!
Some of these may not be used in the pattern – these are the most basic stitches that I use most frequently!
If you see an abbreviation that you are unfamiliar with, please refer back to this chart.
| ML | magic loop (also known as a magic circle or magic ring – MC/ MR) |
| R | row/round |
| st | stitch |
| slp st | slip stitch (or sometimes this is shared as sl st) |
| ch | chain |
| sc | single crochet |
| hdc | half double crochet |
| dc | double crochet |
| tr | treble crochet |
| FLOsc | front loop only single crochet |
| FLOscdec | front loop only single crochet decrease |
| BLOsc | back loop only single crochet |
| BLOscdec | back loop only single crochet decrease |
| inc | increase |
| dec | decrease |
| * * | repeat |
| ( ) | number of sts in row or total rounds to crochet |
A brief note about stuffing this heart – you want to focus stuffing into the point of the heart and on the outer edges of the ventricles (right where they meet the body).
Blanket yarn can be rather stiff and somewhat uncooperative when shaping, so don’t be afraid to pull the ventricles apart from one another to get the best shape while stuffing!

That really helps create the rounded shape of the heart.
We have updated and rewritten this pattern (after making many and having so much fun with these!!) it is available as a free crochet pattern in Craft Alotl’s ravelry store. If you choose to download this, please DO follow her store and share images of your finished makes!

Getting Started on your heart crochet
You can watch our Crochet Heart video tutorial on auto play as well! It only requires you to crocht a magic circle and 8 rows (the last two rows are split over the two halves of the heart shape)!
Begin with your yarn of choice (again, I’m using Bernat’s Baby Blanket in Baby Pink and a 10mm crochet hook).
R1: ML 6sc

R2: *sc, inc* 3 times around (9)

R3: *2sc, inc* 3 times around (12)

R4: *sc, inc* around (18)

At this point, we’ve formed the heart’s point.
I like to give the magic loop tail a quick tug before I go on any further, just to make sure the circle’s fully closed before progressing onto the next row.
R5 – R6: sc around (2 rounds total!) (18) [Note: If you want a “Longer” heart, you can add a 3rd row here, we love just doing R6 in our red chunky hearts – the step photos show and extra row]

Creating the Ventricles – Right Ventricle
Next, we’ll need to divide the heart in half so that we can create each ventricle – you will have an even 9 stitches for either ventricle.
To begin counting the stitches off for your left ventricle, position your heart so that the last stitch of R6 is directly in the centre and pinch flat.
Mark the stitch directly across to your current stitch, from there make sure that there is a total of 9 stitches all the way around back to your starting position.

Then, going around the stitches of the heart clockwise, count out 9 stitches total (not including the last stitch of R6).
Using a stitch marker, pinch the first and the 9th stitch together to keep them separate from the side that we’ll continue working on.

R7: 9 sc (9)
Important to note – you want to insert your crochet hook from the outside toward the inside of the work! It’s easy to insert the hook from the inside out, which will twist the stitch.


Continue single crocheting all the way around for one row – 9 stitches total.

Add a little stuffing.

R8: *sc, dec* x3. Slip stitch to the next stitch, then leave a long tail to use for sewing.
Do not seal the hole.

I also like to add a little more fluff to the top of the ventricle now, too.

Left Ventricle of the Crochet Heart
Now that we’ve added the right, we’ll need to make the left ventricle. This is done the same. You need to re-attach the yarn first to continue. Hold the heart so the finished ventricle is on your left.


R7: Insert the hook next to this ventricle. Pull a loop through…


…and chain 1.


Sc into that same stitch = first stitch.

Turn the work, so the first ventricle is on your right again. And sc again – going into the stitch from the outside.
Place a stitch marker into the first stitch if helps you.


Sc all the way round to the stitch marker, you should have 9 stitches (9)
R8: *sc, dec* x3
Cut a tail and pull through.
Do not seal the hole.
OPTIONAL: Kawaii Heart Faces

If you are planning to add safety eyes to your crochet heart to turn it into an adorable Kawaii Crochet Heart, now is the time to add them – though to be fair you can “fiddle” and get them in at the end too. The safety-eye placement is a matter of preference, we like to have them around the middle of the heart – which would be roughly Row 4 or Row 5 on this pattern.

Alternatively, you can cut out kawaii face shapes from black felt and glue these on at the end. Or use black yarn/ thread to sew on features! Lots of options!
Finishing Off the Heart
To complete our heart, we have a little sewing to do!

Notice how both ventricles are open on top, and that there’s also a gap between them. We need to close all three of these off.
Start by threading your tapestry needle with one of the tail ends from one of the ventricles.
Note: When working with blanket yarn, it breaks very easily. Be careful not to pull too tightly, or you’ll break your tail thread!


Once you’ve sewn through all of the stitches, tie a knot. Then, weave the tail down through the ventricle and to the front of the heart, right in front of the opening between the two ventricles.

We’ll sew a few straight stitches over the surface of the heart, front to back, whip stitching this opening closed:


Once you’ve whip stitched this gap closed, tie a knot.
Send the tail into the body of the heart and out, cutting the tail close to the body to weave in the tail end.
To finish, use the tail from the other ventricle to sew through each of the remaining 6 stitches. Pull the tail gently to close the ventricle.
Tie a knot, and weave in the tail end by sending it into the body of the heart and cutting it short.

That completes this heart plushie pattern! Isn’t it adprable? Hope you have fun giving this free crochet heart pattern a go.
You may wantt o squish you heart a bit to shape it!
OPTIONAL: For extra cuteness you can sew on some kawaii faces! Please note the safety eyes need to be added before you start sewing the heart’s ventricals!

A big thank you to Crochet Concupiscence for sharing this lovely pattern tutorial with us today!
Check out the remaining of our Free Crochet Projects: