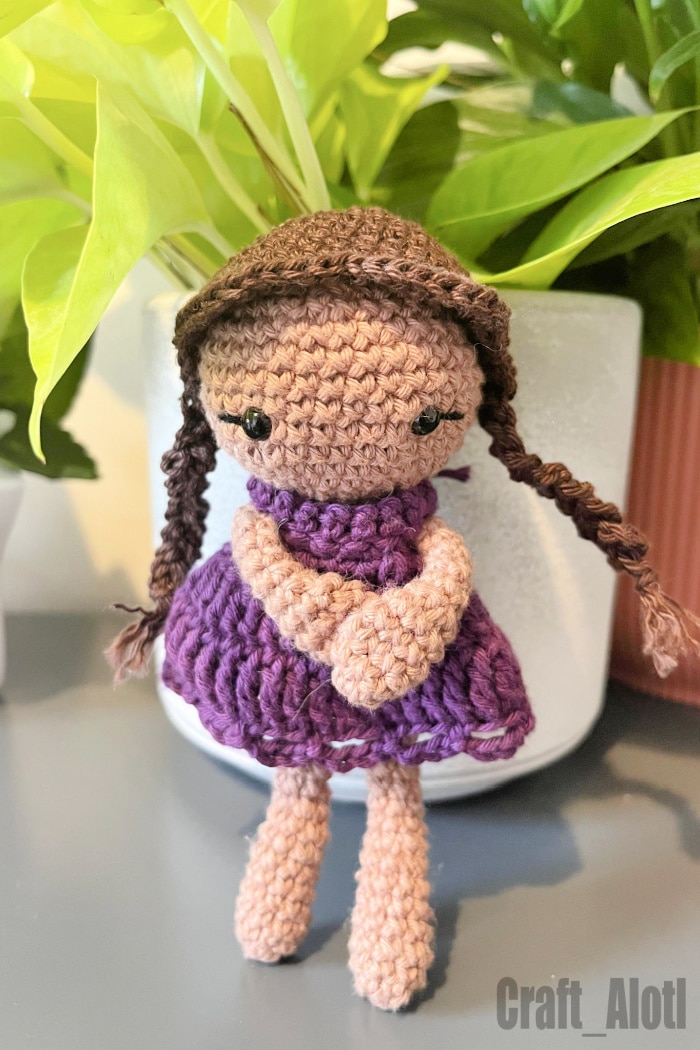
Amigurumi doll crochet pattern for Ellie doll
Finally.. all these years of crafting with my kids has paid off! My now 13yrs old has started writing crochet patterns for us, under the Craft_Alotl alias! Woohoo. How lovely. Today, she shares the Amigurmu doll crochet pattern for her Ellie Crochet Doll! It is a free crochet pattern for Red Ted Art readers for now! So make the most of it.

This doll is a super sweet doll, for a slightly more advance beginner to intermidiary crocheter. A great doll pattern to flex your crochet skills and make some adorable.
This little Ellie Crochet Doll would make a lovely gift too! Our little niece was quite taken by Ellie, I am sure you know a little girl or boy, who would enjoy this too! This Ellie Doll comes with one outfit and hair do, but we have more Ellie friends with different outfits coming soon. Enjoy this free crochet doll pattern!
Ellie Doll by Craft Alotl
Ellie Doll Pattern designed by @Craft_Alotl. Instagram; Esty Shop; Raverly
Copyright Craft Alotl 2022. For personal use only. You are not allowed to sell, distribute or publish this pattern in any form.
If you would like this pattern ad free (or maybe you would like Ellie AND her friends Alice and Maya?), as well as support an emerging artist build a college fund, click on the big red “click for printable pattern” here and grab your download. The price varies a little by region due to different tax laws. We appreciate your support, as does the college fund!
Or get Ellie, Alice & Maya all in one go! Curly haired Naomi coming soon!
This pattern uses American terminology throughout
Pattern Key
SC – Single Crochet
MC – Magic Circle
Dec – Decrease
Inc – Increase
TB – treble crochet
HDC – Half double crochet
DC – Double Crochet
CH – Chain
Slip stitch
Materials
2mm crochet hook
Ricorumi DK , 100% cotton crochet yarn (you can use 3-4mm hooks for this yarn too, you will get a bigger doll).
A little stuffing and some safety eyes.
This doll is 15.5cm/ 6inch tall as our crochet is a little tighter than normal. Your doll will end up a little bigger.
Begin with the doll’s legs:
01: 6 sc into mc [6]
02: (1 sc, inc) x3 [9]
03-08: 9sc [9]
Stuff lightly
09: (2 sc, dec) x2, sc [7]
10 – 14: 7sc [7]
15: (1sc, inc) x3, sc [10]
Fasten off for leg 1
Make leg 2 but keep the yarn attached
Make the doll’s body
16: (join both legs) 20 sc [20]
17: (4sc, inc) x4 [24]
18 – 23: 24 sc [24]
24: (4 sc, dec) x4 [20]
25: 20 sc [20]
26: (3 sc, dec) x4 [16]
27: (2sc, dec) x4 [12]
Finish stuffing the body
Make the doll’s head
28: (1sc, inc) x6 [18]
29: (2 sc, inc) x6 [24]
30: (3sc, inc) x6 [30]
31: (4sc, inc) x6 [36]
32 – 37: 36 sc
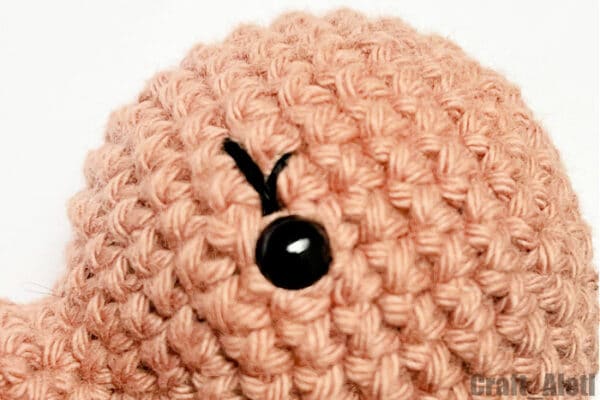
Place eyes between row 33 and 34 with a gap of 6 stitches
38: (4sc, dec) x6 [30]
39: (3sc, dec) x6 [24]
40: (2sc, dec) x6 [18]
Begin stuffing the head
41: (sc, dec) x6 [12]
42: 6 dec [6]
Finish stuffing the head
Fasten off and seal up the hole
Embroider eyelashes
Sew a line three stitches long from the eye. Sew a diagonal line, one stitch long from the eye.
Doll’s arms (make two)
01: 6 sc into mc [6]
02: (2sc, inc) x2 [8]
03 – 05: 8 sc [8]
06: (2 sc, dec) x2 [6]
07 – 12: 6 sc [6]
Fasten off and leave string tail for sewing.
Sew arms between rows 26 and 27 of body and sew them 6-7 stitches apart.
Make the doll’s hair
Starting off with the hair cap
01: 6 sc in mc [6]
02: 6 inc [12]
03: (1 sc, inc) x6 [18]
04: (2 sc, inc) x6 [24]
05: (3 sc, inc) x6 [30]
06: (4 sc, inc) x6 [36]
07 – 11: 36 sc [36]
12: Bangs & Plaits next
Making bangs
Slip stitch, (Sc inc, hdc inc, 2 dc inc, hdc inc, sc inc, slip stitch) x2
Making plaits
2 sc, ch 15
Fasten off
(Join new string in next stitch. Slip stitch, ch 15, fasten off) x2
Leave long tail ends
Join 5 stitches away from the first slip stitch in row 12, ch 15, fasten off.
Join new string in next stitch. Slip stitch, ch 15, fasten off) x2
Leave long tail ends
Plait the three chains either side.
Sew hair to head.
Make the doll’s dress
01: ch 19 [19]
02: Start two stitches from hook. 17 dc [17]
03: ch 1 and turn, 3 sc, skip 3 stitches and ch 4, 5 sc, skip 3 stitches and ch 4, 3 sc [19]
04: ch 2 and turn, 3 dc inc, 4 dc, dc inc, 3 dc, dc inc, 4 dc, 3dc inc [27]
05: ch 2 and turn, (dc inc, 1 dc) x 13, dc inc [41]
06: join both sides together, so that you will now be working in rounds,
ch 3, 40 tb, dc in last stitch [41]
07: slip stitch, (ch 4, skip 2 stitches, slip stitch) x13, slip stitch
Fasten off.
Sew in the tail ends.
If you want, sew on a button to the back of the dress, or attach a piece of string to the back and tie a bow. This will make the back of the dress more neat.
Enjoy your Ellie Doll! I hope you have enjoyed this tutorial!
Copyright Craft Alotl 2022. For personal use only. You are not allowed to sell, distribute or publish this pattern in any form.
More free patterns coming soon! Check out the Ellie & Friends Set on Etsy and support a young entrepeneurial crocheter in her activities. She will be super chuffed. Every sale, makes her do a happy dance! Alternatively, you can support Craft Alotl, simply by liking her store and favouriting her products!! That too would be an amazing way to show support!
More Free Crochet Patterns here:


