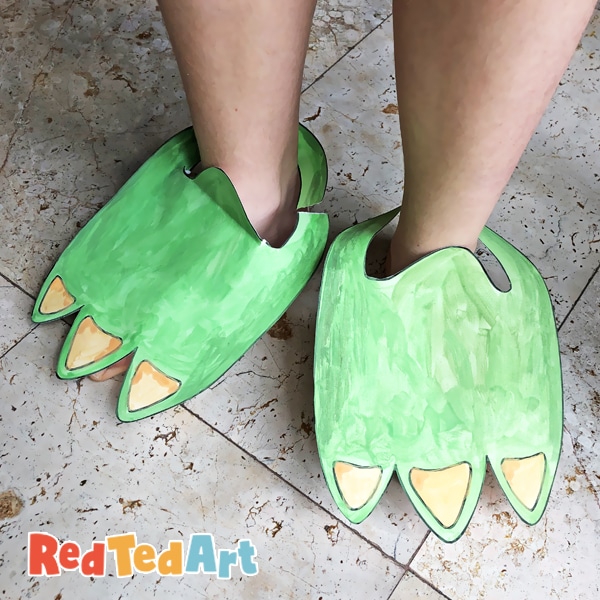
Easy Cardboard Dinosaur Feet
Make your own Gigantosaurus Dinosaur Feet for National Dinosaur Day!
Disclaimer: this post is sponsored by Tiny Pop
Today, the new Gigantosaurus series comes to Tiny Pop, which is very timely as today is also National Dinosaur Day! And we have something special for all Gigantosaurus fans today!! We love cute Dinosaur Activities for preschoolers!
Learn how to make your own Gigantosaurus Dinosaur Feet. All you need is some cardboard and paints. You can make use of our handy free printable or create your own from scratch.
The dinosaur world is a fascinating one, isn’t it?! There is so much to learn and to explore! In this simple craft activity your little ones not only get to learn more about dinosaurs but also practise their cutting skills and get to paint. There is ample opportunity to talk about colours (e.g. prime colours, and how colours mix – or maybe you can take a look at Tiny Pop’s cheerful logo and be inspired by its colours too!) and to think about how space (here dinosaur feet) can be filled creatively.
Gigantosaurus Dinosaur Feet – Materials
You will need:
- a cardboard or cardstock
- pencil and/or marker (and eraser for mistakes?!) to sketch outline of the feet
- scissors to cut out feet
- paint & brushes
- normal paper if you want to create scales for your feet
- glue to glue on scales
- your feet
If you prefer using a template you can do so, too! Find it here. Add $0 at check out for your simple freebie download!
How to make Dinosaur Feet from Cardboard!
We thought of three ways to make this a really fun craft activity for all ages! Tiny Pop likes to include the WHOLE family. So, for the younger crafters among us we have the more cartoon like version. Older kids might prefer the more realistic looking dinosaur feet. We also offer a template you can simply print in case you are short in time or don’t like sketching dinosaur feet.
Version I – Design your own Dinosaur Feet
Did one of the Gigantosaurus characters inspire you specifically? Let them influence your final design. Time to pick up your pencil or marker! We will begin by outlining some easy shaped dinosaur feet onto cardboard or cardstock. The dinosaur feet will look like a U and on top of the U we will draw three little triangles next to each other.
Discussion opportunity: How big were dinosaur feet? Compare your own feet to the size of those of different types of dinosaurs. The characters from Gigantosaurus on Tiny Pop would be a great starting point for these discussions!
Towards the bottom of the dinosaur foot draw a half moon like shape. This is where the feet will go through. You could also simply draw an X. Finally cut out the template including the foot hole.
Version II – More realistic looking Dinosaur Feet
You might want to try your drawing skills on these fantastic looking dinosaur feet. In the next picture I show you how to approach this best!
Draw a diamond like shape. The bottom edge is a bit rounder and here we will draw a half circle inside (see picture on the top right hand corner). Then we will make two points on the half circle. They mark the “in between” of the toes. Three marks on the diamond outline will be the tip of the toes. Then we draw the toes and the foot hole.
Lets be clever and cut out that first dinosaur foot outline. Then we use that very foot that we just cut out to create the second dinosaur foot. Flip it, place it on to cardboard, outline the shape again and cut out the second dinosaur foot!
Version III – Make use of the Dinosaur Foot printable
Finally, to make things super easy for you – especially if you are little shorter on time, you can make use of this free printable created especially for our Gigantosaurus fans.
Just print out 2 templates, colour and cut out! Done! You are ready to watch the next instalment of your favourite dinosaur show.
Decorating our Dinosaur Feet
An activity younger kids love is to fill paper with paint. This can happen in any way really. Dots, circles, stripes… what other patterns are possible? For our cartoon like dinosaur feet we filled two A3 pages with colour dots. And let it dry before continuing.
Here is an opportunity for your little one to choose what shapes she/he would like to cut and glue on the dinosaur foot.
We then decided to make scales. After outlining the scale shape like pattern cut out the scales. Have a look first how you want to set up your scales on the dinosaur foot BEFORE starting to use glue. When happy with your set up add glue to the foot and start adding the scales.
Discussion opportunity: What did dinosaurs look like? What did their skin look like? Did they have feathers, fur or scales?
What is more protective; scales or tuff skin or feathers?! If you were a dinosaur what would you prefer to wear?
The more realistic dinosaur feet we chose to paint directly. Don’t forget to let your decorated dinosaur feet dry!
And this is what they have turned into and what they look like on our feet:
Now you have made your very own Gigantosaurus Dinosaur Feet, it is time for a good stomp a round!! Roar!
A big thank you to Tiny Pop for sponsoring this super fun project! Let’s dive into this adventurous series on Tiny Pop, by following in their footsteps – literally! Join me in making dinosaur feet to wear whilst you watch your new favourite dinosaur show, Gigantosaurus! I hope you have enjoyed it as much as we have. And have a Happy National Dinosaur Day!!

More adorable Dinosaur Crafts for Preschoolers:


