
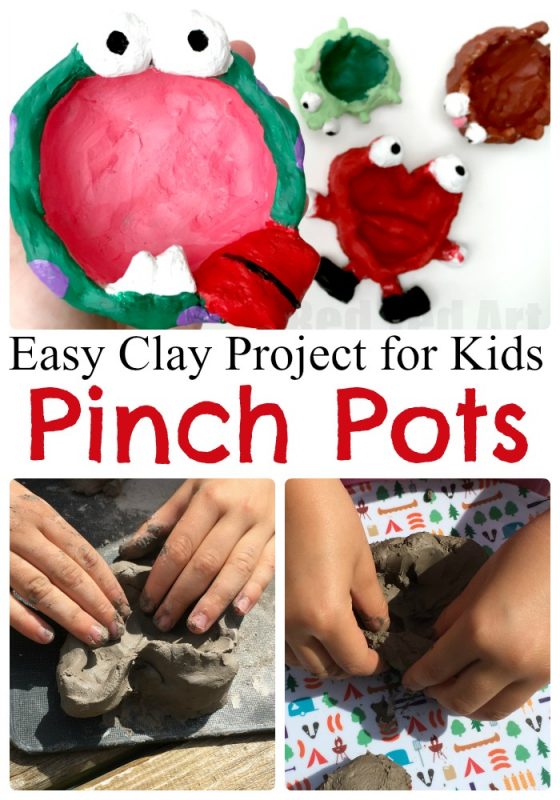
Easy Pinch Pot DIY – Clay for Beginners
So Pip Squeak came home from school recently with a pinch pot in her hands. SHE LOVED MAKING IT!!! And asked if she could make another STRAIGHT AWAY. So I thought, why not – we have clay and pinch pots (also kown as Thumb Pots) really are super easy and fun to make. This joins our collection of fantastic Air Drying Clay Projects for Kids!
First we discovered that our air drying clay had gotten REALLY hard ad it was super frustrating for her to work with this hard air drying clay. So I decided I need to do a quick softening of the clay – it is actually really easy to do – but you do need a day – so plan ahead (video shared below)… and then a couple days later we FINALLY got around to making our Pinch Pots.
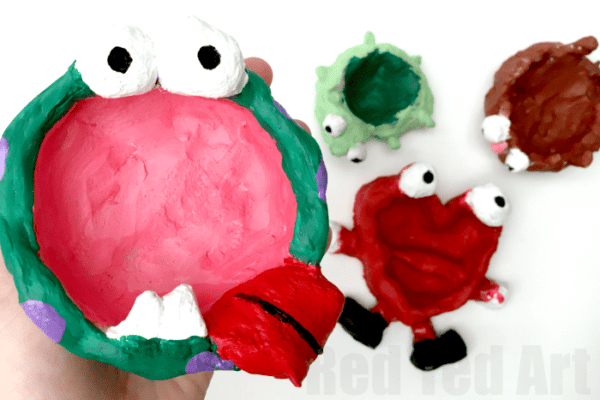
As Autumn is just around the corner, Pip Squeak made a Hedgehog pinch pot, I made a Monster Pinch Pot for Halloween… Red Ted decided to make a Love Heart Monster (mmmh that is probably for Valentine’s Day.. ) and then we also have a random turtle addition.. well why not?! (If need be find out how to soften hardened air-dry clay here).
We also have a super cute easy Apple Pinch Pots version too – the kids will love this easy Autumn craft!
Pinch Pot DIY – materials needed:
Making pinch pots really only needs some clay and suitable paints:
- air drying clay
- parchment paper (for drying)
- wire (for removing off table)
- acrylic paints OR ordinary paints with PVA glue added (you can’t really use watercolor paint as it won’t show up, unless you add a white base layer first)
Optional: you can add glazes or varnishes to your finished pinch pots if you wish!
You don’t really need any clay tools either for a basic pinch pot, it is only when you are honing your skills and making more delicate pinch pots that you would need to start adding clay tools!
Using air dry clay, means you don’t need to use a kiln! Though of course pinch pots are great clay projects for beginners using a kiln for the first time. Just insure you don’t have any trapped air bubbles in the clay before you start working with it!
Monster Pinch Pot DIY – How To:
I share a video of how to make the Monster Pinch Pot here… you can watch that or follow the written and photo instructions below. I think the video tutorial is great to use in a lesson if you wish! I have also included a video on how to soften hard Air Drying Clay because I think it is super helpful!!
Please note: I got the clay a bit too soggy in this video!! Let it dry out for 10-15min before you start working and it should be fine (and a cold day, leave it out for 30min!).
How to soften hard air drying clay easily:
The video tutorial on auto play shows how to soften air dry clay easily! In summary – it dose take a couple of days, so be sure to check this out now and check your clay before you want to use it!
A copy of this video is also available on YouTube:
How to make Thumb Pots (written instructions).
- Begin with a good ball of clay. We like enough that fits nicely into a pair of cup hands. We like to knead the dough a little first to make sure it is smooth throughout and any air pockets squished out.
- Form a ball.
- Then indenting your thumbs, start squishing it into a bowl. This is your basic pinch pot. Keep working round with your thumb and make it as smooth and even as possible. Though don’t make the sides of your pinch pot too thin. And yes, it really is that easy to make a basic pinch pot!

- Red Ted quickly decided he wanted to shape his pinch pot into a heart. This is the stage to let your kids’ creativity go wild. You can shape your pinch pot into what ever you want. My sample video is a clay pinch pot monster, complete with big eyes, teeth and tongue.. but really let your kids or students decide. We made a fun heart man pinch pot, a turtle pinch pot and a hedgehog pinch pot. Too cute!


5. Once you have you basic shape sorted you can add things like heads, eyes, legs or arms. These basically are little balls or coils for eye balls, arms, legs, horns, teeth or eyebrows.
Remember to connect your clay pieces by cross hatching the connecting surfaces and then also smoothing down the sides of the connecting pieces. If the clay breaks during drying it is very hard to fix.
6. Let your creations dry fully.

7. Then paint the thumb pot with acrylic paints. Pip Squeak gets VERY excited at this point and wants to make sure you know you can use ordinary paint mixed with PVA glue!
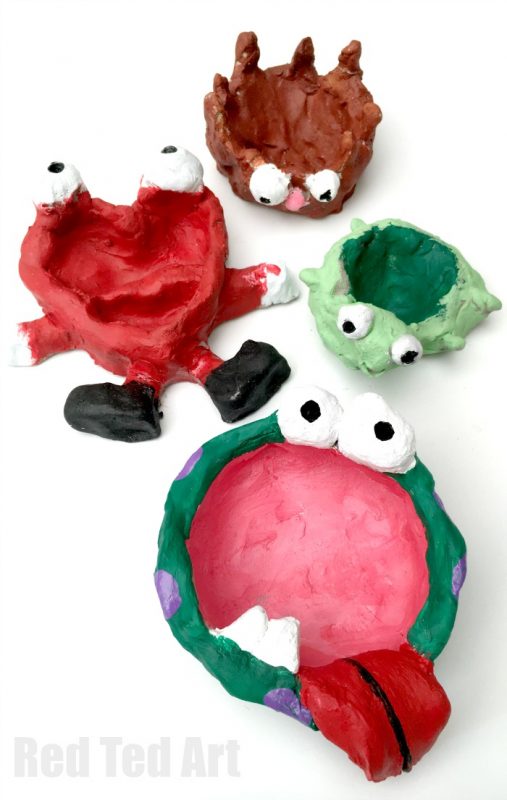
And finished! Aren’t these simply fabulous DIY Pinch Pots?
Such a great easy Beginner’s Clay craft for kids. One you can do with all age groups!! Have fun making Thumb Pots!!! Students love making these pots and they are great activity for the first day of school!
See more great Air Drying Clay Projects for Kids here:
