
DIY Felt Cloud Brooch – Sewing with Kids
Summer is a great time to get sewing with kids! Kids are never too young to learn and there are lots of things you can do to get them started on sewing! We have a variety of sewing projects for kids to help inspire you! Today, we are making super cute little Rainbow Cloud Brooch or Pins.
They also work well as keychains or backpack charms. Though this is an EASY sewing project, it is definitely for a slightly more confident sewer, as you have to keep the rainbow “in place”. A larger cushion version of this would be great for less experience crafters. This is part of the Sew a Softie summer challenge.

To make your Cloud Brooches you will need:
- White felt (though, light blue or grey would work too)
- Yarn in rainbow colours (though could do these in blue as well or use ribbons instead)
- Mini split pins in black and pink (though you can stitch these features or glue on black and pink felt circles)
- Thread
- Sewing needle
- Safety pin (for the back)
- Scissors
- A little stuffing
How to make a Felt Cloud Brooch
For this project we use some twisted wool as the rainbow. Babble Dabble Do has a great little video to show you how to twist your wool into a “yarn rope”. It is so quick and easy and I used to love making bracelets like this as a child! If you don’t like this method, you can also plait your wool or maybe use rainbow coloured ribbons!
Time needed: 20 minutes
This is a relatively quick and easy project to make and sew. As with many sewing projects, the “prep” time probably takes as long as the sewing itself. If you want the sewing to “take longer” than the prep, I suggest you make a cusion version of this (we have one planned!! Excited!).
- Sketch out and cut your cloud shapes
If need be have several goes at sketching your cloud shape. Being happy with your basic shape is key with being happy with the whole craft. So take your time and don’t worry about neatness!
- Cut out 2 white pieces of felt
Cut out your white pieces of felt. You will need two identical shapes. If need be, use a pencil to draw and outline.
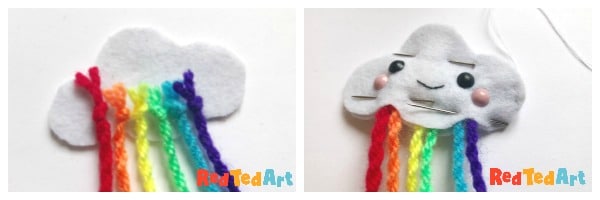
- Add the cloud brooch’s face
Time to add you split pins. Make sure when you fold them at the back, that they don’t stick out over the edge of your cloud pin! If you don’t have split pins glue on felt details or sew some eyes! Also sew a little mouth.

- Make your twisted wool & postion
I shared links to Babble Dabble Do’s easy to follow “rope yarn” video above (scroll back for it). But making rope yarn is quick and easy. You simply take a double the length you want. Hold it between your fingers in one hand and twist the other end. Then with your mouth (or something) grab the middle and let go….. Make a little knot. And now position you rainbow.
- Place your cloud face on top
Secure the two pieces together with some pins. This will prevent the rainbow from slipping around !

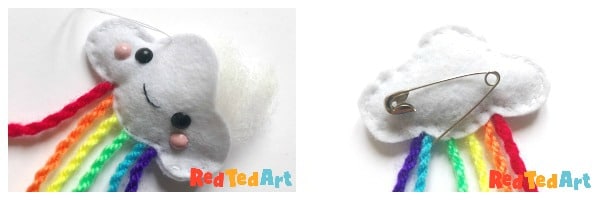
- Sew your cloud together
Using a running stitch, sew around your cloud. Start at the bottom to secure your rainbow strands. Make sure that each stitch goes through one rainbow, so each rainbow strand is secure. When you are at the top, add a little stuffing and sew shut.
- Add your safety pin
FInally sew a safety pin to the back – be sure you sew the right half on! And done!!

Isn’t it cute? Now I really do want to make a big one. This is a great little sewing project if your kids want to make gifts for their friends. They are easy to post too! Lovely.

Hope you have a go! Don’t forget to check out the rest of the Sew A Softie Projects being shared throughout July!
More sewing projects for kids here:
