How to blow an egg for Easter Egg decorating (with step photos)
Welcome back to Red Ted Art and this week’s “How to”. Once again, I am not sure if this a “how to” as such, but I guess if you have never done Easter Egg Blowing, it will indeed be new to you… for those of you that have, it will hopefully serve as a reminder, provide you with some handy tips and give you a pretty and VERY simple “Austrian” Easter egg design – it is one of my favourites ever and I use it on many things! I also have a fun easter decor for kids idea coming up very soon .. so be sure to be back!

Note: affiliate links have been added to this post. Should you choose to purchase via these links, I will earn a small comission that goes towards the upkeep of this website!
I love blown eggs as they have something wonderfully delicate about them! Quite pretty I think! They make great ornaments at Easter and are a wonderful basis for Easter crafting!
Using blown eggs with preschoolers

As this is a natural material and as you are not wasting any eggs to decorate blown eggs, please do be “confident” to let even younger children have a go at decorating REAL eggs. The best method for younger children to work with eggshells, is to use our tissue paper decorating ideas – as they give the eggs “strength” and are less likely to break!
See our tissue paper chicks, as well as our Eric Carle eggs! Or check out our complete list of Easter Egg Decorating Ideas for Preschoolers.
Blown Eggs are Eco Friendly AND Thrifty
I also love this craft, as it is incredibly thrifty: you still get to use the eggs! So it is virtually FREE! Only costs to you are a ribbon, a pin and some paint!


We have only ever used blown eggs for our School Egg Decorating competitions too. Yes, there are the occasional breakages, but the kids have learnt quickly to how to handle them. Combined with recycled materials from the recycling box, and our school egg decorating competitions have been lots of fun (with lots of wins too!).
Easter Egg Blowing – Supplies
- Eggs
- One needle/ pin or thumbtack
- Toothpick
- Bowl for catching your raw egg
- For drying – empty egg carton
- For hanging – a little bakers twine and a toothpick
- For decorating – a skewer can be handy
NOTE: if you prefer, you can of course using an Egg Blowing Tool! Some people prefer this to avoid getting light headed.
FYI to paint our Easter Eggs, I used acrylic paint – they are strong bold colours. You can use food dies and die your egg by – mixing 10-20 drops of food die with 1/2 cup of water and a tablespoon of white vinegar (see my full how to die easter eggs instructions here).
Egg Blowing and Salmonella
Some people are worried about Salmonella when using real eggs. In all the years we have blown out eggs, we have never had a problem with Salmonella. However, things to consider:
- use fresh eggs. If in doubt, by a new batch
- wipe the egg clean before blowing
- if really concerned, use the bulb syringe method or buy an aunt marge’s egg blower
How to blow out an egg for Easter
Wash your eggs in warm water and pat dry.

Make small holes on either end of your egg
Poke holes on either end of your eggs with a pin – I usually make the holes around 4-6 pin pricks big. You can make them smaller, but the blowing is much harder! So we prefer to make a slightly larger hole.
TOP TIP: If you get the pin prick holds big enough the blowing really isn’t too hard – can almost do it one breath!
Break the Yolk inside the Egg
Once you have made the hole in boths ends of the egg, use a toothpick to break the yolk inside the egg. It will make blowing out the egg content easier!
Get ready to blow out the egg
Hold the egg steady in both hands and blow through the top hole – and make sure you catch the egg whites and egg yolks in your bowl (perfect for baking cakes, pancakes or scrambled eggs). This is no easy task at first, you may want to make your hole a little bigger. But it is possible!
Out 12 eggs, I have only broken one… and that is because I got impatient and hurried it.
TOP TIP: You can actually do this with a turkey baster or any other type of “bulb syringe” too. But it isn’t quite as effective! And may take a little longer! To use a turkey baster, you remove the rubber “Bulb” from the syringe and place it over the top of the hole. Then pump the air out of the bulb. Lift the bulb, let air back in and repeat.

Some children find it easier if you cup the hole egg your hand!
TOP TIP: I find using the toothpick now and again and giving the insides of the egg a wiggle help!
Rinse your eggs
Once, I have blown the inside of the eggs out, I like to rinse some hot water through the egg. So your eggshell and the inside of your egg is nice and clean! And blow out any excess water too and give them a little shake. Wipe clean with a paper towel.
Let your Egg shells dry fully!
Let your egg shells dry fully by resting them in an empty egg carton. Any excess water will be soaked up by the carton.
NOTE: we make the holes “bigger” now – which means my kids (10 and 8) can manage the blowing! They LOVE doing it themselves and I think this is a real memory maker for them!
How to decorate your blown out eggs
There are SOOOO many ways to decorate Easter eggs. Our preferred method is to paint them (as we mostly used our blown out eggs for Egg Decorating Competitions).. but you can decorate the empty eggshells by:
- Painting your eggs (see below for some tips)
- Using food dye for your eggs
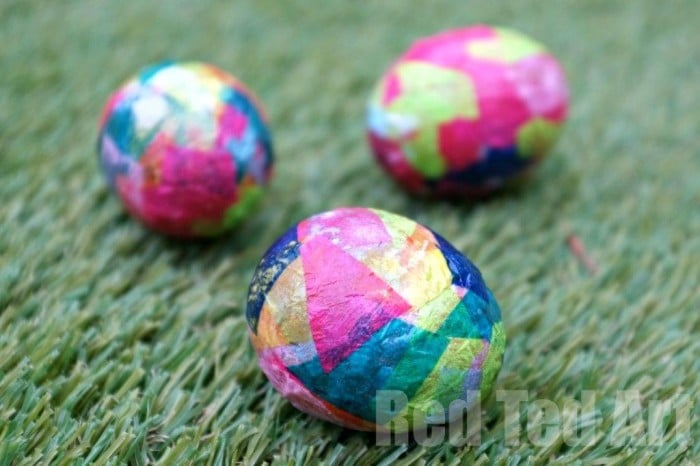
- Use napkin decoupage or simple tissue paper decoupage eggs
- Use permanent markers (make some fabulous doodle eggs)

I found it very useful to “skewer” the egg with a thin wooden kebab stick – this makes painting and drying much easier! Alternatively, you can hang it first, but I still find that a little messy!
Hanging the twine insider your blown-out eggs
The bakers twine was tied around a broken piece of toothpick which I then popped into the hole at the top of the empty shell. It forms a “t bar” across the hole allowing the twine to secure in place. Some people like to use a straightened paperclip, that works too!

That said, most kids prefer to simply hold their eggs as they paint. It just gets a little messier! Plus you may still wish to use the skewer to pop the eggs on afterwards and let them dry!
Paint your eggs
Paint a base colour – match your decor. Darker colours provide a nice contrast to the final design, lighter colours look fabulous for spring!

Experiment with Food Colors and Homemade Natural Dyeing Agents
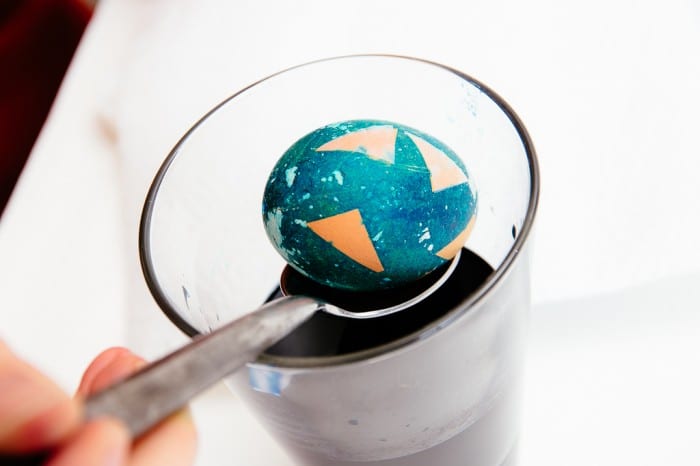

Learn how to dye your easter eggs with food colors here. You will find food colors are not as vibrant, especially if are using brown eggs like us, here in the UK. That said, if you are using white eggs, then using the food color dying method can give you lovely pastel shaded eggs! You can also check out our natural dyeing agents how to!
All food dyes are not equal. So experimenting is key!
Austrian Easter Egg Pattern

For the Austrian Easter Egg Pattern.. Paint your little flowers: they are so easy: one dot in the middle, 5-6 dots around it. Space evenly – but don’t worry too much about exact spacing – they will look nice however you do them. Let dry
Once dry: tie some thread/ ribbon to the pin or broken toothpick. When it is hanging the pin and the string will form an upside down T in your egg, which is what holds it in place.
Make sure the hole in the egg is big enough to fit the knot through. If not, just gently make it a little bigger with the pin. Push the pin and knot through. The pin should then straighten out to from a T with the string and hold it in place. (the Images show that I added the string first.. Believe me, it is better at the end!)

Hang. Finish. Admire.
Make more:

I find these quite addictive. And since giving them a go again a week ago or so, I can’t help but blow out every egg I need for cooking. They make FABULOUS little Easter gifts too!
Now you have mastered how to blow the insides of an egg out, here are some brilliant Easter Egg decorating ideas for kids of all ages!

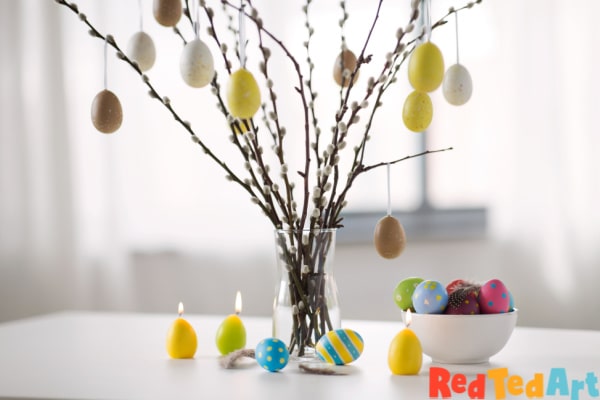
Needless to say, handblown eggs are perfect for the Easter Tree. Here are some How to decorate and Easter Tree Ideas: