We love Autumn and Fall Colours. And there is nothing better than some lovely Autumn Crafts for Kids this time of year. We particularly love working with nature finds this time of year and love the “rainbow” of leaf colours you get. But how to preserve leaves to keep these colours? Read on to explore 6 different methods for preserving leaves!
In our house we like to experiment! We like to try things out and see what works best and then come back and share our findings (a few years ago, I experimented with how to make a candle wick.. and shared what I found – and that went down a treat!). I find it particularly useful to experiment and share results, when the findings are, what I would call inconclusive.
What is the best way to preserve leaves?
When it comes to how to preserve leaves, we found.. well there is no real “best way”. There are lots of different ways to preserve leaves, but none, in my opinion, is best – for different reasons. But they are all good ways to preserve leaves, again, for different reasons. So I will list the most common leaf preservation methods (I confess, there is one we didn’t try – which is to wax your leaves, so I can’t compare ALL methods, but I can make an educated guess about the outcome for you).
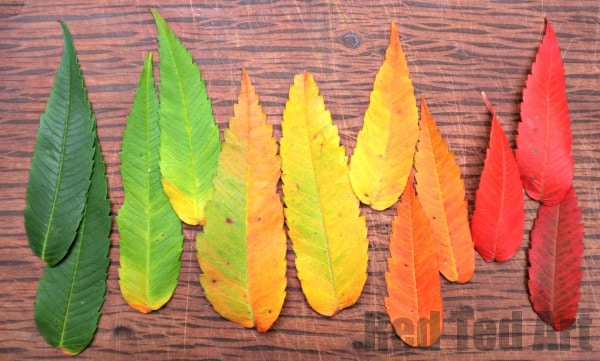
The first thing to note when preserving leaves – is to SET YOUR EXPECTATIONS. Autumn leaves are stunning and beautiful – with bright reds and bright yellows.
It is incredibly HARD to preserve this brightness – especially for the reds. So just set your expectations and anticipate that final colours, will be lovely, but not as stunning. In a way, I am happy about that, because that way we appreciate nature year on year even more so.
I have created a short video about the Glycering Bath method and compare what the leaves look like to pressed leaves, laminated leaves and PVA leaves at the end (so watch the all of it!). Then BELOW the video, is a list of the different methods + the waxed leaf method, with some advantages and disadvantages highlighted!
How to Preserve Leaves Video
Watch our video on Auto Play or read through the instructions below, highlighting the pros and cons of each method!
Whilst I have your Attention
All crafts supplied on this website are free for you to follow and read. Occassionally, I charge for the odd template, but the templates are not necessary for crafting! During this super uncertain time of Covid, if would like to show me additional support, there are number of ways you can really help me (and help continue with this free resource website!!):
- Follow me on YouTube (I am soooo keen to hit that 1mill subs milestone!)
- Sign up to my FREE weekly newsletter
- For Preschoolers – follow my FREE FB Group or join this newsletter
- Or if you wish, you can buy me a coffee!
Any, or all of the above are super helpful!!
THANK YOU!
So. Here we go – the most common leave preservation methods:
1. Pressing Leaves
Pressing leaves is easy and fun classic way to preserve leaves. You make sure your leaves are dry (pat them dry with some kitchen towel), place them between 2 pieces of newspaper and pile on some books. Or get yourself a fancy flower and leaf press!
Advantages pressing leaves:
- easy to do – you just need newspaper and books
- you get nice flat leaves, which are great for making collages and other crafty projects
- Greens & yellows tend to do well – but eventually they will darken and go brown too
Disadvantages pressing leaves:
- it takes a few days (though 1 or 2 days is usually enough before starting a craft project)
- leaves become delicate and brittle
- I find that you tend to “loose” the red colours the most
2. Laminating Leaves
You need a laminator, so not everyone can do this. It is important to make sure you leaves are properly dry (ideally press them a little for a few days)! Then feed the leaves through the laminator. My daughter “simulated” the laminator by taping up her leaves with tape (ha!). It worked surprisingly well.
We found that the laminating leaves was great for preserving colour INITIALLY, but that over time the colours would also darken and fade.
Advantages laminating leaves:
- sturdy leaves, great for play or hanging on walls and windows, but not other crafts
Disadvantages laminating leaves:
- cost of the machine and laminating plastics
- less eco friendly as using more plastic
3. Glycerin Bath Leaves
The glycerin bath method was new to us (and you can watch our video below to see how we did it and what we thought – in the video, we also show what the “laminated” leaves, the pressed leaves and the PVA leaves look like in comparison). For a glycerin bath you use 1 part glycerin (from the baking section in the supermarket) and 2 parts water.
Advantages laminating leaves:
- the leaves are wonderfully subtle and feel “like real leaves”
- best for yellows
Disadvantages laminating leaves:
- cost of glycerine – isn’t hugely expensive, but if you want to do LOTS, then you would need to consider the cost
- takes 3-5 days
- you have to make sure you properly submerge all your leaves
4. PVA (White Glue) Leaves or can you preserve leaves with Modge podge?
PVA presevered leaves essentially means that you paint your leaves with PVA glue and let dry. This method works well enough, for leaf collage art – especially if you want it to be 3D, as the leaves will not stick flat (unless you have pressed them first!). Over time, leaves will darken.
Advantages PVA leaves:
- Most people have PVA handy and it is relatively inexpensive
- Great for green leaves, but again, colours will darken with time
- great for garlands
Disadvantages PVA leaves:
- It can be a bit messy! Especially if you want to cover both sides
- it is VERY dependent on the quality of the glue – good quality will result in much better leaves (obviously!!)
- it is still hard to preserve the wonderful colours
5. Waxed Tipped Leaves
This is one method, I have NOT done myself. In essence – you melt down a pot of white left over candle wax and dip your leaves, then hang to dry or place on baking paper to dry. Make sure you leaves are dry and not wet first.
Advantages laminating leaves:
- leave will look more life like and preserve the 3d shapes
- great for garlands
Disadvantages laminating leaves
- anything with molten wax is messy!
- not ideal for younger kids
- leaves can crack if the wax and crumble is too thick
I can only guess at how well the colours will keep.. but suspect it is like all of the above…. colours will darken over time. Reds will turn into magentas, yellows, will do well, but fade to light browns over time!
6. Wax Paper Ironed Leaves
This is essentially similar to the wax dipped leaves.. but the result is different in that your leave is flattened and the wax layer is much thinner. You will need old fashioned “waxed paper” – like that used for wrapping sandwiches – note: this is hard to find in the UK, but common enough in the US!
Take your waxed paper, put some on either side of your leave. Place on newspaper and old tea towels and iron. Take care NOT to get wax on your ironing board or iron!
Advantages laminating leaves:
- Flat leaves
- a good way to do lots of leaves quickly
Disadvantages laminating leaves
- paper may be hard to get hold of
- grown ups need to do it for kids
No time to preserve leaves?
Here is a great Leaf Project that doesn’t need preservation first – but looks amazing and will last all Autumn – it DOES help if you flatten the leaves a little first – maybe just a day between some newspapers and a book!
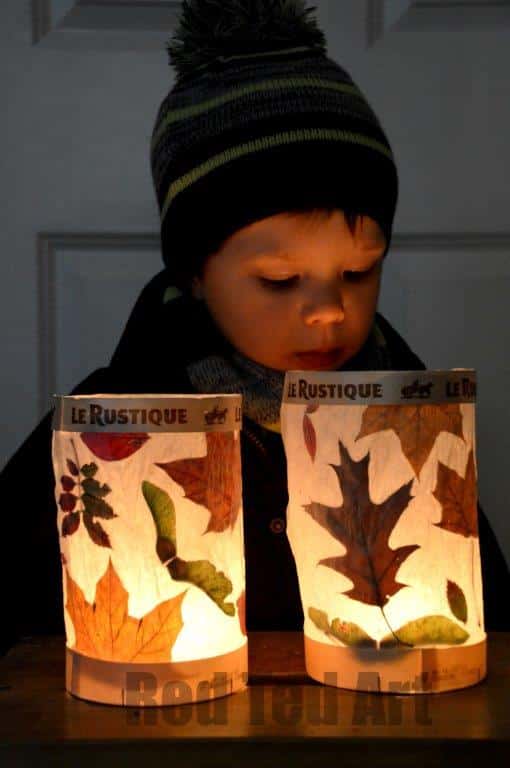
Learn how to make LEAF LANTERNS here.
I have to say I feel that I am “inconclusive” about what the BEST method is – basically, it is hard to keep those beautiful reds and bright yellows, as the chemical make of these simply changes over time. In future, I would probably opt for ease – e.g. the pressing of leaves or laminating or PVA gluing depending on the project, over the “hassle” of glycerin baths” or mess of wax dipping!
So… please do leave comments below with your experience of preserving leaves and I can update this post as and when more information is shared! Happy Leaf Crafting!!!
How to preserve leaves
Instructions
- Pressing Leaves – between two sheets of newspaper and heavy books
- Laminating Leaves – dry leaves and laminate
- Glycerine Bath Leaves – soak in a water & gylcerine solution for 3-5 days
- Clear Glue Leaves – paint with glue and let dry
- Waxed tipped leaves – melt down wax and dip the leaves, hang to dry or place on baking paper
- Wax Paper Ironed Leaves – get waxed paper, place of leaves, add a tea towel and iron
Notes
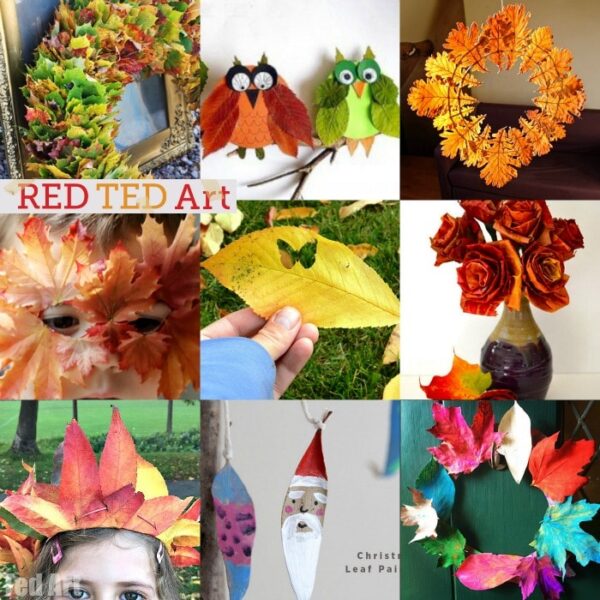
Now you have preserved your leaves.. take a look at these 20+ Wonderful Leaf Craft Ideas:
This video tutorial is also available on YouTube
Gail Plaskiewicz says
Laminating leaves is very easy and I don’t have a machine. You buy sticky laminate paper from either the Dollar Store or in an office supply store. The Dollar Store kind is in a roll, the kind from an office supply store is in sheets. I like to put the leave on the paper and cut out a square. Then I cut out another square of the same size. I peel of the backings and put the leave on. Then I cut some of the laminate from around the leave. I have a bag of some of them and I’ve used them on cards. People are so freaked out that those are real leaves. The color of them does change some but not a lot.
Kat Stewart says
What a great idea!
Yilly says
Hi! Have you tried this method with green leaves? I recently collected one very big and I would like to keep it with the original color if itยดs possible. Thanks!
Red Ted Art says
I confess, I haven’t but would love to have your input on it!
H says
I was just thinking that I’d use an old frame and place the tape all on one side like a window then place the leaves on it and then cover the other side with tape. Then cut it out of the frame and close to the edge of each leaf that I pressed!
classe says
hi,
nice post
Sunil Kumar says
It’s very nice post..what a great ideas ๐
Jackie Allen says
I am trying to preserve banana leaves. Do you think the pva method would work. I want to make a large flower and use the leaves as petals
Red Ted Art says
Oh I am not sure, but worth a try?
Stephanie says
I have a friend who used green leaves as seat assignments at her wedding.
I secretly collected them and want to make something special for her. Most of them are still all green, a few have brown spots, but I want to preserve the green for the most part. What is the best way, you think to do this?
Red Ted Art says
I haven’t tried this method with green leaves – so am not sure how LONG they would last. I think the safest would be to press them?
Emily says
Hi! I am interested in preserving green leaves. did you try preserving the green leaves any have any luck? I only need mine to last in color for a little over 2 months.
Red Ted Art says
I am afraid I didn’t try!! Good question!
Susan says
This may seem silly, but has anyone ever tried to *paint* leaves? I’ve pressed them and they have lost all of their color. I’d like to use them as fun wall decorations, paint them various shades of green. What do you think? Would the paint protect them?
Red Ted Art says
I would use acrylic paints! I think that would work
Gia says
Oh I loveeee this idea!
Judy says
I just spray painted some dry, pressed oak leaves white. Then drew three ghost faces with a Sharpie on the center upper lobe of the leaf. Just three dots, really. Got the idea from a recent issue of Good Housekeeping (Sept-Oct). Added the ghost leaves to a fall wreath.
Red Ted Art says
Oh sounds so fun!
Heather Edwards says
I used a furniture polish spray after pressing the leaves. I would leave the spray on for a few minutes, wipe with a paper towel, then repeat with the other side. Then after 6 hours of drying, I would make small tape loops for the back, and place the leaves between the glass of a “floating” picture frame. The results were amazing. After 5-7 years, the reds would darken and the wax residue would break down a bit, but the longer you leave them alone, the longer they looked good. Especially with a white-walled background, or blue, grey, and green walls. I gave a lot away as gifts, for I was a leaf hoarder, LOL. I collect books and I only had a dozen out of 100 books free of leaves.
Red Ted Art says
Ooh thank you for the top tip!
Ceci says
Hello Heather!! Which paint did you use? Thanks!!
Rey says
Hi, great post! Iยดm an artist and I work with leaves since 10 years ago. I live in a tropical island and there is no autumn, so it is a struggle to find nice colors. I only use the pressing method but with several months of waiting, always trying to get the final color of each leaf because I gave up trying to preserve the original one. It seems impossible! In my recent investigations I read that an epoxy resin coat could work. What do you think? May you experiment with that too and add the results to the post? It would be very helpful! For me is impossible right now.
Vicki says
To preserve the lovely ratio of leaf to stem, only cut a tiny bit of the stem before immersing in gylcerine solution.
These methods were shown on the video with only short term outcomes. I’d suggest combining methods in order to get a good long-lasting product. Thanks for making the video though!
Marjolein Van Vessem says
I use PVAglue but first dry the leaves in the microwave between absorbant kitchen paper. After a night drying the glue, you can easily do things with the leaf, like embroidering. See my experiments on http://www.goedesier2015.blogspot.nl
And thank you for your information!
Mary says
Thank you for such an interesting article! Personally, I prefer the Glycerine method, but never considered lamination, that sounds like an interesting idea – I’ll give it a go.
Keep up the good work!
Red Ted Art says
My pleasure and thank you for your kind words!
Joanna Oliver says
hi Maggie,
I picked up the most interesting magnolia leaf yesterday that had fallen onto my back deck. It is in the rare shape of a lovely heart even with the stem remaining although it is more dead than alive as it is a gold color. I just love it and would love to preserve it but afraid to iron or put any pressure on it as the leaf is a little stiff and also has a little curl on the edges. Do you think I could just put it in an air tight show box. I am a novice at this. Y’alls comments and suggestions would be greatly appreciated as it is just to lovely not to keep!!
Red Ted Art says
I have to confess it is really hard to keep the colour of leaves – especially those bright golden and bright reds! Even with the methods above, they will dull over time. I think your best bet would be laminate it (though it may squish a little) or dip it in wax?
Cyndee Holesa says
I have seen magnolia leaves done in green tinted glycerine. They lasted for years?
Red Ted Art says
Oh that is clever!
Linda Moorhead says
As a child, I was very pleased with my “stained glass window” when I ironed 8 leaves between two 18 inch sheets of waxed paper and then taped them to window
Red Ted Art says
Oh wonderful
Ponder says
I found a 5 leaf clover in my yard and I was very excited to preserve it. After spending quite a bit of time searching for the “best” options, I settled on the glycerin bath. After the requisite 5 day soak, my 5 leaf clover looked like a small, horribly rotted lump of spinach.
Red Ted Art says
Oh dear! For a 4 leaf clover I would have pressed it!!
Cheryl | TimeToCraft says
I use the dip in melted wax method. In fact, just got the ones out that we dipped a few years ago, for our autumn display. The colours do keep. I use bees wax and the smell just adds to it.
Red Ted Art says
wonderful thank you for feedback!
Lorraine says
Hi, Iโm a leader at a Beaver Scout colony in the UK. Weโre pkanning a leaf printing session in December but by then all the trees will be bare and the leaves will be dry and brittle. I thought about collecting them New and preserving them until December. What would you recommend? I just want to stop them drying out. The colour doesnโt particularly matter. The kids will paint the leaves and print into paper. Unless I find a more exciting alternative in the meantime!
Red Ted Art says
I think the glycerin method would work best for you then? As the leaves keep the shapes and bendy-ness!
Daminih says
Hi, i have found a half dried leaf and want to preserve it and frame it. will varnish be a good idea for that?? as i dont wanna press it.
do suggest me.
Thanks!
Red Ted Art says
I think varnish should work. But remember over time, they will still loose the colour.
Winnie says
I love laminating fall leaves! Have even done some green ones! I also like to include sprigs of dried grass grains and make an arrangement with a ‘spray’ of colors or shapes with the grass as accents. Then I put the laminated leaves in a frame with homemade paper as a textured background behind the leaves with coordinating color. I always have beautifully preserved leaves with matching borders, frames, and handmade paper. Some I did 3 years ago, and they still look great!!!
Samantha says
Hello. I would like to make a tree identification book using leaves and pictures of the tree and bark. I want to make one (instead of buying one) of the trees around our house to teach my boys. I would like to keep both the texture, color, and shape of the leaves. Any suggestions on how?
Thanks
Red Ted Art says
I guess you need to pick one of these methods above?
Aure says
Can I boil to sterilize and then dehydrate/low bake in oven to kill buggies? Prior to preserving techniques?
Red Ted Art says
You can experiment? But I think boiling would make the leaves wilt?
Michelle says
What about husk off palm trees?I have beautiful light pinks they are still fresh do u think it might work with p.v.a ?
Red Ted Art says
Oh I don’t know, so sorry!